ECAD and Architecture Practical Classes
Setup instructions
The following sections give information on the various routes to running the labs:
- Route A: Virtual machine on your machine using VirtualBox
- Route A2: Virtual machine on Apple Silicon Mac using UTM/QEMU
- Route B: Using an MCS workstation in the Intel Lab
- Route C: Using an MCS server via SSH
- Route D: Using the RISC-V tools via Docker
Route A: Ubuntu virtual machine on your x86 machine using VirtualBox
If you have a suitable machine and ability to download an 8GB file, we would recommend this route. A suitable machine is one of approximately the following spec:
- Intel/AMD CPU
- Virtualization support (VT-x or AMD-V) present and enabled in BIOS
- 4GB RAM (8GB or more strongly recommended)
- 24GB of free storage. It is possible to use USB storage or SD card but some USBs/SDs are very slow. Look for a drive with good IOPS (the 4K random write benchmark is a good indicator). If you are using this method, format to exFAT (Windows or Mac), ext3/ext4 (Linux), HFS+/APFS (Mac), NTFS (Windows) - other combinations are likely to have poor performance.
- 8GB of temporary storage (USB stick is fine, formatted something other than FAT32 which has a 4GB file size limit)
- A 64-bit host OS supported by VirtualBox (Windows, MacOS and Linux should be fine).
If you have a suitable machine, download a virtual machine image to your temporary storage (requires Raven to get the download link, but you can use a download manager or other tool on the link itself if you have connectivity problems).
Install VirtualBox
First download the most recent VirtualBox 6.1.x and also download the `VirtualBox Oracle VM VirtualBox Extension Pack' for the same version (this is necessary for USB 2 support). If you are using a Linux distro with a package manager, instead install the VirtualBox package supplied by your distro and find the matching extension pack from the VirtualBox site (looking at the older builds downloads if need be).
Note: VirtualBox 7.0 was released on 10th October 2022. We did all our testing prior to this date, so we strongly recommend the latest 6.x release instead.
Install VirtualBox on your machine. To install the Extension Pack, go to File->Preferences, click on the Extensions button, then click on the 'folder with triangle'. Navigate to the Extensions Pack file you downloaded (.vbox-extpack) and select it. Then follow the prompts to install the pack.
Importing the VM
Make sure you have the ECAD-Labs .vmdk (disc image) and .vbox (VirtualBox configuration file). You will need to uncompress the .vmdk.xz you downloaded to make the .vmdk
Start VirtualBox, go to the Machine->Add menu and choose your .vbox file. You should now see an ECAD-Labs entry in the VM list on the left.
Next we need to add the disc. Click on Settings, find the
Storage panel and inside the Controller: SATA. Select
this. An 'add hard disk' button  should appear to the
right. Pick 'Choose existing disk' from the popup and select your .vmdk
file.
should appear to the
right. Pick 'Choose existing disk' from the popup and select your .vmdk
file.
If you have more than 4GB RAM, before booting we recommend increasing System->Base Memory to 6GB (on an 8GB laptop) or more if you have more than 8GB RAM. This will reduce your FPGA synthesis time. If you have only 4GB of RAM, don't open too many other programs while the VM is running otherwise your system will become slow and memory constrained. You should also allocate as many cores to the VM as you have in your machine.
Your VM should now be ready to boot. The login information for the VM is : login:ecad, password:ecad.
Start the VM and login to the desktop. Most of your work will be launched from the terminal which is reached via the start menu (bottom left), System Tools, QTerminal.
Guest additions
You will probably want to install VirtualBox's Guest Additions, which enable features such as resize of the VM's display, shared clipboard, shared folders, and so on. To do this, boot your VM to the desktop. Then on the menu of the VM window go to Devices->Insert Guest Additions CD Image. This should insert a virtual CD into the VM system that will automatically install the additions and their kernel module (when prompted the password is 'ecad').
If the installer doesn't start automatically, open the terminal and type:
sudo /media/ecad/VBox_GAs_6.1.38/VBoxLinuxAdditions.run
(the disc name 'VBox_GAs_6.1.38' may be different on your version - press Tab to autocomplete it).
Reboot the VM afterwards for them to take effect. You can then enable Devices->Shared clipboard->Bidirectional and enlarge your window to resize the screen.
Important: when rebooting the VM, don't simply hit the title bar 'X' or the 'power off' option in VirtualBox. This is equivalent to pulling out the power cable - it may leave the storage in an inconsistent state, lose files and possibly become unbootable. Instead, either use the 'reboot' or 'shutdown' menu inside the VM's desktop, or use VirtualBox's option to 'send the shutdown signal' or 'ACPI shutdown'.
Please note: you are responsible for taking backups of your files inside the VM, and should not assume the stability of the VM image (it may fail like any other machine).
USB setup (only if you have hardware)
Linux laptops
If you have a Linux laptop, to give VirtualBox access to your USB ports you will need to run the following outside of the VM:
sudo adduser $USER vboxusers
then reboot your laptop.
Windows laptops
On Windows, before starting the VM click on the 'ECAD-Labs' entry in the list of VMs and click on 'Settings'. Go to 'USB' and choose USB 1.1. OK the settings.
Now, find your VirtualBox install in Windows Explorer (probably C:\Program Files\Oracle\VirtualBox). Go to the drivers\USB\filter subdirectory. Right-click on VBoxUSBMon.inf (of type 'Setup Information') and select Install. Allow Windows to install it. Repeat the same for drivers\USB\device\VBoxUSB.inf.
Note that VirtualBox is incompatible with the USBpcap component of Wireshark, so if you have this you will need to uninstall it.
You should now be able to boot the VM with USB support.
Testing
See below for how to check the tools are correctly functioning.
Help
If you have problems with your VM installation, bring your laptop along to your first lab session in week 1 and we'll try and fix it.
VT-x error
Either you have not enabled VT-x, Intel Virtualisation Technology or similar) in your BIOS/UEFI settings, or Hyper-V (Windows' own hypervisor) is enabled. See this guide for details how to disable Hyper-V and enable VT-x.
On some versions of Windows, VirtualBox can coexist in a limited way with Hyper-V. If it doesn't work for you you may need to turn off Hyper-V. Hyper-V is used by Docker (our Route D) so you may need to change the setting if you switch rotues.
Everything is too small!
If you have a high density (HiDPI) screen, eg 4K, Apple Retina Display or similar, text in the LXDE desktop may be very small. In additional to scaling the VM window (making the pixels bigger - VirtualBox's 'scaled mode'), you can also configure the LXDE desktop for a HiDPI display. There isn't currently a simple setting for this but this answer outlines the procedure.
Keyboard driver
If you want to change to a non-UK keyboard:
- Right-click on an empty space on the window bar at the bottom of the desktop
- Select 'add/remove panel items'
- In 'Panel Applets', click '+ Add'
- Double click 'Keyboard Layout Handler'
- A flag should appear on the bar at the bottom of the screen. Right click it, and click on 'Keyboard Layout Handler Settings'
- Untick 'Keep system layouts'
- Then you are free to add whatever keyboard layout you wish on the left side of the dialogue. Clicking on the flag will alternate between available layouts, or the dialogue will allow you to select a key combination.
Route A2: Virtual machine on Apple Silicon Macs
The Intel FPGA tools are only available for x86 Windows or Linux, which means they can't be run on Macs, even using Rosetta. If you have a Mac with an Apple Silicon (M1) processor you won't be able to run the x86 VM, although Routes B/C/D should still be available to you. Alternatively we have come up with a way to run the FPGA tools in a 64-bit ARM (aarch64) VM under emulation, with some loss of performance over native x86. Being a pile of hacks we can only provide limited support for this, and would appreciate feedback. You can find the instructions for this here.
Route B: MCS machines in the Intel Lab
Please note: There are currently some issues running the tools on the MCS machines so please contact one of the demonstrators if you want to use this option.
Setup with USB stick
If you plan to use the MCS, you can significantly improve Quartus build times (eg from 12 mins to 5 mins) by having a local copy of the Quartus and ModelSim tools, and your project files, on a USB memory stick 32GB or larger (16GB may work but will be tight). We recommend the Samsung USB 3.1 BAR Plus (any size/colour), SanDisk Extreme Go USB 3.1, Samsung EVO 32GB MicroSD card (orange version), or Samsung Pro Plus 32GB MicroSD card, but other memory sticks with good random read/write (eg USB 3) should also give good performance. You will need to reformat it so will likely need to dedicate a stick for the duration of the labs.
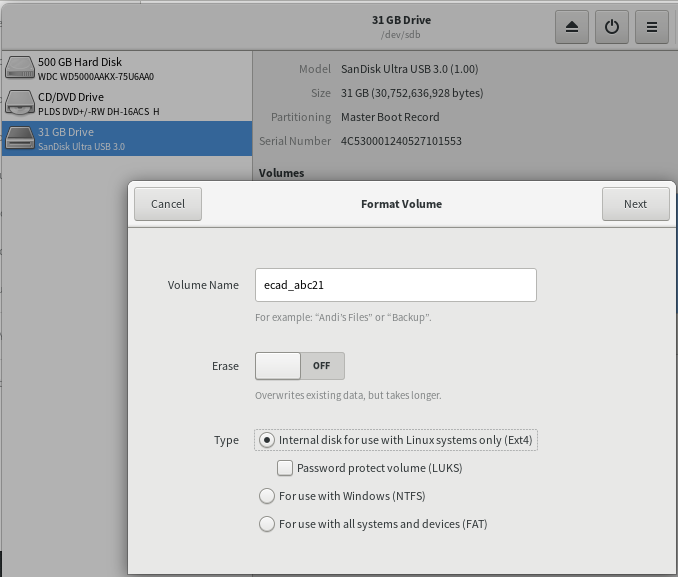
First format the USB stick to ext4, which will erase all existing files. On the MCS, login to MCS Linux and plug the USB stick into the PC. Open a file manager window where you should see your stick appear in the list of drives to the left. Right click on it, and choose 'Format...'
Set Erase to 'quick' and Type to 'ext4'. Name the volume ecad_ followed by your CRSID (don't include any spaces). Accept that you really do want to format it and let the format complete.
Now download the MCS tools bundle and unpack it onto your new device (Cam-only link).
Each time you open a new terminal in which you want to use the tools, you will need to setup paths and environment variables. With your USB stick mounted (click on it in the file manager so that an 'eject' button shows next to it), open a terminal and type:
source /media/<yourusername>/<volume_name>/setup.bash
(don't forget you can use the Tab key to complete filenames so you don't need to type this all). You'll need to source the setup script in each terminal you want to run the tools.
MCS setup without USB stick
If you're using the MCS without a USB stick, you'll use a copy of tools on the shared filesystem (which will get congested when lots of people are compiling). Each time you open a new terminal window, type:
source $CLTEACH/ecad/setup.bash
Testing the tools
You will now be able to use tools like "vsim" (simulator) and "quartus" (FPGA synthesis tool) from the command line. Check these each start a GUI to verify your setup is successful.
The first time you run Quartus it will ask to select a licensing option: simply say 'Run the Quartus Prime software'. Don't worry if there are messages about being unable to contact the licence server when you start Quartus (ask a demonstrator if your compiles fail due to licence errors). Quartus may also complain about a library inconsistency, but this shouldn't be a problem.
Route C: SSH access to MCS Linux
SSH will give you access to command line tools running on an MCS Linux server. It is also possible to use GUI tools like Modelsim and Quartus, but performance will be slow and we don't recommend this.
To get set up, make sure you have an SSH client on your computer. MacOS and Linux should already have the ssh command available in a terminal. For Windows 10, ssh is available in PowerShell, or you can install a third-party client.
From a terminal, type:
ssh [Javascript required]
which should connect to one of the MCS servers:
$ ssh [Javascript required]
The authenticity of host 'linux.cl.ds.cam.ac.uk (131.111.9.26)' can't be established.
RSA key fingerprint is SHA256:EQk7Y9Y37i66zC68cSM5btoeHR18wXwqS2Q4oDWjDO0.
Are you sure you want to continue connecting (yes/no)?
Type 'yes' at this prompt, which you should only get the first time. When prompted, use your UIS (Raven etc) password. When you successfully login:
  Warning: Permanently added 'linux.cl.ds.cam.ac.uk' (RSA) to the list of known hosts.
  Access to this system is restricted to authorized users only.

  This computer may be used only by persons authorised to do so by the
  University of Cambridge.  Use by others will be in contravention of
  the Computer Misuse Act 1990.
(more legal messages follow)
abc21@grace-1:~$
At this prompt, every time you login you will need to add the ECAD labs tools to your PATH so we can execute them:
source $CLTEACH/ecad/setup.bash
You should now be able to run tools, for example:
  abc21@grace-1:~$ source $CLTEACH/ecad/setup.bash
  Altera Quartus envrionment variables setup
  LC_CTYPE not set - setting to  en_GB.UTF-8

  abc2@grace-1:~$ riscv32-unknown-elf-gcc --version
  riscv32-unknown-elf-gcc (GCC) 10.2.0
  Copyright (C) 2020 Free Software Foundation, Inc.
  This is free software; see the source for copying conditions.  There is NO
  warranty; not even for MERCHANTABILITY or FITNESS FOR A PARTICULAR PURPOSE.
Route D: Docker
Docker is an environment for running software in containers - restricted environments where all the necessary software is packaged up together. Containers are more lightweight than virtual machines. In this case we run the RISC-V tools inside an Ubuntu container, which provides a Linux environment even if you might be running on a machine running a different operating system. The single container provides all the tools you will need for the RISC-V parts of this lab. We have not included the Modelsim Verilog simulator and Quartus FPGA tools for licensing reasons.
Setup instructions
To run the container you'll require a machine with Intel or AMD CPU running Windows, MacOS or Linux.
First, install Docker. Docker Desktop is the recommended version on Windows or Mac, but the older Docker Toolbox should also work and works on more systems. Docker Engine is the recommended version on Linux (your distribution may provide Docker itself but it may be out of date). In Windows you may need to enable Windows features such as Hyper-V.
You can check Docker is successfully installed by opening a terminal window (PowerShell on Windows) and typing:
docker run hello-world
which should output:
  $ docker run hello-world
  Unable to find image 'hello-world:latest' locally
  latest: Pulling from library/hello-world
  0e03bdcc26d7: Pull complete
  Digest: sha256:4cf9c47f86df71d48364001ede3a4fcd85ae80ce02ebad74156906caff5378bc
  Status: Downloaded newer image for hello-world:latest

  Hello from Docker!
  This message shows that your installation appears to be working correctly.

  To generate this message, Docker took the following steps:
   1. The Docker client contacted the Docker daemon.
   2. The Docker daemon pulled the "hello-world" image from the Docker Hub.
      (amd64)
   3. The Docker daemon created a new container from that image which runs the
      executable that produces the output you are currently reading.
   4. The Docker daemon streamed that output to the Docker client, which sent it
      to your terminal.

  To try something more ambitious, you can run an Ubuntu container with:
   $ docker run -it ubuntu bash

  Share images, automate workflows, and more with a free Docker ID:
   https://hub.docker.com/

  For more examples and ideas, visit:
   https://docs.docker.com/get-started/
To run the Docker environment for the labs, first change directory in your terminal to a location on your machine where you want to save your work. For example on Windows:
mkdir C:\Users\me\ecad-labs
cd C:\Users\me\ecad-labs
(instead of C:\Users\me on Windows, on Mac it might be /Users/me and Linux /home/me, where 'me' is the account name on your machine. You are of course free to put it whereever you like on your machine, but we suggest avoiding any folder with spaces in the name.)
Then, on Mac and Linux:
docker run -it -v $(pwd):/home/ecad ucamcstecad/ecad-riscv:latest
or Windows PowerShell:
docker run -it -v ${PWD}:/home/ecad ucamcstecad/ecad-riscv:latest
The first time you run this, it will download the Docker image to your machine and launch it. On subsequent runs it will use a cached image, so can be done offline.
This will launch a Linux bash shell in the /home/ecad folder (the number after @ may vary):
ecad@61f61f4ed56e:~$
The /home/ecad directory in the container is linked to the location you ran the 'docker run' command from, C:\Users\me\ecad-labs in this example. This means that you can see your Windows/Mac/etc files inside the Linux environment.
Inside this environment you can then run the commands we describe in the labs.
Important note: Docker containers are designed to be immutable, that is they don't retain state when you quit them. Things you save in the /home/ecad folder will be retained, but every time you start the container you'll get a fresh instance of things outside. Should you wish to modify the container, for example install extra Ubuntu packages, you'll need to commit the changes to a new container before closing it, essentially making a copy, and then start that container next time. To do this you need the image ID which is the number between ecad@ and :~$ on the prompt (61f61f4ed56e in this example), and run the commands in a second terminal:
$ docker commit 61f61f4ed56e my-ecad-labs:v1
and next time you want to start the container, instead of launching ucamcstecad/ecad-riscv do:
docker run -it -v $(pwd):/home/ecad my-ecad-labs:v1
To further update this state, you can repeat the process with the image ID of this new container.
Windows note: On Windows, file permissions prevent SSH from working inside the container. Therefore we recommend installing Git BASH and running your git and ssh-keygen commands in a separate PowerShell outside the Docker environment. Additionally, you will need to share your working directory (eg C:\Users\me\ecad-labs) by going into Docker's settings, then Resources, File Sharing and adding this directory. (If this option is not present, don't worry - the setting is only needed on some installations of Docker).