ECAD and Architecture Practical Classes
Route A2: Virtual Machine on Apple Silicon using UTM and some emulation hacks
This set of instructions is specifically for those with an Apple Silicon Mac, who aren't able to run x86 virtual machines. The specific problem here is that the Intel FPGA tools (Quartus, Modelsim) are only compiled for x86 Linux and Windows, which means they can't run natively on the Arm architecture and are not (currently) supported by Rosetta.
Emulating a full x86 VM on Apple Silicon is too slow to be usable, so we've come up with a hack. We run an Arm-based Ubuntu Linux virtual machine (which is native to the CPU and hence fast) and then we use 'user-mode emulation' using QEMU. This means that, whenever the Linux kernel is asked to run an x86 binary, it passes it to QEMU's emulation engine which translates x86 instructions into Arm instructions. Crucially, all the Arm binaries run at native speed, so the slowdown is only when we come to run specific x86 binaries.
In early benchmarking, running a compile of the Exercise 8 Cyclone V FPGA project using this method on an M1 Mac Mini took 12 minutes, against 3 minutes on a fast Intel laptop (W-10885H) or 53 minutes with the M1 doing a full Ubuntu x86 emulation.
It should be said, while it's hopefully a lot more pleasant experience than the full x86 emulation, it is a hack, and may potentially break. Please let us know if you have issues - no guarantees that we'll be able to fix them, but we would be interested to know how it goes.
For those interested in the details, or finding this page from outside Cambridge and want to replicate this setup, the scripts for installing Quartus with these patches are included in our Quartus-Install tool repository.
Preliminaries
To follow this route you will need:
- An Apple Silicon Mac (the UTM emulator will also run on some iPads but it's complicated and we haven't tried this)
- We've tested with MacOS Big Sur and Monterey, but other OS should be OK.
- At least 32GiB of storage space. If you use the 'one click' install method, it'll install the VM into your internal storage (specifically, in /Users/[username]/Library/Containers/com.utmapp.UTM/Data/Documents/ ). If you download and unzip the .utm bundle you can save it on USB storage if you don't have sufficient internal storage, however this is likely to make the VM run slower.
- For using the FPGA boards, a USB-C to USB-A converter (USB 2.0 only is fine) as we only have stocks of cables with USB-A plugs.
Installation
- Download and install the UTM app. The direct download version is fine (the Mac App Store version is mainly for making donations to the developer).
- Download our UTM VM image. The one-click link will download and launch UTM in one go. Otherwise you can download the .utm bundle in a zipfile.
- If you got the zipfile, unzip it to the location you want to run the VM from (can be USB if needed, but fast storage recommended).
- Start UTM, go File->Open, find the .utm you unzipped.
- Find the ECAD VM in the left-hand panel and press the Play button to launch the VM.
- The VM should boot, eventually landing at a graphical login screen. Login to the user 'ecad' with the password 'ecad'.
- Most of your work will be launched from the terminal, which is found in the start menu (bottom left) under System Tools, QTerminal.
Important things to note
- The VM uses Ubuntu with the LXDE desktop, so feel free to install other packages (eg editors) or customise the setup as you wish.
- Be sure to shut down the VM cleanly via the shutdown option inside the VM. If you simply use the MacOS 'close' button there is a risk of corrupting the VM image and your files stored inside - just like pulling the power cable out of a running desktop PC.
- Via the UTM toolbar (top right of the VM window when it's running) it is possible to share folders with your Mac - we'd suggest this for backing up your files, but wouldn't recommend building FPGA projects stored outside of the VM as this could be slow. You can also backup via online services, although we wouldn't recommend running a constant 'sync' operation (such as Dropbox) as that may make things slow.
- If you need to delete the VM for any reason, you can delete by right-clicking on the VM in UTM left panel. If you used one-click install it will also delete the VM files, if you used File->Open to open the VM it'll only delete the shortcut in the left panel, and you will have to delete the .utm in Finder yourself.
- The VM is configured with only one CPU core. This is deliberate and parts of Quartus won't work if you configure more cores. There's actually an interesting architectural reason for this. In brief, the Apple CPU, like other Arm implementations, has a relaxed memory ordering - that means writes to an address from different cores into the caches can be applied in any order and the ordering can vary from core to core. Meanwhile x86 uses Total Store Ordering (TSO), which means all cores see the same ordering. x86 software depends on this, so the M1 has a special TSO mode (about 5-10% slower than relaxed consistency) and Rosetta switches the CPU into TSO mode when emulating MacOS x86 binaries. Unfortunately, we're emulating inside a VM so we can't use Rosetta and can't flip the CPU into TSO mode - but running our x86 emulation with relaxed consistency causes various Java synchronisation primitives inside Quartus to hang. Only configuring one core is a simple workaround. This blog (section 'TSO Memory Ordering') has more details of Apple's implementation if you are interested, and Multicore Semantics and Programming in Part II (L304 in Part III) has more background.
USB connection
For using FPGA hardware, we need to pass through the USB connection from the Mac side into the VM. Unfortunately UTM at present doesn't have a way to pre-configure this, so we have to click through a short sequence each time we boot the VM, plug in the USB or power cycle the FPGA board. This is annoying but there doesn't seem to be a better way (tracking UTM issue 3400 in case this improves).
- With the VM started, plug in and power up your FPGA board.
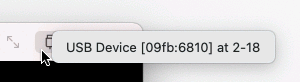
- Find the USB plug icon at the top right of your UTM window:

- Click on it, and you should see a short menu pop up. One of the items
should start 'USB Device [09fb:6810]'. Click on this.
- Next, inside your VM run the 'jtagconfig' command. This will fail with 'No JTAG hardware available' - that's expected.
- Go back to the USB plug icon once more and click it again. This time the short menu should have 'DE-SoC' in it. Click this one.
- Now run 'jtagconfig' again, and the board should be detected this time,
something like:
1) DE-SoC [3-3]
  48A00477   SOCVHPS
  02D120DD   5CSE(BA5|MA5)/5CSTFD5D5/..
which indicates successful communication. - If you have problems, try power cycling your board then trying again.
Troubleshooting
Please see the Virtualbox guide for solutions to problems you may encounter.