
Raspberry Pi
Written by Matthew Kirk.
In this tutorial, we will be building a circuit to connect a temperature sensor to our Raspberry Pi, and writing a program to read the sensor data. The circuit we will build is going to connect to the Raspberry Pi using the GPIO pins.
Once we have built our circuit, the next step is to write a program to read the temperature, and give it to us in a nice format. Once that is done, we will add some LEDs and a button to our circuit, and find out how to measure button presses and turn the LEDs on and off from our program.
Finally, we will put all these bits together to make a button controlled temperature logger—a program that will measure the temperature every second and put this in a file, which can be started and stopped by the press of a button.
Step One: Updating the Kernel
- The first step is to change where our Pi updates from, by
editing a text file. We need to open up the file
/etc/apt/sources.list.d/raspi.list
as root, so type:
sudo leafpad /etc/apt/sources.list.d/raspi.list - Now change the line in this file so that it reads "deb http://archive.raspberrypi.org/debian/ wheezy main untested", then save and close the file.
- Next, do the following commands:
apt-get update
apt-get upgrade
Step Two: Connecting the Temperature Sensor
- Turn off the Pi—it is generally a bad idea to connect wires while there is electricity running through the pins.
- Obtain:
- An AdaFruit ribbon cable connector.
- A DS18B20 temperature sensor (or this version if you want to be able to move your sensor around).
- A 4.7kΩ resistor, a breadboard, and a selection of wires.
- Solder, and a soldering iron.
- Solder the ribbon connector parts together, and attach the ribbon cable connector to the Pi and breadboard.
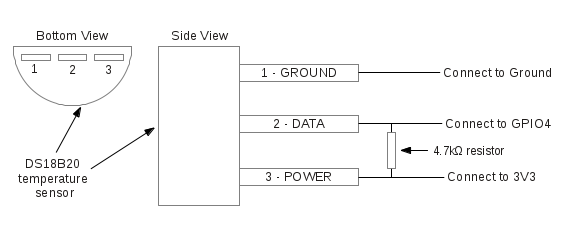
- Connect pin 3 on the sensor to the 3.3V GPIO pin (labelled 3V3 on the AdaFruit connector).
- Connect pin 1 to the ground GPIO pin (labelled GND on the AdaFruit connector).
- Connect pin 2 to the GPIO pin 4 (labelled #4 on the AdaFruit connector).
- Put the 4.7kΩ resistor between pin 2 and pin 3 of the temperature sensor.
- Turn the Pi on, then put your finger against the sensor. If it is connected the wrong way round, then it will get very hot within a second or two, in which case, turn the Pi off once it has booted, and wait a while (it was still hot after 10 minutes when I did it) for it to cool down, and then take out the sensor and put it back in again the right way round.
Step Three (A): Reading the Sensor from the Terminal
- Turn on the Pi.
- Once a user is logged on to the Pi, type these commands
into a terminal, or just at the prompt given upon login
and before typing "startx":
sudo modprobe w1-gpio
sudo modprobe w1-therm
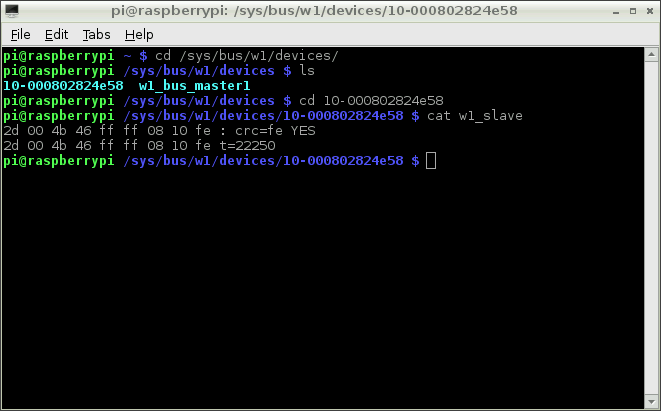
cd /sys/bus/w1/devices/
ls - The entry on the screen that is mostly numbers is the
serial number of the sensor. The sensor used for this
tutorial has the serial number "10-000802824e58".
Replace the serial number in the next command with the
one for the sensor used.
cd 10-000802824e58
cat w1_slave - Two lines of text will be printed. On the second line,
the section starting "t=" is the temperature in degrees
Celsius. A decimal point goes after the first two
digits, so the example value of "t=22250" is in fact
"t=22.250" degrees Celsius:
Try opening the file like any other, in the graphical file manager interface. Open up the file browser, go to the directory the file is in and open up the file in Leafpad. The same text as before will be displayed.
Step Three (B): Reading the Temperature from Python
- Open a terminal and type python.
- At the python IDLE command prompt, type the commands
below, ignoring the lines starting with #—they
explain what the commands do:
# Open the file that we viewed earlier so that python can see what is in it. Replace the serial number as before.
tfile = open("/sys/bus/w1/devices/10-000802824e58/w1_slave")
# Read all of the text in the file.
text = tfile.read()
# Close the file now that the text has been read.
tfile.close()
# Split the text with new lines (\n) and select the second line.
secondline = text.split("\n")[1]
# Split the line into words, referring to the spaces, and select the 10th word (counting from 0).
temperaturedata = secondline.split(" ")[9]
# The first two characters are "t=", so get rid of those and convert the temperature from a string to a number.
temperature = float(temperaturedata[2:])
# Put the decimal point in the right place and display it.
temperature = temperature / 1000
print temperature
In the commands just now, the text is slowly broken down until just the temperature values remain, with several lines of code. This many lines of code is not necessary, temperaturedata = text.split("\n")[1].split(" ")[9] would also work, or splitting by spaces from the start, not newlines. The code may be harder to read if it is squashed onto one line, however. This operation can be made faster—play around with it, and if a quicker way becomes apparent, maybe a classmate can work out what it does?
See here for my example code.
Step Four: Write a Script to Print Out the Temperature.
- Install a text editor such as Geany or SciTE or use the preinstalled Leafpad or equivalent.
- Open the editor and copy the code written above (or the version with the different splitting that was suggested).
- Save the file as temperature.py in /home/pi.
- Open a terminal and run python temperature.py. The program should output the temperature as it did before.
Step Five: Connecting an LED
- Turn off the Pi.
- Obtain an LED, a 220Ω resistor, and probably some more wires.
- Pick one of the numbered pins on the ribbon cable that connects your Pi to the breadboard and connect the long leg (on the opposite side to the flat edge of the LED base) of the LED to this pin.
- Connect the 220Ω resistor between the ground pin of the Pi and the other (longer) leg of the LED.
Step Six: Turning On the LED
- Turn on the Pi.
- Open a root terminal from the menu, or by running sudo su in a normal terminal.
- Now, type these commands, where "18" in this example is
replaced by whichever pin the LED is connected to:
cd /sys/class/gpio/
echo "18" > export
cd gpio18
echo "out" > direction
echo "1" > value - The LED should now be turned on.
- To turn the LED off, type:
echo "0" > value
cd ..
echo "18" > unexport
We've just seen how to turn on and off the LED using the terminal, so now it's time to make it work with Python. The program needs to write to a file. Here's an example of writing "Hello" to a file named "example". Build upon that.
# Open the file and write to it, hence
"w"
f = open("example", "w")
f.write("hello")
f.close()
Run this program in a terminal using sudo python for the reasons explained above. It should turn the LED on.
See here for my example code.
Step Seven: There is an Easier Way!
We are going to install a library for Python that will let us turn on GPIO pins, without having to go through the hassle of opening and closing lots of files like in the last exercise.
- Install the package with sudo apt-get install python-rpi.gpio in a terminal.
- Launch Python as root with sudo
python and type:
import RPi.GPIO as GPIO
# Use the pin numbers from the ribbon cable board.
GPIO.setmode(GPIO.BCM)
# Set up the pin you are using ("18" is an example) as output.
GPIO.setup(18, GPIO.OUT)
# Turn on the pin and see the LED light up.
GPIO.output(18, GPIO.HIGH)
Turn off the pin to turn off the LED.
GPIO.output(18, GPIO.LOW)
Step Eight: Connecting a Button
- Here, a push-to-make button and a 1kΩ will be needed.
- Pick another free input pin and connect this pin to one side of the button, and the other side of the button to the 3.3V pin.
- Put the resistor beteen the input pin and the ground pin on the Pi.
Step Nine (A): Checking for the Button Press from the Terminal
- Turn the Pi on.
- Open a root terminal.
- Type in the following, replacing "17" with the pin your
button is connected to:
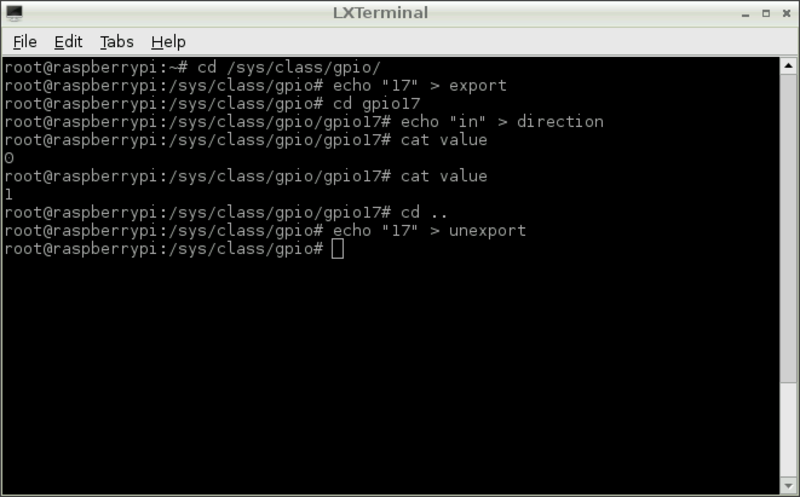
cd /sys/class/gpio/
echo "17" > export
cd gpio17
echo "in" > direction
cat value - If the button is not pressed, this code should print "0".
- Hold the button down and run the program again: the number "1" should have printed out.
- Now the testing is complete, type:
cd ..
echo "17" > unexport
Step Nine (B): Checking for the Button Press Using Python
- Launch Python as root, and type:
import RPi.GPIO as GPIO
# Use the pin numbers from the ribbon cable board
GPIO.setmode(GPIO.BCM)
# Set up this pin as input.
GPIO.setup(17, GPIO.IN)
# Is the button pressed or not?
GPIO.input(17)
# Hold down the button, run the command again. The output should be "true".
GPIO.input(17)
The instructions above have shown how to check for a button press. How about putting this into a loop, so that every time the button is pressed, something happens, like a message printing to the screen. However, the Pi will be able to print out a message and move on to checking the button again much faster than a finger can be taken off the button. So, your program will have to sit and wait for some seconds, maybe with a "while" loop and the "pass" command. Once this works, try to make the program the temperature whenever the button is pressed.
See here for my example code.
Step Ten: Writing a Temperature Logging Program
The final step in this tutorial is putting together all the different things we can do to make a temperature logging program—something that will record the temperature to a file for as long as we want.
- We need another LED, and another 220Ω resistor. The two LEDs will be used to show when our program is ready to start measuring temperature, and when it is actually logging it to a file. To make this more obvious, a different colour LED would be useful here.
- With these extra parts, wire the LED up to another free pin, just like the first LED is.
- Open up text editor, and follow these steps:
- Import the RPi.GPIO library.
- Set up the three GPIO pins (the button and two LEDs) as input and outputs.
- Turn on one of the LEDs to indicate we are ready to start logging.
- Use the code from the previous exercise to check for a button press, and wait for the button to be un-pressed.
- When the button is pressed, we want our first LED to turn off and the other to come on, to indicate that our Pi is now taking data.
- Next, open up a file which we can write, to give us somewhere to put the data.
- Add another while loop to wait until the button is pressed again, and in the loop read the temperature in the same way we've done before.
- Instead of printing the temperature, we will write the temperature to the file which we opened earlier. One change we will need to make from how we learnt to write to files earlier is that now, we want each temperature value to be on a newline. This can be done by adding "\n" to the end of the string we are writing, like str(temperature) + "\n".
- When the last while loop exists, we want to close the file, as we are finished with it, and we do this with datafile.close(), and turn off the LED.
See here for my example code.
Tutorial over! Enjoy your temperature monitoring, and see below for Appendices.
Appendices
Programs can almost always be improved, perhaps by adding some more code so that it can do something new, or just by changing what is there to make it better, or more readable. This is what this section is all about—pointing out things that don't work as well as they could, or things which would be better done in a different way.
Appendix One: Name of the Data File
The same filename is always used for the script, so old data disappears everytime there is some more. Filenames can be made unique with "temperaturedata1.log", "temperaturedata2.log", but a more helpful way is to add what is known as a timestamp to the name. To do this in Python:
- Import the "time" module into Python, find out the current
time for the logging file and put it in an easy to read
form, then append this to the file name, like so:
import time
# This displays the time in the format year-month-day, hour-minute-second.
timestamp = time.strftime("%Y-%m-%d-%H-%M-%S")
# Put together the different bits of the filename into one, and open the file.
filename = "".join(["temperaturedata", timestamp, ".log"])
datafile = open(filename, "w", 1)
See here for my example code.
Appendix Two: Changing the GPIO pins
Another idea is that up to here, the pin numbers for our two LEDs, button, and temperature sensor have been put straight into the program as needed. Which works fine, but what happens when we move stuff about on the board? Suddenly, everything is connected to a different GPIO pin, and all our clever instructions are being sent to the wrong things—we'll be checking for a push of an LED, and trying to light up a button. Fixing this means going though the whole of our program, checking for each time we used a pin number, and changing each of them to the new one. So instead, how about we fix this properly?
- At the beginning of the script, put in a few variables called, say, LED1_GPIO_PIN, LED2_GPIO_PIN, and BUTTON_GPIO_PIN. Give them the value of the appropriate pin number. Then, replace all the occurrences of actual pin numbers in the code with these variables.
So now if we change the position of the pins on the Pi, all we have to do is change the value of these new variables, and everything will still work.
See here for my example code.
Appendix Three: Logging at a variable rate
With our program as it currently is, the temperature is always measured as fast as possible, which is about once every three-quarters of a second (this is basically how long it takes the sensor itself to measure the temperature, rather than any slow working by the Pi). If we are measuring temperature over 30 seconds, or a few minutes perhaps, this sampling rate is fine. But if we wanted to look at how the temperature varied over an hour, or even a day, then we would end up with thousands, maybe tens of thousands of readings, which would change quite slowly. In this case, it would be nice to be able to make our program only make measurements at much larger intervals.
If we want to do this, we need to make our program wait for the right amount of time between measurements, so that they are done at the right intervals. Using the function time in the Python time module, we can work out how long has passed since we last asked for the temperature, and then compare this to how long we want to wait between measurements.
- So in your code, add in a variable that stores the time just before you read the temperature, and at the end of the while loop. You can compare these two times, and if the difference is less than the wait we want, make the program wait for however long it needs to make up the difference. In Python, making your program wait for a while is as simple as using the sleep command in the time module, and giving it the length of time you want to sleep for.
But there is a problem with this. When the program is sleeping, it isn't paying attention to anything else—in particular, not the button which tells our program to stop logging. This means to stop our program, as it currently is, requires you to press the button during the small amount of time when the Pi is not sleeping or reading the temperature. To solve this, we will make the Pi do lots of small sleeps, and check the button between each of them.
- Replace the single sleep with a for loop, that will sleep for 0.1 seconds however many times is required to make up the difference, and check for the button press after each little sleep. If the button is pressed, you will want to use the break command to exit the for loop, but first, set some variable to True, so that we can test this variable in the outer while loop, and break out of that is it is True. Don't forget to define this variable as False before the loop starts, to stop Python becoming confused.
- Your code for this section will probably look a bit like:
if (time_2 - time_1) < measurement_wait:no_of_sleeps = int(round((measurement_wait - (time_2 - time_1)) / 0.1))if button_pressed:
for i in range(no_of_sleeps):time.sleep(0.1)
if GPIO.input(BUTTON_GPIO_PIN):button_pressed = True
break
break
See here for my example code.
Where Next?
Now we've got a complete temperature sensor program, what can we do next? Well, having written all this code just to measure temperature, wouldn't it be good if we could just write some small piece of code to use a different type of sensor, and then have this just work?
Fortunately for you, this is exactly what the next page is all about. So let's move on and explore how we can start using plugins.
If you need some hints as to what your code should look like, here are my versions of the Python code after particular steps:
- Step 3B: How to read the temperature in Python.
- Step 6: How to turn on and off an LED from Python.
- Step 9B: How to check a button press from Python.
- Step 10: A complete temperature logger.
- Appendix 1: Making the data file timestamped.
- Appendix 2: Cleaning up our code.
- Appendix 3: Allowing for a variable measurement rate.
All code licensed under the MIT license.

Raspberry Pi Temperature Sensor Tutorial by Matthew Kirk is licensed under a Creative Commons Attribution-ShareAlike 3.0 Unported License.