We have a number of cards available with Zynq devices. These include Parallella, ZedBoard, Arty and Pynq. There is a table below.
You should create for yourself an account on one or more of the Zynq cards that we are going to be using. You should first login as user linaro using something like
ssh linaro@parcard-djg3.sm
you should then become root using the 'su' command. Finally create your own account using your crsid and a password of your own choosing. You will then have your own filespace using the 'adduser' command as root. The passwords were in the email(s).
These machines are behind the Computer Laboratory 'firewall' but accessible from all Computer Lab machines, such as the acs machines. From outside, you need to first ssh or otherwise log in to something like slogin.cl.cam.ac.uk, ely.cl.cam.ac.uk or svr-acs-01.cl.cam.ac.uk as a bridging machine.
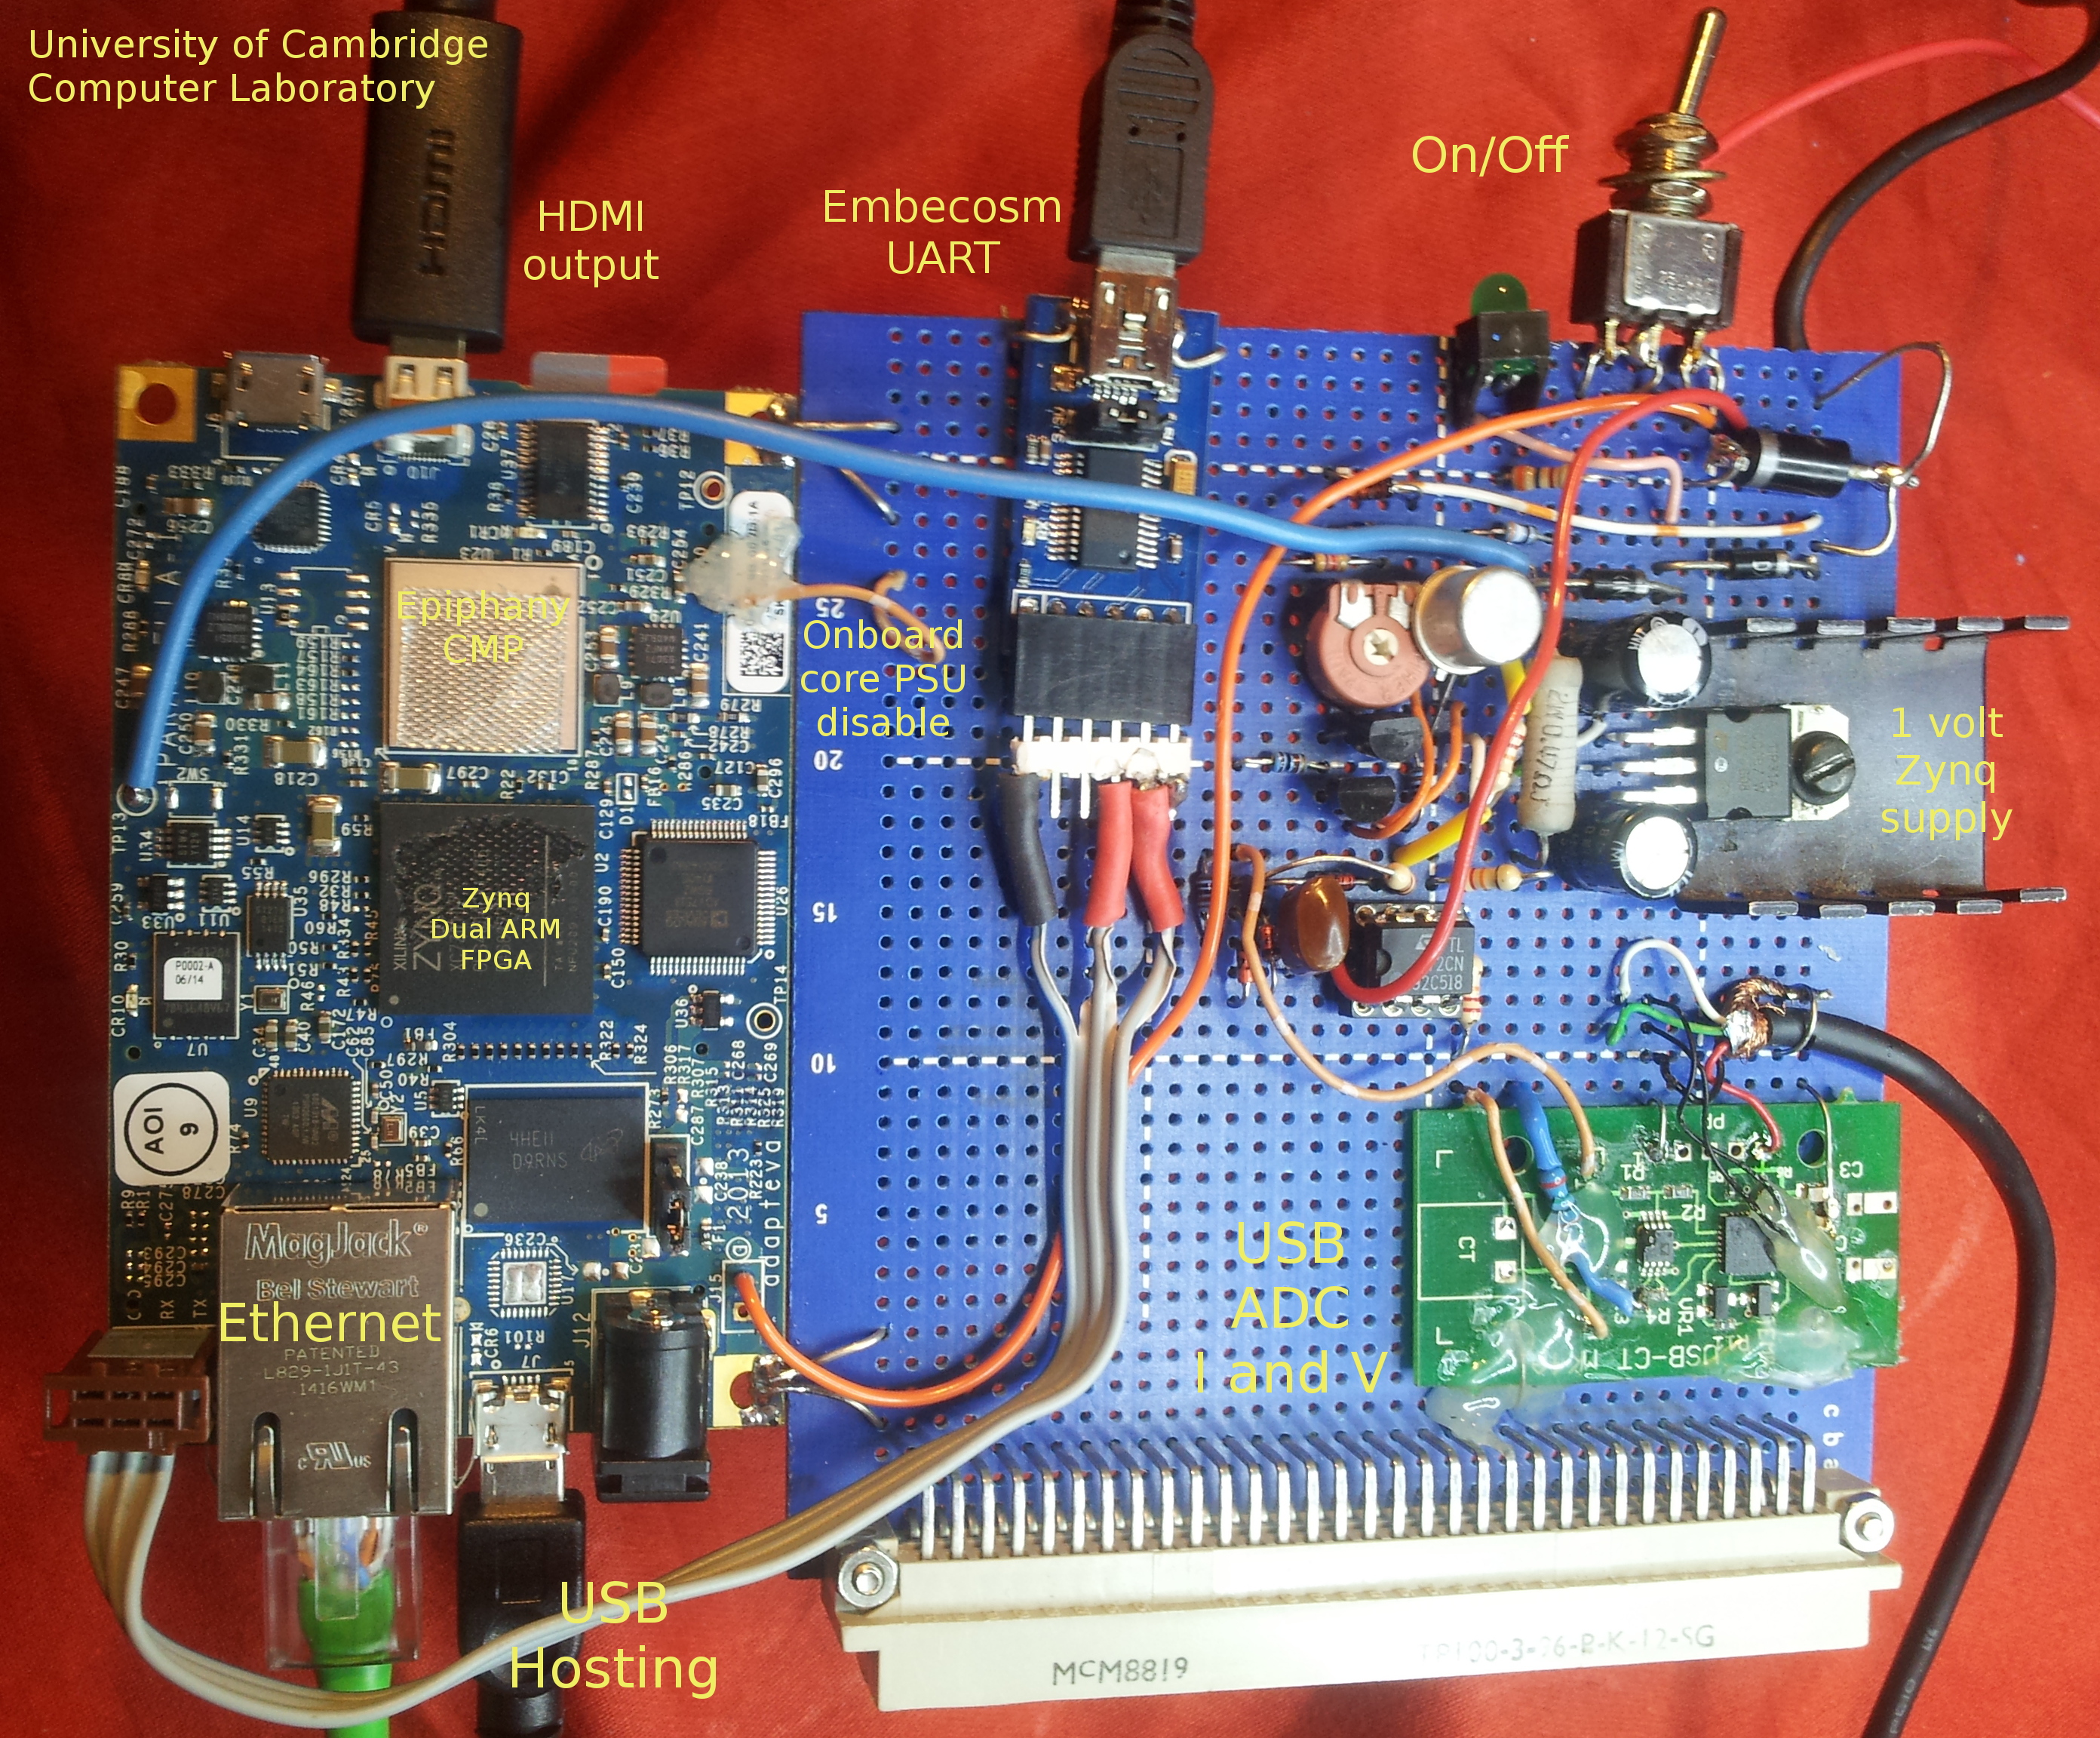
Running S/W on a Physical Zynq Card
This photo shows a parallella card with supply monitor and 1Volt regulator. The 1Volt core supply regulator
on the parallella card was disabled and the external 1Volt supply run in. This core supply feeds the ARMs, their caches, onboard hardened controllers and the FPGA logic.
The monitor tracks two currents: one for the 1Volt feed and the other for the 5Volt supply to the rest of the card which includes the Zynq pad ring.

There are several cards available, number one has the energy monitors.
| Name --------------------- | Kind | Location | Chip | Notes ------------------------------------------ |
|---|---|---|---|---|
| parcard-djg1.sm | Parallella | FN12 | xc7z010clg400-1 | Has power probe via bognor |
| parcard-djg2.sm | Parallella | SW02 | xc7z010clg400-1 | |
| parcard-djg3.sm | Parallella | SW02 near acs-07 | xc7z010clg400-1 | Has one PIO LED soldered on |
| Zedra10.sm | Zedboard | SW02 | xc7z020clg484-1 | |
| pynq-djg1.sm | Pynq | SW02 near acs-08 | xc7z020clg400-1 | A pink Pynq card |
| pynq-djg2.sm | Pynq | -- | xc7z020clg400-1 | An Arty card |
| pynq-djg3.sm | Pynq | -- | xc7z020clg400-1 | An Arty card |
The Ethernet RJ45 has a green LED which indicates link operational and an orange LED which indicates network traffic by going off around packets. Clarification: for 10Mbps the orange LED is on and flashes off for traffic indication, for 100 Mbps the green LED is on and flashes off for traffic indication and for 1 1Gbps both leds are on with with the orange flashing off to indicate traffic. No that's not right, even on a 10Mbps link the green led comes on solidly once linux is booted.
See if you can ping a card: it should reply after about 10 seconds from reset or power on.
Some Parallella cards had crashing problems but are now fixed. They will crash if connected to a 10Mbps Ethernet cable or the UART RX input is left floating. Unfortunately the LEDs on the Ethernet socket flash in response to arriving traffic even if it has not booted or has crashed, so a crash is not visually apparent, but pings stop working.
The Parallella card UART operates at 115200 baud during boot. Linux sets it back to 9600 when booted but a devicetree kernel args can alter that to serve as a root console at the 115200 rate if needed.
$ stty < /dev/ttyUSB0 115200
ping parcard-djg2.sm
PING parcard-djg2.sm.cl.cam.ac.uk (128.232.60.55) 56(84) bytes of data.
64 bytes from parcard-djg1.sm.cl.cam.ac.uk (128.232.60.55): icmp_req=4 ttl=63 time=0.581 ms
64 bytes from parcard-djg1.sm.cl.cam.ac.uk (128.232.60.55): icmp_req=6 ttl=63 time=0.586 ms
See if you can log on
As mentioned above, you should create an account of your own on the cards so we don't all share the default user name linaro. Certainly keep your own files under /home/linaro/crsid/... if not /home/crsid where crsid is your University of Cambridge id.
If you need to attach via USB UART use something like 'cu' which can be obtained with "yum install uucp".
chmod a+rwx  /dev/ttyACM0 -- otherwise you get a misleading "line in use" error
cu -s 115200 -l /dev/ttyACM0
Copy personal data on and off using scp
$ scp -r myfolder linaro@parcard-djg2.sm.cl.cam.ac.uk:/home/crsid/...
Rebooting
Before rebooting, check that nobody else is logged on and currently active using the unix who command (w).
The cards you have physically to hand can be rebooted by pressing the switch.
To reset parcard-djg1.sm you can log on to bognor.sm.cl.cam.ac.uk as linaro (linaro password was in email) and issue a command that resets it (there is a wire between the the machines). The command is
parcard-djg1.resetand you may need to be root to run it (root password was in email).
Read Energy Figures From parcard-djg1.sm
Parcard 1 has the energy monitors fixed up.
The energy monitor for parcard-djg1 is designed to be read over a TCP socket from the parcard or elsewhere. The energy monitor is the program
/usr/bin/parcard-powermonitor -noxrunning on bognor.sm.cl.cam.ac.uk (128.232.60.58). If, by chance, it is not running, log in to bognor and su to root and then start it in the background. The -nox suffix stops it opening its X-windows plot which is not needed for remote TCP access. It normally listens on port 2002.

The X-windows plot shows real-time graphical plot from the energy monitor that generates
images like this boot-sequence example, which has been manually annotated.
Note that the core is plotted on a more sensitive ordinate scale.

Manual access to the bognor energy readings can be demonstrated using telnet as follows, but energyshim should fetch the readings automatically using the same protocol:
telnet bognor.sm 2002
Escape character is '^]'.
cmd
ENERGY=86168!5177!
cmd
ENERGY=99158!5954!
The protocol is embodied in this little fragment : currentprobe-client.zip energyshim client code will redirect to bognor if you set the environment variable
export CURRENTPROBE=128.232.60.58
The client code may be part of your Prazor repo under vhls/images/powertesters/currentprobe-client{.c,.h}. Energyshim can be compiled to include this or else read via the sPEEDO interface or return energy nulls. sPEEDO is an API supported in Prazor when POWER3 is enabled so that an application can find out how much energy it has used.
The numbers returned to the command 'cmd' are energies in mJ. They are ever-increasing running totals. The first number returned is the energy of the whole Parallella card (from summing the 5V and 1V feeds) while the second is the energy used by the FPGA and ARM core logic only which excludes I/O pads, the DRAM and other components on the PCB.
You should check whether other users are running programs (using top etc) before starting your own - otherwise performance results will be confused. Also check that the clock is at the correct speed (devmem2 0xF8000120 w should give 0x1F000200) and caches are on (TBD) ... or else issue a reboot as root to be sure.
Note, Computer Laboratory networks may not enable telnet (or otherwise open sockets) to bognor.sm from some parts of the outside world, but parcard-djg1.sm does have access, which is what we need.
Adjusting CPU Clock Frequency on a Real Card
You can write to the Zynq clock frequency register to slow the ARM cores down and compare your results at different clock rates with the Prazor simulation at correspondingly modelled different rates.
The program devmem2 (www.lartmaker.nl/lartware/port/devmem2.c) lets you read and write the Zynq control registers. We can adjust the clock frequency divisor in ARM_CLK_CTRL at 0x1F00_0120 (Zynq manual page 1583). Bits 13:8 are the divisor, which must not be 0, 1 or 3. The standard value of 2 gives 666 MHz I think, whereas programs get noticeably slower if you bump this up to, say E, as follows:
 $ devmem2 0xF8000120 w                                  // View current value
     Value at address 0xF8000120 (0xb6ff3120): 0x1F000200
 $ devmem2 0xF8000120 w 0x1F000E00                       // Make it slow down a lot
     Value at address 0xF8000120 (0xb6ff3120): 0x1F000200
     Written 0x1F000E00; readback 0x1F000E00
 $ devmem2 0xF8000120 w 0x1F000200                       // Set back to full speed
Turning off a core on the real card
The following sequence turns off core 1 leaving only 0.
root@linaro-nano:/sys/devices/system/cpu# ls online
online
root@linaro-nano:/sys/devices/system/cpu# cat online
0-1
root@linaro-nano:/sys/devices/system/cpu# ls cpu1/online
cpu1/online
root@linaro-nano:/sys/devices/system/cpu# cat cpu1/online
1
root@linaro-nano:/sys/devices/system/cpu# echo 0 > cpu1/online
root@linaro-nano:/sys/devices/system/cpu# cat online
0
An alternate approach is to set maxcpus=1 on the kernel command line and reboot.
Reducing O/S crosstalk on the real card
To get consistent results from profile experiments, it is best to turn off as much of linux as possible to get bare-metal like results.
One way to do this is boot single user mode and log in from the UART serial port.
Another is to turn off interrupts from user space during the critical part of your program. Most system resources, including remote shells, seem to recover fine with interrupts having been off for a few minutes, but sometimes the system crashes.
Interrupts can be turned on and off by updating the GIC enable register after mapping it to user space:
void *page_f8_open(off_t target)
{
    static int fd = -1000;
    static unsigned int page = 0;
    static void *map_base = 0;
    unsigned long read_result;


    if (fd < 0)
      {
        fd = open("/dev/mem", O_RDWR | O_SYNC);
        if (fd < 0)
          {
            printf("lowlevel_accessor failed %s:%i Am I running with root privelege?\n", __FILE__, __LINE__);
            exit(1);
          }

        LL_TRC(printf("/dev/mem opened.\n"); fflush(stdout));
      }

    if (map_base)  // check page is still the correct one
      {
        unsigned int page_primed = target & ~MAP_MASK;
        if (page != page_primed)
          {
            printf("lowlevel_accessor failed %s:%i new page requested : %x cf %x\n", __FILE__, __LINE__, page_primed, page);
            exit(1);
          }
      }
    else
      {     /* Map one page */
        page = target & ~MAP_MASK;
        map_base = mmap(0, MAP_SIZE, PROT_READ | PROT_WRITE, MAP_SHARED, fd, page);
        if (map_base == (void *) -1)
          {
            printf("lowlevel_accessor failed %s:%i failed to map page\n", __FILE__, __LINE__);
            exit(1);
          }
      }

    LL_TRC(printf("Memory mapped at address %p.\n", map_base); fflush(stdout));
    return map_base;
}

unsigned int gic_ints_enable(int enablef)
{
  off_t target = 0xF8F01000; // GIC master interrupt control register
  void *map_base = page_f8_open(target);
  void *virt_addr = map_base + (target & MAP_MASK);
  ((unsigned long *) virt_addr)[0] = (enablef) ? 1:0;
  return enablef;
}
Turning on/off Caches on a Real Card and the Prazor Virtual Platform
... TBD ... L2 can perhaps be turned on/off by writing to L2_cache reg1_control at 0xF8F02100
Running linux turns on the caches. On the bare-metal runs on real cards or the PRAZOR simulator, please insert something like the following code to enable the L1 and L2 caches. Without this you will see only zeros in the cache hit statistics since caches power up disabled.
This code is found in the energyshim.c wrapper:
  asm("mov r0,#0x1000"); // Turn on L1 Cache (see Zynq TRM for further details.)
  asm("orr r0,r0,#4");
  asm("mcr  p15, 0, r0, c1, c0, 0"); //  (r0 = 0x1004)
  // You might possibly also need
  ((int *)0xF8F02100)[0] = 1; // Zynq: turn on L2 cache

This will cause the following to be printed from Prazor when appropriate tracing is enabled:
Cache the_top.coreunit_0.l1_d_cache_0 is ENABLED now
Cache the_top.l2_cache_and_controller is ENABLED now
Cache the_top.l2_cache_and_controller is ENABLED now
Cache the_top.coreunit_0.l1_i_cache_0 is ENABLED now
In Prazor, adjusting zync.cpp (or abench.h on or1k models) or the command line flags will alter the physical size of the caches and hence their static energy consumption and hit ratios. The hit ratio of a cache affects the dynamic energy use of its backside components.
For the Zynq model, the abench.h file is replaced with the file src/platform/arm/zynq/parallella/zynq.cpp.
UnixBench Performance on Physical Parallella or Zynq at Different Clock Frequencies
  $ wget http://byte-unixbench.googlecode.com/files/UnixBench5.1.3.tgz
  $ tar -xf UnixBench5.1.3.tgz
  $ ./UnixBench/Run
Results at full and slow speed:
Summary of results, as reported: No difference! But actual execution real time was greatly different, taking 56 minutes of real time at 1/3rd clock speed. The timers are giving dilated answers on lower clock speeds so execution time is reported the same. This is graphically demonstrated by running 'xclock -update 1'
parcard-unixbench-results-fullspeed.txt:System Benchmarks Index Score                                          75.5
parcard-unixbench-results-fullspeed.txt:System Benchmarks Index Score                                         106.2
parcard-unixbench-results-thirdspeed.txt:System Benchmarks Index Score                                          77.7
parcard-unixbench-results-thirdspeed.txt:System Benchmarks Index Score                                         111.4
FPGA booting on the Zynq Chips or Parallella Cards
The basic procedure for loading a bitstream into a real Zynq card relies on the Zynq card being already booted with linux. We copy the bitstream to the card with scp from the place where it was compiled. Then cat it into /dev/xdevcfg as root.
We assume that there is no parallella.bit.bin file on the SD card. If so, it would be loaded into the FPGA at boot time. Most likely this would be an X-windows framestore for a local console. But assuming there is no such FPGA boot, command line access via the UART or ssh is needed.
The FPGA is not loaded

djg11@parcard-djg1:~$ cat /sys/devices/amba.0/f8007000.ps7-dev-cfg/prog_done
0

Or it might be:   cat /sys/devices/soc0/amba/f8007000.devcfg/prog_done

We boot the FPGA like this

root@parcard-djg1:~# cat parallella.bit.bin > /dev/xdevcfg
root@parcard-djg1:~# cat /sys/devices/amba.0/f8007000.ps7-dev-cfg/prog_done
1


The booted file looks like this:

root@parcard-djg1:~# od -x parallella.bit.bin | head -10
0000000 ffff ffff ffff ffff ffff ffff ffff ffff
*
0000060 00bb 0000 0044 1122 ffff ffff ffff ffff
0000100 5566 aa99 0000 2000 2001 3002 0000 0000
0000120 0001 3002 0000 0000 8001 3000 0000 0000
0000140 0000 2000 8001 3000 0007 0000 0000 2000
0000160 0000 2000 6001 3002 0000 0000 2001 3001
0000200 3fe5 0200 c001 3001 0000 0000 8001 3001
0000220 2093 0372 8001 3000 0009 0000 0000 2000
0000240 c001 3000 0401 0000 a001 3000 0501 0000
root@parcard-djg1:~# ls -l parallella.bit.bin
-rw-r--r-- 1 root root 2083760 Oct  1  2015 parallella.bit.bin
Modern releases of the xdevcfg device driver will cope with either endedness files and strip the leading meta-info from a .bit file as generated by vivado.
Mouseless FPGA Build - Invoking Vivado by tcl Script (ksubs2 Makefile)
You can make a bit stream by running Vivado for the appropriate device, such as XC7010clg400-1 which has 17600 LUTs, 60 BRAMs and 80 DSPs.
Building your first design and getting programmed I/O from the ARM to the FPGA logic on the Zynq platfom all to work is quite a learning curve with the Vivado tools. As a shortcut, you can copy the rough framework in the ksubs2 folder which illustrates a simple approach. You can test this from user space on the embedded linux using devmem2 and you can use the code in devmem2.c as a basis for you embedded code: the important lines are an open of /dev/mem and a mmap call.
The ksubs2 framework is intended for supporting the output from Kiwi HLS. It is used to quickly generate an FPGA design using just a Makefile. Further notes are here: Kiwi Scientific Acceleration: Zynq Substrate Programmed I/O and DMA Basic Demo.
It's best to include a serial number register in your design so that when you make a programmed I/O read from it you have a sanity check for which design is loaded. For instance, at the start of your programmed I/O register file decode, put something like
 assign maxi_rdata =
     (addr == 0) ? 24'h552904:
     (addr == 1) ? ...
Then, when logged on to the Zynq linux (either on Prazor or the real card) do
root@parcard-djg1:~# gcc -o devmem2 devmem2.c
root@parcard-djg1:~# ./devmem2 0x43c00000 w
Value at address 0x43C00000 (0xb6fc5000): 0x552904
and check you get back your distinctive number, in this case 552904.
Setting FPGA Clock Frequency
Most designs are clocked from FCLK_CLK0.
If you inspect FPGA0_CLK_CTRL (see page 680 of the Zynq Technical Reference Manual) with devmem2 0xF8000170
$ devmem2  0xF8000170
Value at address 0xF8000170 (0xb6fd4170): 0x100A00
You can see it is dividing the 1GHz I/O PLL by 10 to make 100 MHz. To get a 200 MHz clock it is as simple as writing 5 instead of 10.
$ devmem2 0xF8000170 w 0x100500
Written 0x100500; readback 0x100500
A clock frquency of 500 MHz is generated if you set the register to 0x100200 or 0x200100.
Measured RAW PIO Peformance
We measured the raw I/O performance for transferring 32-bit dummy data words over the PIO bus by timing the following loop:
  volatile unsigned int *map_base_u8 = (unsigned int *)ksubs3_map_base;

  for (i=0; i!=loops-1; i++)
    {
      long long unsigned int d = 0;
      map_base_u8[16] = d;
      map_base_u8[24] = d;
      map_base_u8[28] = d;
      map_base_u8[32] = ++d;
     asm volatile (" ");
    }
The results are as follows:

Which can be broadly summarised as quite poor. But PIO should not be used for high performance data movement anyway!
Note that if the data is being sourced by the Zynq filesystem, which is a class 10 SD Card with throughput 10 MB/s, that may also be a limit. But the second time a file is read it is likey to be largely cached in DRAM and hence not a limitation.
EOF. Prazor Home Page.