
Raspberry Pi
Lesson 11 Input02
The Input02 lesson builds on Input01, by building a simple command line interface where the user can type commands and the computer interprets and displays them. It is assumed you have the code for the Lesson 11: Input01 operating system as a basis.
Contents |
1 Terminal 1
In the early days of computing, there would usually be one large computer in a building, and many 'terminals' which sent commands to it. The computer would take it in turns to execute different incoming commands.
Almost every operating system starts life out as a text terminal. This is typically a black screen with white writing, where you type commands for the computer to execute on the keyboard, and it explains how you've mistyped them, or very occasionally, does what you want. This approach has two main advantages: it provides a simple, robust control mechanism for the computer using only a keyboard and monitor, and it is done by almost every operating system, so is widely understood by system administrators.
Let's analyse what we want to do precisely:
- Computer turns on, displays some sort of welcome message
- Computer indicates its ready for input
- User types a command, with parameters, on the keyboard
- User presses return or enter to commit the command
- Computer interprets command and performs actions if command is acceptable
- Computer displays messages to indicate if command was successful, and also what happened
- Loop back to 2
One defining feature of such terminals is that they are unified for both input and output. The same screen is used to enter inputs as is used to print outputs. This means it is useful to build an abstraction of a character based display. In a character based display, the smallest unit is a character, not a pixel. The screen is divided into a fixed number of characters which have varying colours. We can build this on top of our existing screen code, by storing the characters and their colours, and then using the DrawCharacter method to push them to the screen. Once we have a character based display, drawing text becomes a matter of drawing a line of characters.
In a new file called terminal.s copy the following code:
.section .data
.align 4
terminalStart:
.int terminalBuffer
terminalStop:
.int terminalBuffer
terminalView:
.int terminalBuffer
terminalColour:
.byte 0xf
.align 8
terminalBuffer:
.rept 128*128
.byte 0x7f
.byte 0x0
.endr
terminalScreen:
.rept 1024/8 * 768/16
.byte 0x7f
.byte 0x0
.endr
This sets up the data we need for the text terminal. We have two main storages: terminalBuffer and terminalScreen. terminalBuffer is storage for all of the text we have displayed. It stores up to 128 lines of text (each containing 128 characters). Each character consists of an ASCII character code and a colour, all of which are initially set to 0x7f (ASCII delete) and 0 (black on a black background). terminalScreen stores the characters that are currently displayed on the screen. It is 128 by 48 characters, similarly initialised. You may think that we only need this terminalScreen, not the terminalBuffer, but storing the buffer has 2 main advantages:
- We can easily see which characters are different, so we only have to draw those.
- We can 'scroll' back through the terminal's history because it is stored (to a limit).
You should always try to design systems that do the minimum amount of work, as they run much faster for things which don't often change.
The differing trick is really common on low power Operating Systems. Drawing the screen is a slow operation, and so we only want to draw thing that we absolutely have to. In this system, we can freely alter the terminalBuffer, and then call a method which copies the bits that change to the screen. This means we don't have to draw each character as we go along, which may save time in the long run on very long sections of text that span many lines.
The other values in the .data section are as follows:
- terminalStart
- The first character which has been written in terminalBuffer.
- terminalStop
- The last character which has been written in terminalBuffer.
- terminalView
- The first character on the screen at present. We can use this to scroll the screen.
- temrinalColour
- The colour to draw new characters with.
Circular buffers are an example of an data structure. These are just ideas we have for organising data, that we sometimes implement in software.
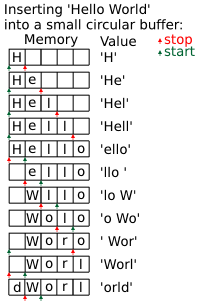 The reason why terminalStart needs to be stored is because termainlBuffer should
be a circular buffer. This means that when the buffer is completely full, the end
'wraps' round to the start, and so the character after the very last one is the
first one. Thus, we need to advance terminalStart so we know that we've done this.
When wokring with the buffer this can easily be implemented by checking if the index
goes beyond the end of the buffer, and setting it back to the beginning if it does.
Circular buffers are a common and clever way of storing a lot of data, where only
the most recent data is important. It allows us to keep writing indefinitely, while
always being sure there is a certain amount of recent data available. They're often
used in signal processing or compression algorithms. In this case, it allows us
to store a 128 line history of the terminal, without any penalties for writing over
128 lines. If we didn't have this, we would have to copy 127 lines back a line very
time we went beyond the 128th line, wasting valuable time.
The reason why terminalStart needs to be stored is because termainlBuffer should
be a circular buffer. This means that when the buffer is completely full, the end
'wraps' round to the start, and so the character after the very last one is the
first one. Thus, we need to advance terminalStart so we know that we've done this.
When wokring with the buffer this can easily be implemented by checking if the index
goes beyond the end of the buffer, and setting it back to the beginning if it does.
Circular buffers are a common and clever way of storing a lot of data, where only
the most recent data is important. It allows us to keep writing indefinitely, while
always being sure there is a certain amount of recent data available. They're often
used in signal processing or compression algorithms. In this case, it allows us
to store a 128 line history of the terminal, without any penalties for writing over
128 lines. If we didn't have this, we would have to copy 127 lines back a line very
time we went beyond the 128th line, wasting valuable time.
I've mentioned the terminalColour here a few times. You can implement this however you, wish, however there is something of a standard on text terminals to have only 16 colours for foreground, and 16 colours for background (meaning there are 162 = 256 combinations). The colours on a CGA terminal are defined as follows:
| Number | Colour (R, G, B) |
|---|---|
| 0 | Black (0, 0, 0) |
| 1 | Blue (0, 0, ⅔) |
| 2 | Green (0, ⅔, 0) |
| 3 | Cyan (0, ⅔, ⅔) |
| 4 | Red (⅔, 0, 0) |
| 5 | Magenta (⅔, 0, ⅔) |
| 6 | Brown (⅔, ⅓, 0) |
| 7 | Light Grey (⅔, ⅔, ⅔) |
| 8 | Grey (⅓, ⅓, ⅓) |
| 9 | Light Blue (⅓, ⅓, 1) |
| 10 | Light Green (⅓, 1, ⅓) |
| 11 | Light Cyan (⅓, 1, 1) |
| 12 | Light Red (1, ⅓, ⅓) |
| 13 | Light Magenta (1, ⅓, 1) |
| 14 | Yellow (1, 1, ⅓) |
| 15 | White (1, 1, 1) |
Brown was used as the alternative (dark yellow) was unappealing and not useful.
We store the colour of each character by storing the fore colour in the low nibble of the colour byte, and the background colour in the high nibble. Apart from brown, all of these colours follow a pattern such that in binary, the top bit represents adding ⅓ to each component, and the other bits represent adding ⅔ to individual components. This makes it easy to convert to RGB colour values.
We need a method, TerminalColour, to read these 4 bit colour codes, and then call SetForeColour with the 16 bit equivalent. Try to implement this on your own. If you get stuck, or have not completed the Screen series, my implementation is given below:
.section .text
TerminalColour:
teq r0,#6
ldreq r0,=0x02B5
beq SetForeColour
tst r0,#0b1000
ldrne r1,=0x52AA
moveq r1,#0
tst r0,#0b0100
addne r1,#0x15
tst r0,#0b0010
addne r1,#0x540
tst r0,#0b0001
addne r1,#0xA800
mov r0,r1
b SetForeColour
2 Showing the Text
The first method we really need for our terminal is TerminalDisplay, one that copies the current data from terminalBuffer to terminalScreen and the actual screen. As mentioned, this method should do a minimal amount of work, because we need to be able to call it often. It should compare the text in terminalBuffer with that in terminalDisplay, and copy it across if they're different. Remember, terminalBuffer is a circular buffer running, in this case, from terminalView to terminalStop or 128*48 characters, whichever comes sooner. If we hit terminalStop, we'll assume all characters after that point are 7f16 (ASCII delete), and have colour 0 (black on a black background).
Let's look at what we have to do:
- Load in terminalView, terminalStop and the address of terminalDisplay.
- For each row:
- For each column:
- If view is not equal to stop, load the current character and colour from view
- Otherwise load the character as 0x7f and the colour as 0
- Load the current character from terminalDisplay
- If the character and colour are equal, go to 10
- Store the character and colour to terminalDisplay
- Call TerminalColour with the background colour in r0
- Call DrawCharacter with r0 = 0x7f (ASCII delete, a block), r1 = x, r2 = y
- Call TerminalColour with the foreground colour in r0
- Call DrawCharacter with r0 = character, r1 = x, r2 = y
- Increment the position in terminalDisplay by 2
- If view and stop are not equal, increment the view position by 2
- If the view position is at the end of textBuffer, set it to the start
- Increment the x co-ordinate by 8
- Increment the y co-ordinate by 16
- For each column:
Try to implement this yourself. If you get stuck, my solution is given below:
-
.globl TerminalDisplay
TerminalDisplay:
push {r4,r5,r6,r7,r8,r9,r10,r11,lr}
x .req r4
y .req r5
char .req r6
col .req r7
screen .req r8
taddr .req r9
view .req r10
stop .req r11
ldr taddr,=terminalStart
ldr view,[taddr,#terminalView - terminalStart]
ldr stop,[taddr,#terminalStop - terminalStart]
add taddr,#terminalBuffer - terminalStart
add taddr,#128*128*2
mov screen,taddr
I go a little wild with variables here. I'm using taddr to store the location of the end of the textBuffer for ease.
-
mov y,#0
yLoop$:
Start off the y loop.
-
mov x,#0
xLoop$:
Start off the x loop.
-
teq view,stop
ldrneh char,[view]
I load both the character and the colour into char simultaneously for ease.
-
moveq char,#0x7f
This line complements the one above by acting as though a black delete character was read.
-
ldrh col,[screen]
For simplicity I load both the character and colour into col simultaneously.
-
teq col,char
beq xLoopContinue$
Now we can check if anything has changed with a teq.
-
strh char,[screen]
We can also easily save the current value.
-
lsr col,char,#8
and char,#0x7f
lsr r0,col,#4
bl TerminalColour
I split up char into the colour in col and the character in char with a bitshift and an and, then use a bitshift to get the background colour to call TerminalColour.
-
mov r0,#0x7f
mov r1,x
mov r2,y
bl DrawCharacter
Write out a delete character which is a coloured block.
-
and r0,col,#0xf
bl TerminalColour
Use an and to get the low nibble of col then call TerminalColour.
-
mov r0,char
mov r1,x
mov r2,y
bl DrawCharacter
Write out the character we're supposed to write.
-
xLoopContinue$:
add screen,#2
Increment the screen pointer.
-
teq view,stop
addne view,#2
Increment the view pointer if necessary.
-
teq view,taddr
subeq view,#128*128*2
It's easy to check for view going past the end of the buffer because the end of the buffer's address is stored in taddr.
-
add x,#8
teq x,#1024
bne xLoop$
We increment x and then loop back if there are more characters to go.
-
-
add y,#16
teq y,#768
bne yLoop$
We increment y and then loop back if there are more characters to go.
pop {r4,r5,r6,r7,r8,r9,r10,r11,pc}
.unreq x
.unreq y
.unreq char
.unreq col
.unreq screen
.unreq taddr
.unreq view
.unreq stop
Don't forget to clean up at the end!
-
3 Printing Lines
Now we have our TerminalDisplay method, which will automatically display the contents of terminalBuffer to terminalScreen, so theoretically we can draw text. However, we don't actually have any drawing routines that work on a character based display. A quick method that will come in handy first of all is TerminalClear, which completely clears the terminal. This can actually very easily be achieved with no loops. Try to deduce why the following method suffices:
.globl TerminalClear
TerminalClear:
ldr r0,=terminalStart
add r1,r0,#terminalBuffer-terminalStart
str r1,[r0]
str r1,[r0,#terminalStop-terminalStart]
str r1,[r0,#terminalView-terminalStart]
mov pc,lr
Now we need to make a basic method for character based displays; the Print function. This takes in a string address in r0, and a length in r1, and simply writes it to the current location at the screen. There are a few special characters to be wary of, as well as special behaviour to ensure that terminalView is kept up to date. Let's analyse what it has to do:
- Check if string length is 0, if so return
- Load in terminalStop and terminalView
- Deduce the x-coordinate of terminalStop
- For each character:
- Check if the character is a new line
- If so, increment bufferStop to the end of the line storing a black on black delete character.
- Otherwise, copy the character in the current terminalColour
- Check if we're at the end of a line
- If so, check if the number of characters between terminalView and terminalStop is more than one screen
- If so, increment terminalView by one line
- Check if terminalView is at the end of the buffer, replace it with the start if so
- Check if terminalStop is at the end of the buffer, replace it with the start if so
- Check if terminalStop equals terminalStart, increment terminalStart by one line if so
- Check if terminalStart is at the end of the buffer, replace it with the start if so
- Store back terminalStop and terminalView.
See if you can implement this yourself. My solution is provided below:
-
.globl Print
Print:
teq r1,#0
moveq pc,lr
This quick check at the beginning makes a call to Print with a string of length 0 almost instant.
-
push {r4,r5,r6,r7,r8,r9,r10,r11,lr}
bufferStart .req r4
taddr .req r5
x .req r6
string .req r7
length .req r8
char .req r9
bufferStop .req r10
view .req r11
mov string,r0
mov length,r1
ldr taddr,=terminalStart
ldr bufferStop,[taddr,#terminalStop-terminalStart]
ldr view,[taddr,#terminalView-terminalStart]
ldr bufferStart,[taddr]
add taddr,#terminalBuffer-terminalStart
add taddr,#128*128*2
I do a lot of setup here. bufferStart contains terminalStart, bufferStop contains terminalStop, view contains terminalView, taddr is the address of the end of terminalBuffer.
-
and x,bufferStop,#0xfe
lsr x,#1
As per usual, a sneaky alignment trick makes everything easier. Because of the aligment of terminalBuffer, the x-coordinate of any character address is simply the last 8 bits divided by 2.
-
-
charLoop$:
ldrb char,[string]
and char,#0x7f
teq char,#'\n'
bne charNormal$
We need to check for new lines.
-
mov r0,#0x7f
clearLine$:
strh r0,[bufferStop]
add bufferStop,#2
add x,#1
teq x,#128 blt clearLine$
b charLoopContinue$
Loop until the end of the line, writing out 0x7f; a delete character in black on a black background.
-
charNormal$:
strb char,[bufferStop]
ldr r0,=terminalColour
ldrb r0,[r0]
strb r0,[bufferStop,#1]
add bufferStop,#2
add x,#1
Store the current character in the string and the terminalColour to the end of the terminalBuffer and then increment it and x.
-
charLoopContinue$:
cmp x,#128
blt noScroll$
Check if x is at the end of a line; 128.
-
mov x,#0
subs r0,bufferStop,view
addlt r0,#128*128*2
cmp r0,#128*(768/16)*2
Set x back to 0 and check if we're currently showing more than one screen. Remember, we're using a circular buffer, so if the difference between bufferStop and view is negative, we're actually wrapping around the buffer.
-
addge view,#128*2
Add one lines worth of bytes to the view address.
-
teq view,taddr
subeq view,taddr,#128*128*2
If the view address is at the end of the buffer we subtract the buffer length from it to move it back to the start. I set taddr to the address of the end of the buffer at the beginning.
-
noScroll$:
teq bufferStop,taddr
subeq bufferStop,taddr,#128*128*2
If the stop address is at the end of the buffer we subtract the buffer length from it to move it back to the start. I set taddr to the address of the end of the buffer at the beginning.
-
teq bufferStop,bufferStart
addeq bufferStart,#128*2
Check if bufferStop equals bufferStart. If so, add one line to bufferStart.
-
teq bufferStart,taddr
subeq bufferStart,taddr,#128*128*2
If the start address is at the end of the buffer we subtract the buffer length from it to move it back to the start. I set taddr to the address of the end of the buffer at the beginning.
subs length,#1
add string,#1
bgt charLoop$
Loop until the string is done.
-
-
charLoopBreak$:
sub taddr,#128*128*2
sub taddr,#terminalBuffer-terminalStart
str bufferStop,[taddr,#terminalStop-terminalStart]
str view,[taddr,#terminalView-terminalStart]
str bufferStart,[taddr]
pop {r4,r5,r6,r7,r8,r9,r10,r11,pc}
.unreq bufferStart
.unreq taddr
.unreq x
.unreq string
.unreq length
.unreq char
.unreq bufferStop
.unreq view
Store back the variables and return.
This method allows us to print arbitrary text to the screen. Throughout, I've been using the colour variable, but no where have we actually set it. Normally, terminals use special combinations of characters to change the colour. For example ASCII Escape (1b16) followed by a number 0 to f in hexadecimal could set the foreground colour to that CGA colour number. You can try implementing this yourself; my version is in the further examples section on the download page.
4 Standard Input
By convention, in many programming languages, every program has access to stdin and stdout, which are an input and and output stream linked to the terminal. This is still true on graphical programs, though many don't use it.
Now we have an output terminal that in theory can print out text and display it. That is only half the story however, we want input. We want to implement a method, ReadLine, which stores the next line of text a user types to a location given in r0, up to a maximum length given in r1, and returns the length of the string read in r0. The tricky thing is, the user annoyingly wants to see what they're typing as they type it, they want to use backspace to delete mistakes and they want to use return to submit commands. They probably even want a flashing underscore character to indicate the computer would like input! These perfectly reasonable requests make this method a real challenge. One way to achieve all of this is to store the text they type in memory somewhere along with its length, and then after every character, move the terminalStop address back to where it started when ReadLine was called and calling Print. This means we only have to be able to manipulate a string in memory, and then make use of our Print function.
Lets have a look at what ReadLine will do:
- If the maximum length is 0, return 0
- Retrieve the current values of terminalStop and terminalView
- If the maximum length is bigger than half the buffer size, set it to half the buffer size
- Subtract one from maximum length to ensure it can store our flashing underscore or a null terminator
- Write an underscore to the string
- Write the stored terminalView and terminalStop addresses back to the memory
- Call Print on the current string
- Call TerminalDisplay
- Call KeyboardUpdate
- Call KeyboardGetChar
- If it is a new line character go to 16
- If it is a backspace character, subtract 1 from the length of the string (if it is > 0)
- If it is an ordinary character, write it to the string (if the length < maximum length)
- If the string ends in an underscore, write a space, otherwise write an underscore
- Go to 6
- Write a new line character to the end of the string
- Call Print and TerminalDisplay
- Replace the new line with a null terminator
- Return the length of the string
Convince yourself that this will work, and then try to implement it yourself. My implementation is given below:
-
.globl ReadLine
ReadLine:
teq r1,#0
moveq r0,#0
moveq pc,lr
Quick special handling for the zero case, which is otherwise difficult.
-
string .req r4
maxLength .req r5
input .req r6
taddr .req r7
length .req r8
view .req r9
push {r4,r5,r6,r7,r8,r9,lr}
mov string,r0
mov maxLength,r1
ldr taddr,=terminalStart
ldr input,[taddr,#terminalStop-terminalStart]
ldr view,[taddr,#terminalView-terminalStart]
mov length,#0
As per the general theme, I do a lot of initialisations early. input contains the value of terminalStop and view contains terminalView. Length starts at 0.
-
cmp maxLength,#128*64
movhi maxLength,#128*64
We have to check for unusually large reads, as we can't process them beyond the size of the terminalBuffer (I suppose we CAN, but it would be very buggy, as terminalStart could move past the stored terminalStop).
-
sub maxLength,#1
Since the user wants a flashing cursor, and we ideally want to put a null terminator on this string, we need 1 spare character.
-
mov r0,#'_'
strb r0,[string,length]
Write out the underscore to let the user know they can input.
-
readLoop$:
str input,[taddr,#terminalStop-terminalStart]
str view,[taddr,#terminalView-terminalStart]
Save the stored terminalStop and terminalView. This is important to reset the terminal after each call to Print, which changes these variables. Strictly speaking it can change terminalStart too, but this is irreversible.
-
mov r0,string
mov r1,length
add r1,#1
bl Print
Write the current input. We add 1 to the length for the underscore.
-
bl TerminalDisplay
Copy the new text to the screen.
-
bl KeyboardUpdate
Fetch the latest keyboard input.
-
bl KeyboardGetChar
Retrieve the key pressed.
-
teq r0,#'\n'
beq readLoopBreak$
teq r0,#0
beq cursor$
teq r0,#'\b'
bne standard$
Break out of the loop if we have an enter key. Also skip these conditions if we have a null terminator and process a backspace if we have one.
-
delete$:
cmp length,#0
subgt length,#1
b cursor$
Remove one from the length to delete a character.
-
standard$:
cmp length,maxLength
bge cursor$
strb r0,[string,length]
add length,#1
Write out an ordinary character where possible.
-
cursor$:
ldrb r0,[string,length]
teq r0,#'_'
moveq r0,#' '
movne r0,#'_'
strb r0,[string,length]
Load in the last character, and change it to an underscore if it isn't one, and a space if it is.
-
b readLoop$
readLoopBreak$:
Loop until the user presses enter.
-
mov r0,#'\n'
strb r0,[string,length]
Store a new line at the end of the string.
-
str input,[taddr,#terminalStop-terminalStart]
str view,[taddr,#terminalView-terminalStart]
mov r0,string
mov r1,length
add r1,#1
bl Print
bl TerminalDisplay
Reset the terminalView and terminalStop and then Print and TerminalDisplay the final input.
-
mov r0,#0
strb r0,[string,length]
Write out the null terminator.
-
mov r0,length
pop {r4,r5,r6,r7,r8,r9,pc}
.unreq string
.unreq maxLength
.unreq input
.unreq taddr
.unreq length
.unreq view
Return the length.
5 The Terminal: Rise of the Machine
So, now we can theoretically interact with the user on the terminal. The most obvious thing to do is to put this to the test! In 'main.s' delete everything after bl UsbInitialise and copy in the following code:
reset$:
mov sp,#0x8000
bl TerminalClear
ldr r0,=welcome
mov r1,#welcomeEnd-welcome
bl Print
loop$:
ldr r0,=prompt
mov r1,#promptEnd-prompt
bl Print
ldr r0,=command
mov r1,#commandEnd-command
bl ReadLine
teq r0,#0
beq loopContinue$
mov r4,r0
ldr r5,=command
ldr r6,=commandTable
ldr r7,[r6,#0]
ldr r9,[r6,#4]
commandLoop$:
ldr r8,[r6,#8]
sub r1,r8,r7
cmp r1,r4
bgt commandLoopContinue$
mov r0,#0
commandName$:
ldrb r2,[r5,r0]
ldrb r3,[r7,r0]
teq r2,r3
bne commandLoopContinue$
add r0,#1
teq r0,r1
bne commandName$
ldrb r2,[r5,r0]
teq r2,#0
teqne r2,#' '
bne commandLoopContinue$
mov r0,r5
mov r1,r4
mov lr,pc
mov pc,r9
b loopContinue$
commandLoopContinue$:
add r6,#8
mov r7,r8
ldr r9,[r6,#4]
teq r9,#0
bne commandLoop$
ldr r0,=commandUnknown
mov r1,#commandUnknownEnd-commandUnknown
ldr r2,=formatBuffer
ldr r3,=command
bl FormatString
mov r1,r0
ldr r0,=formatBuffer
bl Print
loopContinue$:
bl TerminalDisplay
b loop$
echo:
cmp r1,#5
movle pc,lr
add r0,#5
sub r1,#5
b Print
ok:
teq r1,#5
beq okOn$
teq r1,#6
beq okOff$
mov pc,lr
okOn$:
ldrb r2,[r0,#3]
teq r2,#'o'
ldreqb r2,[r0,#4]
teqeq r2,#'n'
movne pc,lr
mov r1,#0
b okAct$
okOff$:
ldrb r2,[r0,#3]
teq r2,#'o'
ldreqb r2,[r0,#4]
teqeq r2,#'f'
ldreqb r2,[r0,#5]
teqeq r2,#'f'
movne pc,lr
mov r1,#1
okAct$:
mov r0,#16
b SetGpio
.section .data
.align 2
welcome: .ascii "Welcome to Alex's OS - Everyone's favourite OS"
welcomeEnd:
.align 2
prompt: .ascii "\n> "
promptEnd:
.align 2
command:
.rept 128
.byte 0
.endr
commandEnd:
.byte 0
.align 2
commandUnknown: .ascii "Command `%s' was not recognised.\n"
commandUnknownEnd:
.align 2
formatBuffer:
.rept 256
.byte 0
.endr
formatEnd:
.align 2
commandStringEcho: .ascii "echo"
commandStringReset: .ascii "reset"
commandStringOk: .ascii "ok"
commandStringCls: .ascii "cls"
commandStringEnd:
.align 2
commandTable:
.int commandStringEcho, echo
.int commandStringReset, reset$
.int commandStringOk, ok
.int commandStringCls, TerminalClear
.int commandStringEnd, 0
This code brings everything together into a simple command line operating system. The commands available are echo, reset, ok and cls. echo copies any text after it back to the terminal, reset resets the operating system if things go wrong, ok has two functions: ok on turns the OK LED on, and ok off turns the OK LED off, and cls clears the terminal using TerminalClear.
Have a go with this code on the Raspberry Pi. If it doesn't work, please see our troubleshooting page.
When it works, congratulations you've completed a basic terminal Operating System, and have completed the input series. Unfortunately, this is as far as these tutorials go at the moment, but I hope to make more in the future. Please send feedback to [Javascript required].
You're now in position to start building some simple terminal Operating Systems. My code above builds up a table of available commands in commandTable. Each entry in the table is an int for the address of the string, and an int for the address of the code to run. The last entry has to be commandStringEnd, 0. Try implementing some of your own commands, using our existing functions, or making new ones. The parameters for the functions to run are r0 is the address of the command the user typed, and r1 is the length. You can use this to pass inputs to your commands. Maybe you could make a calculator program, perhaps a drawing program or a chess program. Whatever ideas you've got, give them a go!
Spot a mistake? You can help improve this tutorial on GitHub.

Baking Pi: Operating Systems Development by Alex Chadwick is licensed under a Creative Commons Attribution-ShareAlike 3.0 Unported License.
Based on contributions at https://github.com/chadderz121/bakingpi-www.