Next: Kiwi Supported Language Subset Up: Kiwi / KiwiC Compiler Previous: Scientific Users' Guide Contents Index
Kiwi is currently not as easy to use as it could be. You can find an `addin' for the monodevelop IDE on the following URL but it is currently not very useful and since it is really focussed on Kiwi performance prediction which is immature. Currently it is best if you craft a Makefile based on one of the examples.
Monodevelop addin: http://www.cl.cam.ac.uk/users/djg11/kiwi/kiwiaddins/KiwiScientificAssist.
The Makefile will compile your application and optionally run the application on your workstation under mono or the Windows equivalent.
The Makefile will then invoke the Kiwi compiler to generate a Verilog RTL file and combine this with the provided substrate Verilog files for your FPGA target. Finally it will invoke the FPGA tool suite to give a bitstream file to be loaded to the FPGA.
The means for loading to the FPGA is currently highly-platform specific. Each substrate should have its own user guide.
Kiwi is available in source and precompiled binary form.
Requirements:. You need a working dotnet environment (mono or Windows) on your machine including a C# compiler. It is also handy to have Modelsim or Icarus Verilog and Verilator and SystemC.
Do not do this for Windows, but for linux set your shell environment MONO variable
$ setenv MONO=mono
$
KiwiC/HPR is currently internally implemented in F# but you just need a C# compiler to use the precompiled distribution.
Kiwi binary form is normally supplied as a zip file that contains folders called lib, bin, doc and so on. If you want the source for the compiler it is now public.
You will need the F# compiler to compile HPR and KiwiC from source.
The source build should be configured by editing the paths in hpr/Makefile.inc. Set the HPRLS shell
variable to where the source code sits and run `make' in kiwipro/kiwic/src to build the compiler.
If F# is not locally installed you will need to manually add at least the FSharpCore.dll to the KiwiC/distro/lib folder. We do ship one you can move there. Otherwise you may get 'type load' and 'missing entry point' errors.
FSharp can be simply obtained with apt-get install fsharp on some machines.
KiwiC uses the Mono.Cecil front end and hence the Mono.Cecil.dll is required, either installed on the machine or copied to the KiwiC/distro/lib folder.
Note: on some versions of linux, applying the shell to the .exe file without invoking mono invokes wine. The wine Windows emulator munges the dot net O/S interface, telling KiwiC that it is running on Windows NT and interchanging slashes and backslashes. This is liable not to work very smoothly (although more robust programming inside KiwiC would help in this respect).
On a Windows box, to get started running
KiwiC from the Windows command line, create a folder
in your K-Distro folder, cwd to it and copy in
a simple target, like tiny.exe described in §3.2.
Then, in that folder run
..\lib\kiwic.exe tiny.exe -vnl tiny.v
When the Kiwi system is itself compiled, it generates a folder called K-Distro. A user can download this folder or can compile it themselves from the Kiwi source distribution.
The important components of K-Distro are a lib folder containing all of the compiler dlls, a recipes folder containing the recipe XML file and a support folder containing Kiwi.dll and Kiwic.dll and other Kiwi-specific versions of the runtime system (such as System.Random, Math.Sqrt ...).
The Kiwi compiler itself is invoked via a shellscript called kiwic in the bin folder of the K-Distro. It is usual
to put that folder on your PATH. The shellscript does little other than apply mono to ../lib/kiwic.exe.
Place the Kiwi distribution somewhere on your filesystem. Let us call
that place PREFIX. For source build this will be $HPRLS/kiwipro/kiwic/distro/lib.
To run KiwiC on linux you must execute the KiwiC shell script
$ $(PREFIX)/bin/kiwic ... args ...The shellscript just contains
mono $(PREFIX)/lib/kiwic.exe
Windows users can invoke the kiwic.exe executable directly.
The arguments to KiwiC should either be portable assembly files (suffix .dll or .exe) or option flags prefixed with a minus sign. Generally you will supply the current design and KiwiC will automatically load the Kiwi libraries it needs.
Two Kiwi libraries are commonly needed:
To enable the same RTL file to be synthesised for FPGA by vendor tools and simulated [RTL_SIM] but to have slightly different behaviour (e.g. w.r.t. BIST self test) it is handy to define an external input to the Kiwi code that you tie low in the RTL_SIM testbench but strap high in the FPGA substrate pad ring.
[Kiwi.InputBitPort("FPGA")] static bool FPGA;
If you have these libraries in .cs form only, you will need to compile them to .dll form using mcs or similar. You will get some warnings about the `unsafe' code they contain.
You must manually include the reference to Kiwi.dll in the C# compilation step.
For the KiwiC compilation step, KiwiC will automatically search for the above libraries and include them in the compilation and this is equivalent to manually including them on the KiwiC command line.
To disable automatic search or redirect it to specific files, use the command-line flags -kiwic-dll and -kiwi-dll. Set these to the empty string to disable them or set them to a specific location, e.g. -kiwic-dll=/usr/lib/kiwic/mykiwic.dll.
Note that anything specified via the command line can also be specified in an XML recipe file, with the command line taking precedence when specified both ways. Kiwi comes with a standard recipe for accelerating scientific computing. You can modify this to get SystemC output or for privately developed flows based on Kiwi.
Kiwi defines the terms WD, RTL_SIM and FP to define three, so-called, execution environments.
CIL assemblies have the option for an EntryPoint method to be designated. Having one of these is a main difference between .exe and .dll files.
I can add an option to recognise the entrypoint as a root, or make this default failing all else, but, for most cases, a different entry point is preferable for the different execution envs and we'd want to reserve entrypoint for WD. This needs to be looked at especially for multi-FPGA designs.
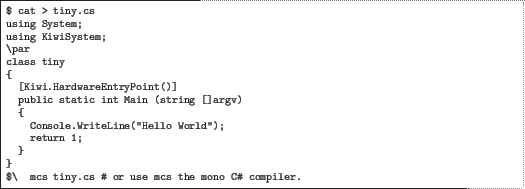
The Kiwi.HardwareEntryPoint attribute
can be attached to one or more static methods in the input program. These denote so-called `client' methods. The control-flow graph beneath such
methods is converted to hardware. The command line -root flag is another
way of specifiying an entry point. KiwiC does not default to using a static Main method.
The HardwareEntryPoint attribute can take a pause mode as an argument. This will, in future, set the starting pause mode for that
entrypoint, and moreover, be used to set pipelined accelerator mode.
To obtain Verilog RTL output, KiwiC requires a source file name and access to its libraries. So the most basic Makefile is something like:
It might be helpful to pass constant values as arguments to the HardwareEntryPoint but this is not supported. Instead, write a C# shim that takes no arguments and passes constants to a putative entry point. (But see also §7.17.)
PREFIX=$(HPRLS)/kiwipro/kiwic/distro
KLIBC=$(PREFIX)/kiwipro/support/Kiwic.dll
KLIB0=$(PREFIX)/kiwipro/support/Kiwi.dll
KIWIC=$(PREFIX)/kiwipro/bin/kiwic

all:
	gmcs /target:library tiny.cs /r:$(KLIB0)
	$(KIWIC) tiny.exe


# Other useful options until recently:  -vnl and -root:
        $(KIWIC) tiny.exe  -root "tiny;tiny.Main" -vnl tiny.v
Given that you have a file called tiny.exe to hand, this should result in a file called tiny.v in your current directory.
To generate tiny.exe one can do the following:
Should you need it, KiwiC will write a disassembly of the PE file to
obj/ast.cil in the current folder, enabled by recipe or command
line flag `-kiwic-cil-dump=separately' or `-kiwic-cil-dumpl=combined'.
If you do not have the Kiwi.dll library to hand (e.g. input from C++ instead of C#) or have other problems putting a HardwareEntryPoint attribute on a method then using the -root command line flag is a good idea.
If you do not have the Kiwi.dll library to hand (e.g. input from C++ instead of C#) or have other problems putting a HardwareEntryPoint attribute on a method then using the -root command line flag is an alternative.
Also, you can externally disassemble a .net CIL file using ikdasm (which works better than the older monodis) shell command. The command pedump may also be useful.