|
The XenoDaemon Management Tool is intended to be used by
the server owner in the XenoServers Open Platform. This document
explains how the XenoDaemon Management Tool should be used to register,
configure, start and monitor the XenoDaemon. Please follow the steps
bellow.
Summary
- Prerequisites
- Starting
the Management Tool
- Configuring
the server properties
- Registering
the Server
- Declaring
resources
- Start
the Server
You should have installed the XenoDaemon software first.
To do so, follow the procedure described here.
Before you start a server you should have verified that your
installation is complete, by executing (in VM0) the corresponding
"sanity check" script provided in the XenoDaemon package.
You should have decided on the network configuration
that is going to be used. If sessions are going to be assigned link-local addresses, then a
bridge should be configured using, for example, the following commands.
# brctl addbr
xenobridge
# ifconfig
xenobridge 192.168.0.1 netmask 255.255.255.0 up
Later on, the 192.168.0.2 IP should be used as the first
session IP (Base IP).
2. Starting the Management Tool
To start the XenoDaemon and its management tool, please
run the xenodaemon
executable which you can find in the XenoDaemon distribution. That
should be at:
$
/opt/xenodaemon/xenodaemon
You should now see the following window, indicating the
state of the XenoDaemon:
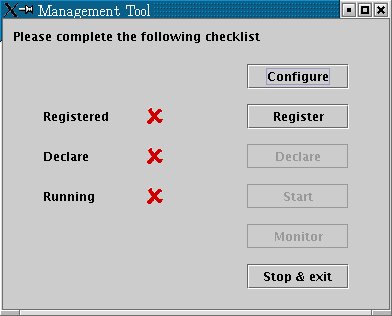
If you are starting the XenoDaemon for the first time,
the XenoServer needs to be configured first. To define configuration
properties (or confirm the defaults) click "configure".
3. Configuring the server properties
You should now see the following window. You most likely
don't have to, but if you need to (or want to) you can set the values
of the following properties of XenoDaemon:
- domain0 IP: The IP address of the management
VM (or VM0 or domain0).
- domain xeno IP: The IP address of the VM in
which XenoDaemon is running. If it is running in VM0, please type the
same IP address as in the domain0IPaddress property.
- ssh command: The command to be used to connect
to VM0 using a secure shell (ssh). In most systems it is ssh or /usr/bin/ssh.
- ssh user: As who XenoDaemon will connect to
VM0 to execute privileged Xen commands.
- base IP: The IP address for the
first client VM. Subsequent VM addresses will be allocated
incrementally.
- console host: The IP address for accessing
domain consoles.
- base port: A range of 100 ports (such as RMI
related ports) starting from this port will be used by the XenoDaemon.
- bridge: The name of the network bridge on
which the newly created VM's network interfaces are attached to.
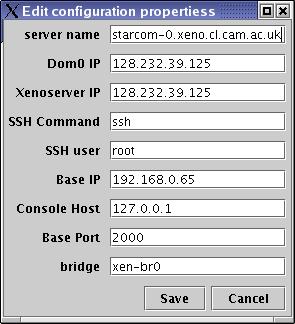
When you are finished, click "save". You should see the
main management tool window again. You are now ready to register the
server with XenoCorp.
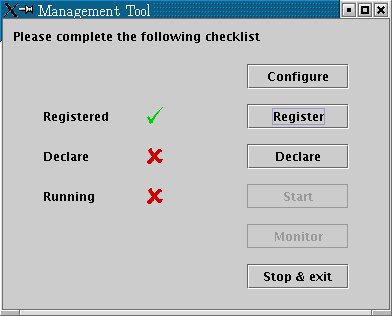
4. Registering the Server
Click on "register" in the main management tool window.
The registration window that you should now be seeing is as shown
below.
Please select the XenoCorp you want to register
with from the drop-down menu at the top of the page. Please type in the
invite number you've been given in the corresponding
text field; participation in the XenoServer platform is (at this stage)
by invitation only. If you have not been given an invite number and
would like to obtain one, or if your invite number does not work,
please contact
us.
At this stage you are asked to provide a password
for the XenoServer's keys. This is important; make sure you remember
your password as you will need it every time you start your XenoServer
in the future. Also, please fill in the user details section
with your personal details. Once you are finished, click "register".
IMPORTANT: Do
not type in real credit card details, as the platform's security is
still under monitoring and development. At this stage you will not need
any real money to use the platform.
When registration is finished, you should return to the
main XenoDaemon management tool window.
5. Declaring resources
Once you are finished with the registration process, you
should have the following view of the main management tool window. You
now have to declare the resources that your server will be
selling, as well as the pricing schemes that you would like to
associate with these resources. To do so, click on "declare" in the
main management tool window.
Authentication
Now, and every time you start the XenoDaemon in the
future, you will be asked to enter the password you have chosen in the
previous step. A dialog appears to carry on with the authentication,
which should look as below. Enter your password and click "next".
Resource declaration
You are now prompted to select whether you want
resources to be detected and declared automatically, or you wish to
manually add them yourself. Unless you *really* are an expert user, we
recommend going for the novice option. Click "next".
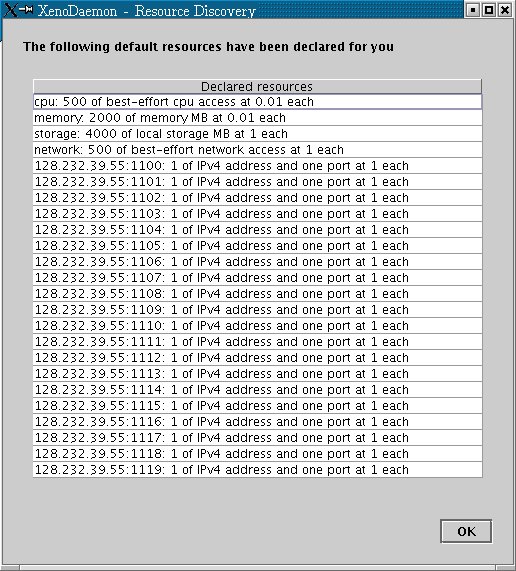
Novice
The XenoDaemon management tool will automatically detect
and declare resources for you. You should be able to review the
declared resources (please make sure none of the major ones is missing,
e.g. CPU, memory, storage, ports):
If none of the major resources is missing, resource
declaration is finished. Please jump to Section 5 of this document.
Expert
The system automatically detects available resources,
but it's now up to the user to declare them. Confusing? We told you,
it's for experts. If you don't understand a word, click "cancel" and
roll back to novice mode.
At this stage you can manually add resources to the
table on the left hand side (total available hardware resources), by
clicking on "add". You then have to define the type of resource you are
about to declare:
Then, you should define the properties of the resource you are
declaring:
Clicking "add" will add your new resource to the list of
available ones. Now you must declare resources, i.e. make some
of the machine's hardware resources available to platform users at a
certain price per unit. Select the resource you want to sell from the
table on the left hand side and click on "declare". A window such as
this will appear:
Here you should declare how you intend to sell the
selected resource, by defining the following properties:
- Description: a human-readable name for the resource.
- Resource kind: the type of the hardware resource you
are selling.
- Pricing unit: the unit at which the resource is to be
sold.
- Consumption ratio: how many of the hardware units
correspond to one of the units in which the resource is sold (e.g. 1 MB
of network traffic corresponds to 1000000 units of "network bytes")
- Owner: the XenoServer platform entity that owns the
server.
- Administrator: the XenoServer platform entity that
manages the server.
- Provider: the XenoServer platform entity that
provides the resource.
When you are finished declaring your resource, click
"declare". The resource will appear in the table on the right hand side.
6. Starting the Server
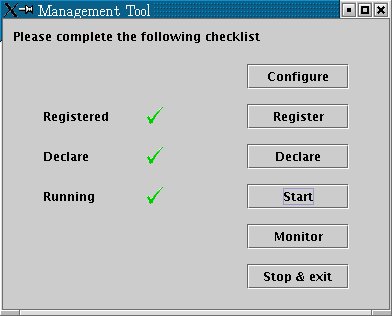
The main management tool window should now look like
this:
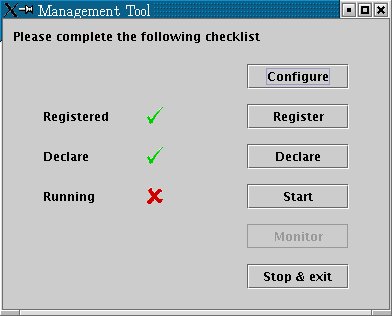
Click on the Start button in the main XenoDaeon
management tool window. If the server is started successfully, you will
receive a notification window as below. The server is now ready to
accept connections from clients, and an active part of the XenoServer
platform.
You should now have this view of the main management
tool window:
|