
Dataflow programming using TensorFlow
This page provides instructions for setting up TensorFlow and implementing simple distributed TensorFlow programs. The goal of this tutorial is to understand how dataflow programming can be used to construct computational graphs, and how these graphs can be executed using distributed workers and parameter servers. Note: If you are already reasonably familiar with TensorFlow, you may skip the first exercise. The final exercise on data structures in computation graphs is meant for students with substantial prior experience. There is no expectation to complete all exercises, and if you are entirely new to TensorFlow, you should prioritize understanding the first exercises well.
You may find the following links useful for this tutorial:
Contents |
Hello TensorFlow
Begin by installing TensorFlow on your machine if it has not been installed yet. You can natively install the CPU version of TensorFlow with:
pip install tensorflow==1.15rc2
If you run into trouble setting up TensorFlow, or want to install TensorFlow on another operating system than Ubuntu, please consult the installation pages.
Verify your installation was successful by starting an interactive Python session and running a minimal example:
$ python
# In Python session:
>>> import tensorflow as tf
>>> hello = tf.constant('Hello, TensorFlow!')
>>> sess = tf.compat.v1.Session()
>>> print(sess.run(hello))
The principle structure of writing static TensorFlow programs consists of defining operations in a computational graph (which is not executed when you define it), creating inputs to this graph, and invoking a session to execute the graph for a given input. In the following sections, you will construct and execute simple TensorFlow graphs.
Linear regression using TensorFlow
In this task, you will learn about placeholders, Tensor variables and constants in the TensorFlow graph. You will implement a simple linear regression and optimise its weights using TensorFlow's gradient descent optimiser. A machine learning task in TensorFlow typically means to create a loss function on the output of the graph, and then let TensorFlow update the weights in the graph via any gradient based optimisation method (such as stochastic gradient descent). This is possible because TensorFlow has registered gradients for most of its operators and can hence automatically compute gradients of most functions you maye define via reverse-mode auto differentation.
Begin by downloading the example file using:
wget http://www.cambridgeplus.net/tutorials/2018/linear_regression.py
The file contains the basic structure for training regression, but is missing various Tensor definitions. Read the comments, consult the TensorFlow documentation and try filling in the missing parts.
After completing all the TODOs, run the file using:
python linear_regression.py
Observe the output of the program. Try understanding the behaviour of the optimisation by going through the following questions:
Try plotting the predictions of the model. How well do predictions fit the data? Try adjusting the learning rate or increase the number of observations. Can you get zero error? What happens if you use another optimiser than the gradient descent optimiser (try Adam)?
In the task so far, you tried to fit a linear model to a non-linear function using a gradient based optimisation. As you may recall from your math classes, there are much simpler ways to fit linear models. Try to now expanding your model to be able to fit non-linear functions, effectively turning it into a neural network. You can do this by either manually adding weights, layers and activations or using TensorFlow's existing layer API.
You may want to visualize the computation graph you created using TensorBoard. Add the following line of code to the end of your script:
writer = tf.train.SummaryWriter('tmp', graph=tf.get_default_graph())
You can now start TensorBoard and visualize your graph in another terminal by running:
tensorboard --logdir=tmp --port 6006Hello distributed TensorFlow
After completion of the linear regression exercise, you should have a basic intuition of how to create and run dataflow graphs. In the following exercise, you will expand upon this by running distributed TensorFlow.
When using distributed TensorFlow to run large computation graphs in clusters, you have to create a training server and communicate with it:
$ python
>>> import tensorflow as tf
>>> c = tf.constant("Hello, distributed TensorFlow!")
>>> server = tf.train.Server.create_local_server()
>>> sess = tf.Session(server.target)  # Create a session on the server.
>>> sess.run(c)
>>> 'Hello, distributed TensorFlow!'
While the intricacies of the different distributed training modes are beyond the scope of this tutorial, you may want to read the first sections of the tutorial.
The purpose of distributed TensorFlow is to have fine-grained control over which part of your computation is executed on which device. For example, when training large machine learning models, you may typically want to use your CPU to read and preprocess training data and your GPU to compute updates on the model. In the next task, you will distribute a simple computation and learn about device scopes and cluster specifications.
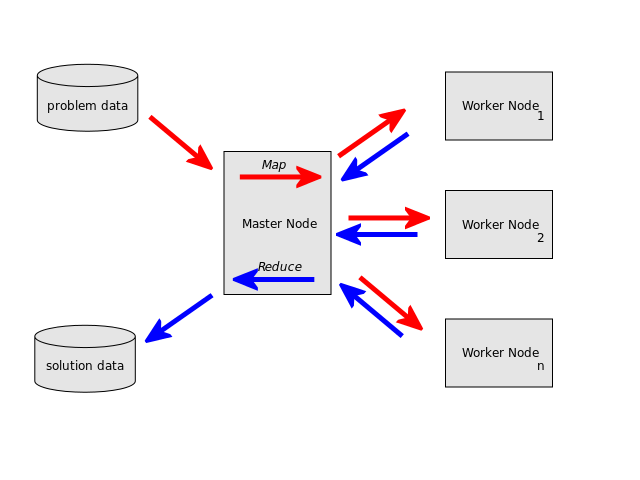
Distributed MapReduce
MapReduce is a parallel programming model wherein a task is split to multiple workers performing map() operations on the input (such as filtering or sorting data), and another task running a reduce() operation to aggregate the results. A typical example for this would be filtering Tweets for certain hashtags in realtime as a map() task, and a reduce() task to sum up and present the result statistics (image source: Wikipedia):
The goal of your task is to distribute a computation implementing the MapReduce paradigm in distributed TensorFlow. First, you will familiarise yourself with cluster specifications. The principal idea behind running a TensorFlow cluster is to create a cluster specification describing jobs and devices, then initialising a server with this spec:
cluster_spec = tf.train.ClusterSpec({"local": ["localhost:2222", "localhost:2223"]})
server = tf.train.Server(cluster_spec, job_name="local", task_index=task)
Here, we have initialised a task 'local' with two workers on localhost, one listening on port 2222, one on 2223. You can try this by creating the following minimal example and running it from two separate terminals:
$ touch server_init.py
# Insert using your editor of choice:
import tensorflow as tf
import sys

def main(argv):
  # Parse command
  task = int(argv[1])
  cluster_spec = tf.train.ClusterSpec({"local": ["localhost:2222", "localhost:2223"]})
  server = tf.train.Server(cluster_spec, job_name="local", task_index=task)

  print("Initialising server {}".format(task))
  server.start()

  # This server will now wait for instructions - n.b. that we did not
  # define an interrupt signal, so you have to close the terminal to kill it
  server.join()

if __name__ == '__main__':
    main(sys.argv)
So how can you run tasks using your cluster? This is where the concept of device specifications comes in. You can specify for any graph operation to be run on a specific device in the cluster by using device decorators:
with tf.device("/job:local/task:0"):
    # Create some TensorFlow ops
Similarly, you can start a session by specifying a GRPC (google remote procedure call) target:
with tf.Session("grpc://localhost:2222") as session:
      # Do something with that session, e.g. session.run(my_op, {input: my_inputs})
You should now download the example file and fill in the TODOs:
wget http://www.cambridgeplus.net/tutorials/2018/map_reduce.py
When you have filled in all TODOs, you can run the map_reduce task in your TensorFlow cluster. Make sure you have started your server init script with 2 workers, then simply run the MapReduce script in a third terminal:
python map_reduce.py
Once you have completed the exercise, think about other ways of distributing this computation. What if you introduced more workers? Would a multi-threaded version be faster? Can you compare?
If you were already familiar with TensorFlow, you might have some time left to explore more complex use cases. In the previous exercise, you were running MapReduce on a single machine. As you can imagine, the overhead of running multiple server/worker processes might not be justified unless you need to communicate between different devices. What is the disadvantage of a parameter server model?
Eager execution
In this tutorial, all computations were defined using a static computation graph. However, TensorFlow also offers an "eager" mode. In eager mode, each statement is simply evaluated like any other imperative code. If you have any time left, see if you can modify your code from the first exercise to eager mode. This means you will not use a session any more, and you may have to structure your code differently. When defining a static graph, only the layout of the graph matters, not in which order you add elements to the graph. In eager mode, everything is executed straight away, so you need to define methods or classes to call each part of the computation as needed. For more information, see the eager documentation.
End-to-end computation graphs
In the first exercise, you used Python code to create TensorFlow computations. You then repeatedely invoked a TensorFlow session to perform training. Each session call results in a context switch between your Python program and the TensorFlow runtime. A more sophisticated implementation would include the loop as part of a computation graph so only a single call to TensorFlow is necessary. Look at the TensorFlow control flow operations (e.g. a while loop.) and try modifying your code so all control-flow is in-graph.
Advanced exercise: data structures in computation graphs
In the prior exercises, you implemented largely functional transformations using different graph paradigms. The computation required you to send input data through a graph, and the optimizer updated internal state automatically (network weights). In some subfields of machine learning like reinforcement learning (RL), algorithms must manage substantial amounts of state. For example, an RL algorithm often needs to write data to a buffer, and later needs to sample from that buffer. Implementing stateful data structures in TensorFlow can be difficult because there are restrictions on variable manipulation and control flow. In this exercise, you will implement a priority queue in pure session-based TensorFlow.
The priority queue should enable users to insert simple data (e.g. a single integer) with an associated priority. The priority queue has a limited size n (e.g. 10), so you need to think about how priority is maintained when elements are inserted and removed if the queue is full. Further, the priority queue must support a dequeue operation which lets users read any number (< n) of records from the queue, ordered by priority. Hint: Think about how data and priorities may be managed separately.