⇡ lowRISC tagged memory tutorial
Running tests on the Zedboard FPGA
Introduction
The Berkeley Rocket Chip can be run on various Zynq FPGA boards. Details of how to do this can be found here. For convenience, we step through a very similar process and describe how to run simple tagged memory tests.
The ZedBoard is a low-cost (~$300-$400) development board built around the Xilinx Zynq-7000. The Zynq-7000 architecture consists of a dual-core ARM Cortex-A9 based “processing system” (PS) and programmable logic (PL), i.e. ARM cores, I/O, caches, memory controllers etc. integrated with and interconnected to an FPGA. 512MB of DDR3 memory and 256MB Quad-SPI flash is also provided.
The ARM side of the system provides a way to bootstrap the RISC-V cores and, when running, services I/O related system calls via the Host-Target Interface Bus (HTIF).
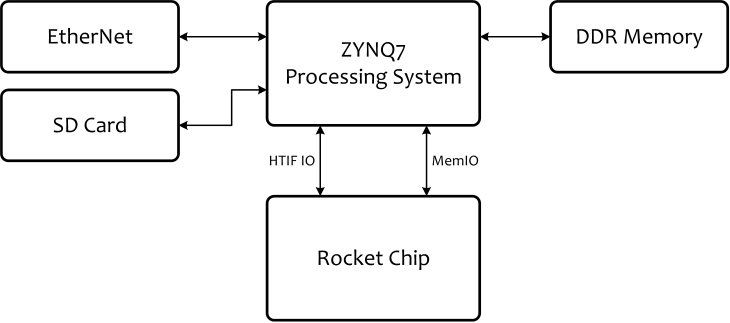
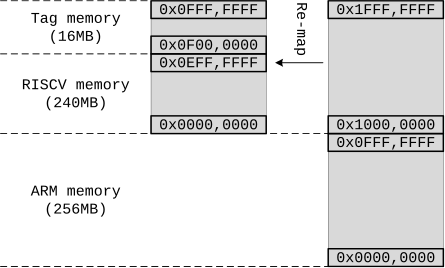
Main memory is shared between the ARM and RISC-V cores. The lower 256MB is allocated to the ARM side and the upper 256MB to the RISC-V side. The top 16MB of the RISC-V memory is reserved for storing tags.
Note: It is possible to change the amount of memory available to the
RISC-V system by modifying the htif_zedbaord_t::mem_mb() function
defined in riscv-tools/riscv-fesvr/fesvr/htif_zedboard.h.
FPGA bitstreams are loaded via the SD card. The ARM side of the board can also be accessed via the board’s ethernet interface using an SSH connection.
The prebuilt boot image
A prebuilt FPGA image is provided at
lowrisc-chip/fpga-zynq/zedboard/fpga-images-zedboard.
The contents of this SD card are described here and below. We add some additional scripts and the preloaded tagged memory test cases.
boot.bin: boot image for the Zynqboot_image/: These files are used to generateboot.bin. They are not used directly by the FPGA.system.bit: FPGA bitstreamu-boot.elf: The ARM u-boot bootloaderzynq_fsbl.elf: First Stage Boot Loader (FSBL)
uImage: ARM Linuxuramdisk.image.gz: the RAMDisk containing the root filesystemdevicetree.dtb: Device map for the ARM’s peripheralsriscv/: RISC-V Linuxvmlimux: The RISC-V Linux kernelroot.bin: the RAMDisk containing the root filesystem for RISC-V Linux
script/: Various scripts to help run our tagged memory teststests/: The preloaded tagged memory tests
Booting the Zedboard
Format a SD card to FAT32.
To use the prebuilt image simply copy the files to the SD card:
cd $TOP/fpga-zynq/zedboard
# in case the pre-compiled image is not downloaded
git submodule update --init fpga-images-zedboard
sudo cp -r fpga-images-zedboard/* /PATH/TO/SD
Note: It is safe to ignore the two warnings about symbolic links
To boot the FPGA demo simply:
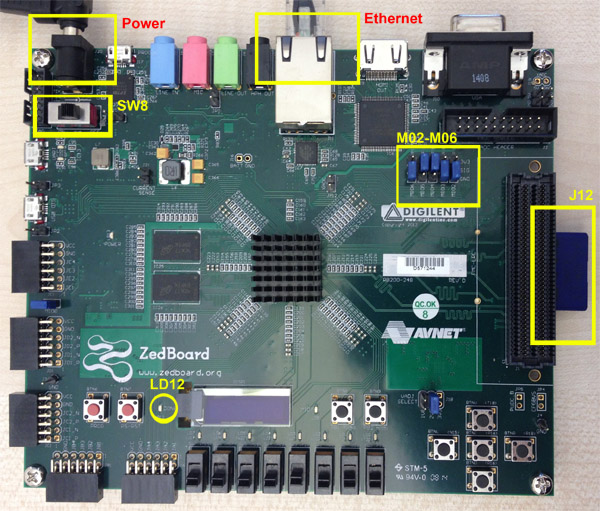
- Turn off the board’s power (
SW8) - Insert the SD card (
J12) - Set jumpers
M02-M06to5'b00110 - Connect power (
J20) - Turn the board on (
SW8) - If all goes well and the image loads, the blue LED (
LD12) should light
Communication with ARM Linux via SSH
The Zedboard is configured to use the IP address 192.168.1.5.
Manually configure your host PC with an IP
address on the 192.168.1.x subnet (e.g. 192.168.1.1).
After setting the IPv4 address, the host PC can access the ZedBoard via SSH (assuming that the ARM Linux has booted successfully):
ssh root@192.168.1.5
SSH is setup on the ramdisk to use root as the user and root as
the password.
Once your have logged in you should see a shell provided by the ARM
Linux. It is also possible to use scp to copy files between the host
PC and ARM Linux filesystem.
“Hello World”
The initial shell you have logged in runs on the ARM Linux rather than
the RISC-V Linux. In this environment you can launch bare metal
programs and those that run with the help of the proxy kernel. Three
executables are pre-loaded in the root home directory (/home/root)
to make this possible:
fesvr-zynq: The front-end server which runs on the ARM core and interfaces to the rocket chippk: The RISC-V proxy kernelhello: A hello world test program that uses the newlib library
To run the test program type:
./fesvr-zynq pk hello
If you see
hello!
Great! The Rocket core is running.
Running more tests
To run more tests the content on the SD card must be mounted into the ARM Linux. A script is provided for this job:
~/setup_env.sh
This script mounts the SD card and copies additional scripts to the root home directory (see script for details).
The bare metal test programs in lowrisc-chip/riscv-tools/riscv-tests
and the proxy kernel test programs in
lowrisc-chip/riscv-tools/lowrisc-tag-tests (used for testing the tag
cache) are pre-loaded to the tests/ directory in the SD card. After
running the setup_env.sh, it is also linked to /home/root/tests.
The tests are stored in four subdirectories, where benchmark, isa, and
mt are the original test cases from riscv-tools/riscv-tests and tag
holds the new tagged memory tests (riscv-tools/lowrisc-tag-tests).
A script (test.sh) is provided to run all tests in a particular
directory. This script is copied from /sdcard/scripts to
/home/root/ after running setup_env.sh.
e.g. to run all tagged memory tests:
 cd ~/tests/tag
 ~/test.sh
Running tests under RISC-V Linux
To run and test the RISC-V Linux on the Rocket core:
~/boot_linux.sh
RISC-V Linux should boot in around 5 seconds, a shell should then be provided on the host PC.
Three test programs are pre-loaded in /tests:
hello: Hello World testparity.linux: tag cache testtag_ld_st.linux: tag cache test
These binaries can be run directly, e.g.
/tests/tag_ld_st.linux