This section contains the instructions for installing Condor at your Unix site.
There are two sets of instructions for installing Condor. They are identified as the older and the newer installation instructions. All discussion prior to installation is valid whether using the newer installation script or the older method. The installation will have a default configuration that can be customized. Sections of the manual that follow this one explain customization.
Read this entire section before starting installation.
Please read the copyright and disclaimer information in
section ![[*]](crossref.png) on
page of the manual, or in the
file LICENSE.TXT, before proceeding. Installation and
use of Condor is acknowledgment that you have read and agree to the
terms.
on
page of the manual, or in the
file LICENSE.TXT, before proceeding. Installation and
use of Condor is acknowledgment that you have read and agree to the
terms.
The platform-dependent Condor files are currently available from two sites. The main site is at the University of Wisconsin-Madison, Madison, Wisconsin, USA. A second site is the Istituto Nazionale di Fisica Nucleare Sezione di Bologna, Bologna, Italy. Please choose the site nearest to you.
Make note of the location of where you download the binary into.
The Condor binary distribution is packaged in the following 5 files and 2 directories:
Before you install, please consider joining the condor-world mailing list. Traffic on this list is kept to an absolute minimum. It is only used to announce new releases of Condor. To subscribe, send a message to majordomo@cs.wisc.edu with the body:
subscribe condor-world
Before installation, make a few important decisions about the basic layout of your pool. The decisions answer the questions:
One machine in your pool must be the central manager. Install Condor on this machine first. This is the centralized information repository for the Condor pool, and it is also the machine that does match-making between available machines and submitted jobs. If the central manager machine crashes, any currently active matches in the system will keep running, but no new matches will be made. Moreover, most Condor tools will stop working. Because of the importance of this machine for the proper functioning of Condor, install the central manager on a machine that is likely to stay up all the time, or on one that will be rebooted quickly if it does crash.
Also consider network traffic and your network layout when choosing your central manager. All the daemons send updates (by default, every 5 minutes) to this machine. Memory requirements for the central manager differ by the number of machines in the pool. A pool with up to about 100 machines will require approximately 25 Mbytes of memory for the central manager's tasks. A pool with about 1000 machines will require approximately 100 Mbytes of memory for the central manager's tasks.
A faster CPU will improve the time to do matchmaking.
Condor can restrict the machines allowed to submit jobs. Alternatively, it can allow any machine the network allows to connect to a submit machine to submit jobs. If the Condor pool is behind a firewall, and all machines inside the firewall are trusted, the HOSTALLOW_WRITE configuration entry can be set to *. Otherwise, it should be set to reflect the set of machines permitted to submit jobs to this pool. Condor tries to be secure by default, so out of the box, the configuration file ships with an invalid definition for this configuration variable. This invalid value allows no machine to connect and submit jobs, so after installation, change this entry. Look for the entry defined with the value YOU_MUST_CHANGE_THIS_INVALID_CONDOR_CONFIGURATION_VALUE.
Start up the Condor daemons as the Unix user root.
Without this,
Condor can do very little to enforce security and policy
decisions.
You can install Condor as any user,
however there are both serious security and performance consequences.
Please see section 3.6.10 on page
in the manual for the details and ramifications of
running Condor as a Unix user other than root.
Either root will be administering Condor directly, or someone else would be acting as the Condor administrator. If root has delegated the responsibility to another person but doesn't want to grant that person root access, root can specify a condor_config.root file that will override settings in the other condor configuration files. This way, the global condor_config file can be owned and controlled by whoever is condor-admin, and the condor_config.root can be owned and controlled only by root. Settings that would compromise root security (such as which binaries are started as root) can be specified in the condor_config.root file while other settings that only control policy or condor-specific settings can still be controlled without root access.
To simplify installation of Condor, create a Unix user named condor on all machines in the pool. The Condor daemons will create files (such as the log files) owned by this user, and the home directory can be used to specify the location of files and directories needed by Condor. The home directory of this user can either be shared among all machines in your pool, or could be a separate home directory on the local partition of each machine. Both approaches have advantages and disadvantages. Having the directories centralized can make administration easier, but also concentrates the resource usage such that you potentially need a lot of space for a single shared home directory. See the section below on machine-specific directories for more details.
If you choose not to create a user named condor,
then you must specify either via the
CONDOR_IDS environment variable or the CONDOR_IDS
config file setting which uid.gid pair should be used for
the ownership of various Condor files.
See section 3.6.10 on UIDs in Condor on
page in the Administrator's Manual for details.
Condor needs a few directories that are unique on every machine in your pool. These are spool, log, and execute. Generally, all three are subdirectories of a single machine specific directory called the local directory (specified by the LOCAL_DIR macro in the configuration file). Each should be owned by the user that Condor is to be run as.
If you have a Unix user named condor with a local home directory on each machine, the LOCAL_DIR could just be user condor's home directory (LOCAL_DIR = $(TILDE) in the configuration file). If this user's home directory is shared among all machines in your pool, you would want to create a directory for each host (named by host name) for the local directory (for example, LOCAL_DIR = $(TILDE)/hosts/$(HOSTNAME)). If you do not have a condor account on your machines, you can put these directories wherever you'd like. However, where to place them will require some thought, as each one has its own resource needs:
for details),
you can ease the disk
space requirements, since all checkpoint files are stored on the
server instead of the spool directories for each machine. However,
the initial checkpoint files (the executables for all the clusters you
submit) are still stored in the spool directory, so you will need
some space, even with a checkpoint server.
Generally speaking, it is recommended that you do not put these directories (except lock) on the same partition as /var, since if the partition fills up, you will fill up /var as well. This will cause lots of problems for your machines. Ideally, you will have a separate partition for the Condor directories. Then, the only consequence of filling up the directories will be Condor's malfunction, not your whole machine.
about Configuring Condor for
Multiple Platforms for details.
In addition, because we recommend that you start the Condor daemons as
root, we allow you to create configuration files that are owned and
controlled by root that will override any other Condor settings. This
way, if the Condor administrator is not root, the regular Condor configuration
files can be owned and writable by condor-admin, but root does not have
to grant root access to this person. See
section on page in the
manual for a detailed discussion of the root configuration files, if you
should use them, and what settings should be in them.
In general, there are a number of places that Condor will look to find its configuration files. The first file it looks for is the global configuration file. These locations are searched in order until a configuration file is found. If none contain a valid configuration file, Condor will print an error message and exit:
If you specify a file in the CONDOR_CONFIG environment variable and there's a problem reading that file, Condor will print an error message and exit right away, instead of continuing to search the other options. However, if no CONDOR_CONFIG environment variable is set, Condor will search through the other options.
Next, Condor tries to load the local configuration file(s). The only way to specify the local configuration file(s) is in the global configuration file, with the LOCAL_CONFIG_FILE macro. If that macro is not set, no local configuration file is used. This macro can be a list of files or a single file.
The root configuration files come in last. The global file is searched for in the following places:
The local root configuration file(s) are found with the LOCAL_ROOT_CONFIG_FILE macro. If that is not set, no local root configuration file is used. This macro can be a list of files or a single file.
Every binary distribution contains a release.tar file that contains five subdirectories: bin, etc, lib, sbin, and libexec. Wherever you choose to install these five directories we call the release directory (specified by the RELEASE_DIR macro in the configuration file). Each release directory contains platform-dependent binaries and libraries, so you will need to install a separate one for each kind of machine in your pool. For ease of administration, these directories should be located on a shared file system, if possible.
All of the files in the bin directory are programs the end Condor users should expect to have in their path. You could either put them in a well known location (such as /usr/local/condor/bin) which you have Condor users add to their PATH environment variable, or copy those files directly into a well known place already in the user's PATHs (such as /usr/local/bin). With the above examples, you could also leave the binaries in /usr/local/condor/bin and put in soft links from /usr/local/bin to point to each program.
All of the files in the sbin directory are Condor daemons and agents, or programs that only the Condor administrator would need to run. Therefore, add these programs only to the PATH of the Condor administrator.
All of the files in the libexec directory are Condor programs that should never be run by hand, but are only used internally by Condor.
The files in the lib directory are the Condor libraries that must be linked in with user jobs for all of Condor's checkpointing and migration features to be used. lib also contains scripts used by the condor_ compile program to help re-link jobs with the Condor libraries. These files should be placed in a location that is world-readable, but they do not need to be placed in anyone's PATH. The condor_ compile script checks the configuration file for the location of the lib directory.
etc contains an examples subdirectory which holds various example configuration files and other files used for installing Condor. etc is the recommended location to keep the master copy of your configuration files. You can put in soft links from one of the places mentioned above that Condor checks automatically to find its global configuration file.
The documentation provided with Condor is currently available in HTML, Postscript and PDF (Adobe Acrobat). It can be locally installed wherever is customary at your site. You can also find the Condor documentation on the web at: http://www.cs.wisc.edu/condor/manual.
If you are using AFS at your site, be sure to read the
section 3.13.1 on page in the
manual.
Condor does not currently have a way to authenticate itself to AFS.
A solution is not ready for
Version 6.8.3.
This implies that you are probably not going to want
to have the LOCAL_DIR for Condor on AFS.
However, you can
(and probably should) have the Condor RELEASE_DIR on AFS, so
that you can share one copy of those files and upgrade them in a
centralized location. You will also have to do something special if
you submit jobs to Condor from a directory on AFS. Again, read manual
section 3.13.1 for all the details.
Condor takes up a fair amount of space. This is another reason why it is a good idea to have it on a shared file system. The size requirements for the downloads are given on the downloads page. They currently vary from about 20 Mbytes (statically linked HP Unix on a PA RISC) to more than 50 Mbytes (dynamically linked Irix on an SGI).
In addition, you will need a lot of disk space in the local directory of any machines that are submitting jobs to Condor. See question 6 above for details on this.
The Perl script condor_ configure installs Condor. Command-line arguments specify all needed information to this script. The script can be executed multiple times, to modify or further set the configuration. condor_ configure has been tested using Perl 5.003. Use this or a more recent version of Perl.
After download, all the files are in a compressed, tar format. They need to be untarred, as
tar xzf completename.tar.gzAfter untarring, the directory will have the Perl script condor_ configure, as well as a second tar file called release.tar. condor_ configure works on release.tar.
condor_ configure is completely command-line driven; it is not interactive. Several command-line arguments are always needed with condor_ configure. The argument
--install=/path/to/release.tarspecifies the path to the Condor release tarball. The argument
--install-dir=directoryspecifies the path to the install directory. The argument
--local-dir=directoryspecifies the path to the local directory.
The -type option to condor_ configure specifies one or more of the roles that a machine may take on within the Condor pool: central manager, submit or execute. These options are given in a comma separated list. So, if a machine is both a submit and execute machine, the proper command-line option is
--type=manager,execute
Configure Condor on the central manager machine first. If Condor will run as root in this pool (Item 3 above), run condor_ configure as root, and it will install and set the file permissions correctly. On the central manager machine, run condor_ configure as follows.
% condor_configure --install=r.tar --install-dir=~condor \
	--local-dir=/scratch/condor --type=manager
The central manager can also be a submit point or and execute machine, but this is only recommended for very small pools. If this is the case, the -type option changes to manager,execute or manager,submit or manager,submit,execute.
After the central manager is installed, the execute and submit machines should then be configured. Decisions about whether to run Condor as root should be consistent throughout the pool. For each machine in the pool, run
% condor_configure --install=r.tar --install-dir=~condor \
	--local-dir=/scratch/condor --type=execute,submit
See the condor_ configure manual page in
section 9 on
page for details.
Please skip to section 3.2.6 for final instructions on configuring and starting Condor.
IF YOU HAVE DECIDED TO CREATE A condor USER AND GROUP, DO THAT ON ALL YOUR MACHINES BEFORE YOU DO ANYTHING ELSE.
After download, all the files are in a compressed, tar format. They need to be untarred, as
tar xzf completename.tar.gz
To install Condor, use one or both of the scripts provided to help you: condor_ install and condor_ init. Run these scripts as the user that you are going to run the Condor daemons as. First, run condor_ install on the machine that will be a file server for shared files used by Condor, such as the release directory, and possibly the condor user's home directory. When you do, choose the ``full-install'' option in step #1 described below.
Once you have run condor_ install on a file server to set up your release directory and configure Condor for your site, you should run condor_ init on any other machines in your pool to create any locally used files that are not created by condor_ install. In the most simple case, where nearly all of Condor is installed on a shared file system, even though condor_ install will create nearly all the files and directories you need, you will still need to use condor_ init to create the LOCK directory on the local disk of each machine. If you have a shared release directory, but the LOCAL_DIR is local on each machine, condor_ init will create all the directories and files needed in LOCAL_DIR. In addition, condor_ init will create any soft links on each machine that are needed so that Condor can find its global configuration file.
If you do not have a shared file system, you need to run condor_ install on each machine in your pool to set up Condor. In this case, there is no need to run condor_ init at all.
In addition, you will want to run condor_ install on your central
manager machine if that machine is different from your file server,
using the ``central-manager'' option in step #1 described below. Run
condor_ install on your file server first, then on your central
manager. If this step fails for some reason (NFS permissions, etc),
you can do it manually quite easily. All this does is copy the
condor_config.local.central.manager file from
<release_dir>/etc/examples to the proper location for the local configuration
file of your central manager machine. If your central manager is an
Alpha or an SGI, you might want to add KBDD to the
$(DAEMON_LIST) macro. See
section 3.3 Configuring Condor on
page of the manual for details.
condor_ install assumes you have perl installed in /usr/bin/perl. If this is not the case, you can either edit the script to put in the right path, or you will have to invoke perl directly from your shell (assuming perl is in your PATH):
% perl condor_install
condor_ install breaks down the installation procedure into various steps. Each step is clearly numbered. The following section explains what each step is for, and suggests how to answer the questions condor_ install will ask you for each one.
There are three types of Condor installation you might choose: 'submit-only', 'full-install', and 'central-manager'. A submit-only machine can submit jobs to a Condor pool, but Condor jobs will not run on it. A full-install machine can both submit and run Condor jobs.
If you are planning to run Condor jobs on your machines, you should either install and run Condor as root, or as the Unix user condor.
If you are planning to set up a submit-only machine, you can either install Condor machine-wide as root or user condor, or, you can install Condor as yourself into your home directory.
The other possible installation type is setting up a machine as a central manager. If you do a full-install and you say that you want the local host to be your central manager, this step will be done automatically. You should only choose the central-manager option at step 1 if you have already run condor_ install on your file server and you now want to run condor_ install on a different machine that will be your central manager.
If you are installing Condor for multiple machines and you have a shared file system, then condor_ install will prompt you for the host names of each machine you want to add to your Condor pool. If you do not have a shared file system, you will have to run condor_ install locally on each machine, so condor_ install does not ask for the names. If you provide a list, it will use the names to automatically create directories and files later. At the end, condor_ install will dump out this list to a roster file which can be used by scripts to help maintain your Condor pool.
If you are only installing Condor on 1 machine, you would answer no to the first question, and move on.
If you have multiple machines with a shared file system that will be running Condor, put the release directory on that shared file system so you only have one copy of all the binaries, and so that when you update them, you can do so in one place. Note that the release directory is architecture dependent, so download separate binary distributions for every platform in your pool.
condor_ install tries to find an already installed release directory. If it cannot find one, it asks if you have installed one already. If you have not installed one, it tries to do so for you by untarring the release.tar file from the binary distribution.
NOTE: If you are only setting up a central manager (you chose 'central manager' in STEP 1), STEP 3 is the last question you will need to answer.
Various parts of Condor will send e-mail to a condor administrator if something goes wrong that needs human attention. You will need to specify the e-mail address of this administrator.
You also specify the full path to a mail program that Condor will use to send the e-mail. This program needs to understand the -s option, to specify a subject for the outgoing message. The default on most platforms will probably be correct. On Linux machines, since there is such variation in Linux distributions and installations, verify that the default works. If the script complains that it cannot find the mail program that was specified, try
% which mailto see what mail program is currently in your PATH. If there is none, try
% which mailxIf you still cannot find anything, ask your system administrator. Verify that the program you use supports -s. The man page for that program will probably tell you.
Condor does not depend on a shared file system and common UID
space for running jobs outside the standard universe.
Jobs can specify file transfer within the submit description file.
See
section 2.5.4 on page
for information on properly setting up file transfer for jobs.
To utilize the convenience of a shared file system (such as NFS),
a common UID space is needed.
This is one in which there is a unique mapping of user names to
UIDs across all machines in the common UID space.
It is important to correctly configure
Condor with respect to a shared file system.
For complete details on what these settings do and how you
should answer the questions, read
section 3.3.7,
Shared File System Configuration File Entries'', on
page .
You will be asked if you have a shared file system. If so, condor_ install will configure your FILESYSTEM_DOMAIN setting to be set to the domain name of the machine running condor_ install. If not, FILESYSTEM_DOMAIN will be set to $(FULL_HOSTNAME), indicating that each machine is in its own domain.
For the UID domain, Condor needs to know if all user names across all the machines in the pool have a unique UID. If so, UID_DOMAIN will be set to the domain name of the machine running condor_ install. If not, UID_DOMAIN will be set to $(FULL_HOSTNAME), indicating that each machine is in its own domain.
If you have a common UID_DOMAIN, condor_ install will
ask if you have a soft UID domain, meaning that although
you have unique UIDs, not every machine in your pool has all the
users in their individual password files. Please see the
description of SOFT_UID_DOMAIN in
section 3.3.7 on
page for details.
Condor has the ability to run Java programs with remote i/o, but no checkpointing. If you would like to enable this feature in Condor, then select yes for enabling of Java Universe. The installer will try to determine if you have a valid JVM and prompt you if nothing suitable can be found. If you do not care to use the Java Universe, then it is safe to say no here.
It is recommended that you install the user-level Condor programs in the release directory, (where they go by default). This way, when you want to install a new version of the Condor binaries, you can just replace your release directory and everything will be updated at once. So, one option is to have Condor users add <release_dir>/bin to their PATH, so that they can access the programs. However, we recommend putting in soft links from some directory already in their PATH (such as /usr/local/bin) that point back to the Condor user programs. condor_ install will do this for you. All you do is tell it what directory to put these links into. This way, users do not have to change their PATH to use Condor, and you can still have the binaries installed in their own location.
If you are installing Condor as neither root nor condor, there is a perl script wrapper to all the Condor tools that is created which sets some appropriate environment variables and automatically passes certain options to the tools. This is all created automatically by condor_ install. So, you need to tell condor_ install where to put this perl script. The script itself is linked to itself with many different names, since it is the name that determines the behavior of the script. This script should go somewhere that is in your PATH already, if possible (such as ~bin).
At this point, the remaining steps differ based on the whether the installation is a full install or a submit-only. Skip to the appropriate section below, based on the kind of installation.
Type in the full host name of the machine you have chosen for your central manager. If condor_ install cannot find information about the host you typed by querying your name server, it will print out an error message and ask you to confirm.
This is the directory discussed in question 5 of the installation introduction. condor_ install tries to make some educated guesses as to what directory you want to use for the purpose. Agree to the correct guess, or (when condor_ install has run out of guesses) type in what you want. Since this directory needs to be unique, it is common to use the host name of each machine in its name. When typing in your own path, you can use '$(HOSTNAME)' which condor_ install (and the Condor configuration files) will expand to the host name of the machine you are currently on. condor_ install will try to create the corresponding directories for all the machines you told it about in STEP 2 above.
Once you have selected the local directory, condor_ install creates all the needed subdirectories of each one with the proper permissions. They should have the following permissions and ownerships:
     drwxr-xr-x   2 condor   root         1024 Mar  6 01:30 execute/
     drwxr-xr-x   2 condor   root         1024 Mar  6 01:30 log/
     drwxr-xr-x   2 condor   root         1024 Mar  6 01:30 spool/
If your local directory is on a shared file system, condor_ install will prompt you for the location of your lock files, as discussed in question #5 above. In this case, when condor_ install is finished, you will have to run condor_ init on each machine in your pool to create the lock directory before you can start up Condor.
As discussed in question STEP 6 above, there are a few different levels of Condor configuration files. There is the global configuration file that will be installed in <release_dir>/etc/condor_config, and there are machine-specific, or local configuration files, that override the settings in the global file. If you are installing on multiple machines or are configuring your central manager machine, you must select a location for your local configuration files.
The two main options are to have a single directory that holds all the local configuration files, each one named $(HOSTNAME).local, or to have the local configuration files go into the individual local directories for each machine. Given a shared file system, we recommend the first option, since it makes it easier to configure your pool from a centralized location.
Since there are a few known places Condor looks to find your configuration file, we recommend that you put a soft link from one of them to point to <release_dir>/etc/condor_config. This way, you can keep your Condor configuration in a centralized location, but all the Condor daemons and tools will be able to find their configuration files. Alternatively, you can set the CONDOR_CONFIG environment variable to contain <release_dir>/etc/condor_config.
condor_ install will ask you if you want to create a soft link from either of the two fixed locations that Condor searches.
Once you have completed STEP 11, you are done. condor_ install prints out a messages describing what to do next. Please skip to section 3.2.6.
A submit-only installation of Condor implies that the machine will be submitting jobs to one or more established Condor pools. Configuration for this installation needs to account for the other pools.
For the submit-only installation, STEP 6 continues and completes the installation.
There is a separate configuration file for each pool. The location of each file is specified.
Identification of each pool requires a unique name. A final question sets a name for each pool. The name will be the argument for -pool command line options.
RPMs are available in Version 6.8.3. This packaging method provides for installation and configuration in one easy step. It is currently available for Linux systems only.
The format of the installation command is
rpm -i <filename> --prefix=<installation dir>
The user provides the path name to the directory
used for the installation.
The rpm program calls condor_ configure to do portions
of the installation.
If the condor user is present on the system,
the installation script will
assume that that is the effective user that Condor should run as
(see
section 3.6.10 on
page ).
If the condor user is not present,
the daemon user
will be used.
This user will be present on all Linux systems.
Note that the user can later be changed by running the condor_ configure
program using the owner option, of the format:
condor_configure --owner=<user>
After a successful installation, the CONDOR_CONFIG configuration variable must be set to point to
<installation dir>/etc/condor_configbefore starting Condor daemons or invoking Condor tools.
RPM upgrade (-u option) does not currently work for Condor Version 6.8.3.
Now that Condor has been installed on your machine(s), there are a few things you should check before you start up Condor.
to learn how to do this.
To start up the Condor daemons, execute <release_dir>/sbin/condor_master. This is the Condor master, whose only job in life is to make sure the other Condor daemons are running. The master keeps track of the daemons, restarts them if they crash, and periodically checks to see if you have installed new binaries (and if so, restarts the affected daemons).
If you are setting up your own pool, you should start Condor on your central manager machine first. If you have done a submit-only installation and are adding machines to an existing pool, the start order does not matter.
To ensure that Condor is running, you can run either:
ps -ef | egrep condor_
or
ps -aux | egrep condor_
depending on your flavor of Unix. On your central manager machine you
should have processes for:
of the manual for details.) If you
have set up a submit-only machine, you will only see:
Once you are sure the Condor daemons are running, check to make sure that they are communicating with each other. You can run condor_ status to get a one line summary of the status of each machine in your pool.
Once you are sure Condor is working properly, you should add condor_ master into your startup/bootup scripts (i.e. /etc/rc ) so that your machine runs condor_ master upon bootup. condor_ master will then fire up the necessary Condor daemons whenever your machine is rebooted.
If your system uses System-V style init scripts, you can look in <release_dir>/etc/examples/condor.boot for a script that can be used to start and stop Condor automatically by init. Normally, you would install this script as /etc/init.d/condor and put in soft link from various directories (for example, /etc/rc2.d) that point back to /etc/init.d/condor. The exact location of these scripts and links will vary on different platforms.
If your system uses BSD style boot scripts, you probably have an /etc/rc.local file. Add a line to start up <release_dir>/sbin/condor_master.
Now that the Condor daemons are running, there are a few things you can and should do:
in the manual for
directions.
in the
manual.
.
An upgrade changes the running version of Condor from the current installation to a newer version. The safe method to install and start running a newer version of Condor in essence is: shutdown the current installation of Condor, install the newer version, and then restart Condor using the newer version.
To allow for falling back to the current version, place the new version in a separate directory. Copy the existing configuration files, and modify the copy to point to and use the new version. Set the CONDOR_CONFIG environment variable to point to the new copy of the configuration, so the new version of Condor will use the new configuration when restarted.
When upgrading from an earlier version of Condor to a version of 6.8, note that the configuration settings must be modified for security reasons. Specifically, the HOSTALLOW_WRITE configuration variable must be explicitly changed, or no jobs may be submitted, and error messages will be issued by Condor tools.
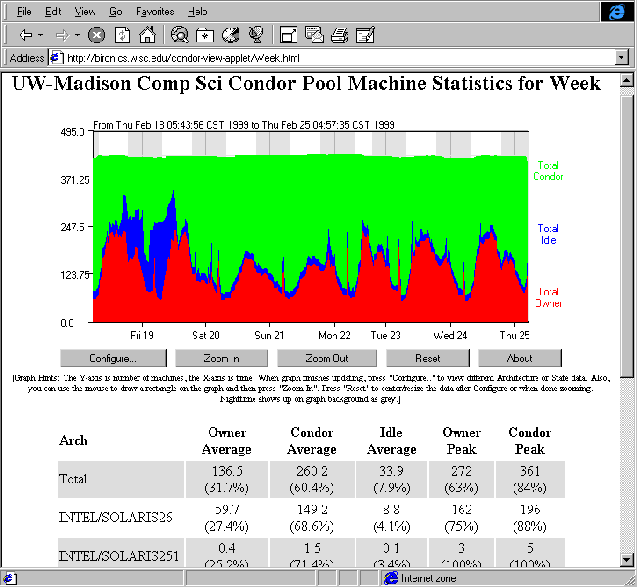
The CondorView Client contrib module is used to automatically generate
World Wide Web pages to display usage statistics of a Condor
pool.
Included in the module is a shell script which invokes the condor_ stats
command to retrieve pool usage statistics from the CondorView server, and
generate HTML pages from the results.
Also included is a Java applet, which graphically visualizes Condor
usage information.
Users can interact with the applet to customize the visualization and to
zoom in to a specific time frame.
Figure 3.2 on page
is a screen shot of a web page created by CondorView.
To get a further feel for what pages generated by CondorView look like,
view the statistics for the University of Wisconsin-Madison pool
by visiting the URL http://www.cs.wisc.edu/condor
and clicking on
Condor View.
After unpacking and installing the CondorView Client, a script named make_stats can be invoked to create HTML pages displaying Condor usage for the past hour, day, week, or month. By using the Unix cron facility to periodically execute make_stats, Condor pool usage statistics can be kept up to date automatically. This simple model allows the CondorView Client to be easily installed; no Web server CGI interface is needed.
    POOL_HISTORY_DIR = /full/path/to/directory/to/store/historical/data
    KEEP_POOL_HISTORY = True
PATH=/bin:/usr/bin:$STATSDIR:/usr/local/bin
./make_stats setup
Open the file index.html to verify that things look good.
crontab cronentries
Dynamic deployment is a mechanism that allows rapid, automated installation and start up of Condor resources on a given machine. In this way any machine can be added to a Condor pool. The dynamic deployment tool set also provides tools to remove a machine from the pool, without leaving residual effects on the machine such as leftover installations, log files, and working directories.
Installation and start up is provided by condor_ cold_start. The condor_ cold_start program determines the operating system and architecture of the target machine, and transfers the correct installation package from an ftp, http, or grid ftp site. After transfer, it installs Condor and creates a local working directory for Condor to run in. As a last step, condor_ cold_start begins running Condor in a manner which allows for later easy and reliable shut down.
The program that reliably shuts down and uninstalls a previously dynamically installed Condor instance is condor_ cold_stop. condor_ cold_stop begins by safely and reliably shutting off the running Condor installation. It ensures that Condor has completely shut down before continuing, and optionally ensures that there are no queued jobs at the site. Next, condor_ cold_stop removes and optionally archives the Condor working directories, including the log directory. These archives can be stored to a mounted file system or to a grid ftp site. As a last step, condor_ cold_stop uninstalls the Condor executables and libraries. The end result is that the machine resources are left unchanged after a dynamic deployment of Condor leaves.
Dynamic deployment is designed for the expert Condor user and administrator. Tool design choices were made for functionality, not ease-of-use.
Like every installation of Condor, a dynamically deployed installation relies on a configuration. To add a target machine to a previously created Condor pool, the global configuration file for that pool is a good starting point. Modifications to that configuration can be made in a separate, local configuration file used in the dynamic deployment. The global configuration file must be placed on an ftp, http, grid ftp, or file server accessible by condor_ cold_start. The local configuration file is to be on a file system accessible by the target machine. There are some specific configuration variables that may be set for dynamic deployment. A list of executables and directories which must be present for Condor to start on the target machine may be set with the configuration variables DEPLOYMENT_REQUIRED_EXECS and DEPLOYMENT_REQUIRED_DIRS . If defined and the comma-separated list of executables or directories are not present, then condor_ cold_start exits with error. Note this does not affect what is installed, only whether start up is successful.
A list of executables and directories which are recommended to be present for Condor to start on the target machine may be set with the configuration variables DEPLOYMENT_RECOMMENDED_EXECS and DEPLOYMENT_RECOMMENDED_DIRS . If defined and the comma-separated lists of executables or directories are not present, then condor_ cold_start prints a warning message and continues. Here is a portion of the configuration relevant to a dynamic deployment of a Condor submit node:
DEPLOYMENT_REQUIRED_EXECS    = MASTER, SCHEDD, PREEN, STARTER, STARTER_PVM,\
                               STARTER_STANDARD, SHADOW, SHADOW_PVM, \
                               SHADOW_STANDARD, GRIDMANAGER, GAHP, CONDOR_GAHP
DEPLOYMENT_REQUIRED_DIRS     = SPOOL, LOG, EXECUTE
DEPLOYMENT_RECOMMENDED_EXECS = CREDD
DEPLOYMENT_RECOMMENDED_DIRS  = LIB, LIBEXEC
Additionally, the user must specify which Condor services will be started. This is done through the DAEMON_LIST configuration variable. Another excerpt from a dynamic submit node deployment configuration:
DAEMON_LIST = MASTER, SCHEDD
Finally, the location of the dynamically installed Condor executables is tricky to set, since the location is unknown before installation. Therefore, the variable DEPLOYMENT_RELEASE_DIR is defined in the environment. It corresponds to the location of the dynamic Condor installation. If, as is often the case, the configuration file specifies the location of Condor executables in relation to the RELEASE_DIR variable, the configuration can be made dynamically deployable by setting RELEASE_DIR to DEPLOYMENT_RELEASE_DIR as
RELEASE_DIR = $(DEPLOYMENT_RELEASE_DIR)
In addition to setting up the configuration, the user must also determine where the installation package will reside. The installation package can be in either tar or gzipped tar form, and may reside on a ftp, http, grid ftp, or file server. Create this installation package by tar'ing up the binaries and libraries needed, and place them on the appropriate server. The binaries can be tar'ed in a flat structure or within bin and sbin. Here is a list of files to give an example structure for a dynamic deployment of the condor_ schedd daemon.
% tar tfz latest-i686-Linux-2.4.21-37.ELsmp.tar.gz
bin/
bin/condor_config_val
bin/condor_q
sbin/
sbin/condor_preen
sbin/condor_shadow.std
sbin/condor_starter.std
sbin/condor_schedd
sbin/condor_master
sbin/condor_starter.pvm
sbin/condor_shadow.pvm
sbin/condor_gridmanager
sbin/gt3_gahp
sbin/gt4_gahp
sbin/gahp_server
sbin/condor_starter
sbin/condor_shadow
sbin/condor_c-gahp
sbin/condor_off