Tick 5: GUILife
In this tick you will move away from relying on the command line for all inputs and develop a more modern Graphical User Interface (GUI) using the Swing libraries supplied as part of Java. Along the way you will observe the use of various design patterns to allow the visual structure and dynamic behaviour you would expect. Your final application will look like the screenshot below. Note there is a video of how it should behave at the bottom of the page.
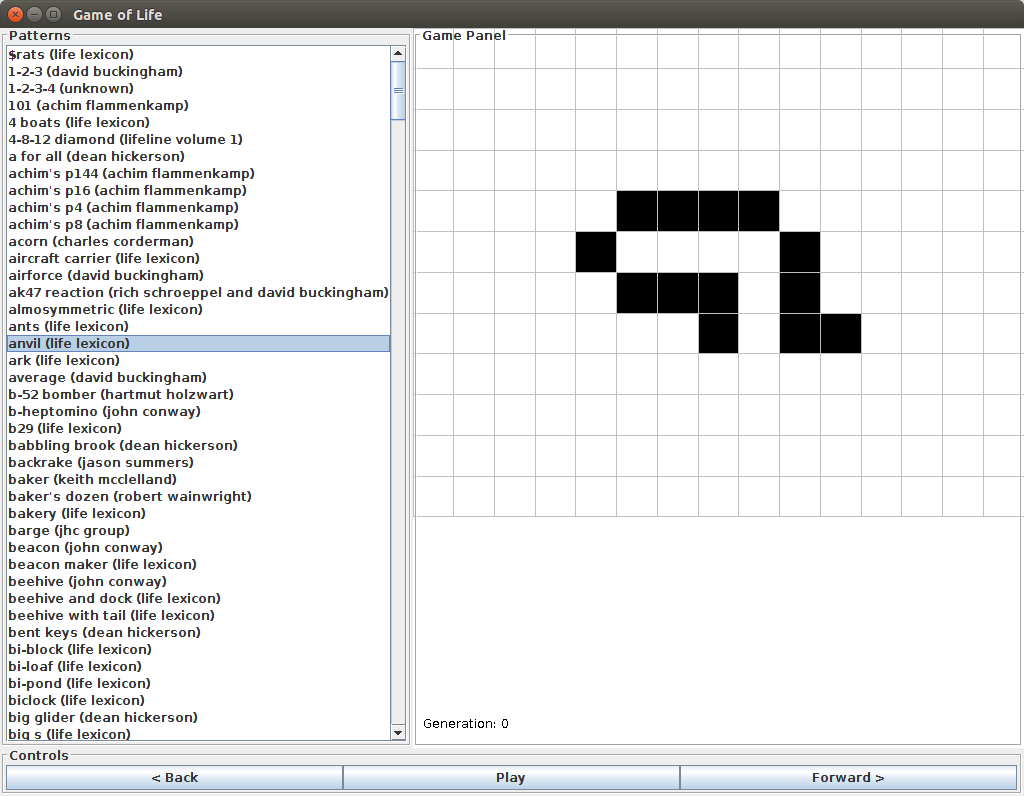
Screenshot
Java Swing
Swing is a GUI toolkit supplied as part of the core Java libraries. It is a (large) set of classes provided all the functionality you need to create an interactive program. The class names are all prefixed with a J (e.g. JPanel, JButton) and, as ever, you can find out everything you need to know by studying the Java API documentation.
We will not spend much time delving into individual components or exploring the full set of Swing classes. You may find it helpful and/or interesting to work through the official Swing Tutorial.
Note there are two common ways to use the Swing classes: the first is to use them as-is; the second is to extend them. Generally the latter is preferred because we often want to add or refine functionality to a specific component on screen. We will use both approaches at various points.
Laying the Components Out
Windows and Layout Managers
A Swing application starts with a desktop window. This functionality is provided by the JFrame class, and the easiest way to use it is to extend it. Here’s your starting point:
package YOUR-PACKAGE.tick5;

import javax.swing.JFrame;

public class GUILife extends JFrame {

    public GUILife() {
        super("Game of Life");
        setDefaultCloseOperation(EXIT_ON_CLOSE);
        setSize(500,400);
    }

    public static void main(String[] args) {
        GUILife gui = new GUILife();
        gui.setVisible(true);

    }

}- Copy, compile and run this code. You should see an empty window entitled “Game of Life” that can be minimised, maximised, resized or closed (check each of these works as expected).
The window is a container for other components, which can themselves be containers for other components, and so on. To achieve this the Swing libraries apply the Composite design pattern, as discussed in lectures:
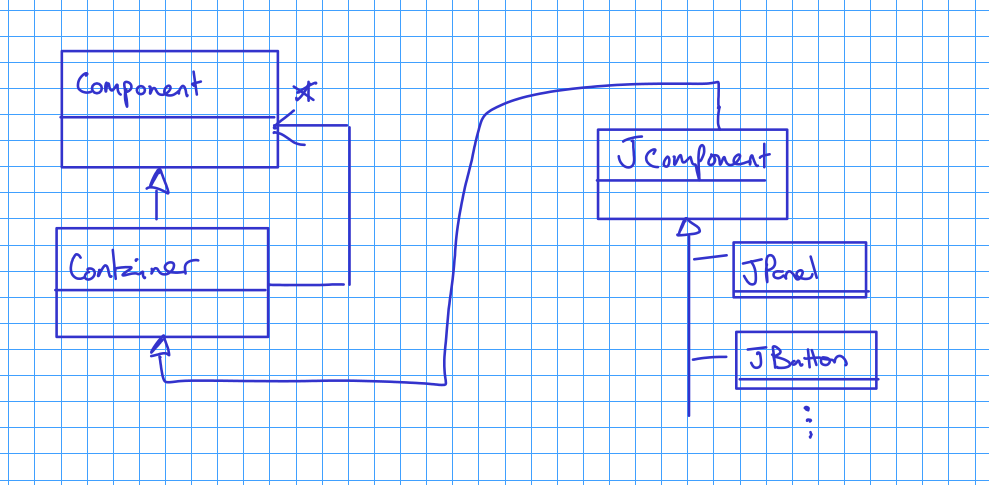
It is therefore possible to add anything that derives from Container, and a quick Google will tell you that you just need the add(...) method. Try adding this to the bottom of your GUILife constructor and running it again:
add(new JButton("Button 1"));You should see a button that fills the window labelled “Button 1”. Now add another button so you have:
add(new JButton("Button 1"));
add(new JButton("Button 2"));
You will find button 2 has replaced button 1 (which is nowhere to be seen). This is because each Container is associated with a LayoutManager that tells it what to do if it finds itself with multiple ‘children’. In this case, the default is a BorderLayout. This has one central component and four satellite components above, below, left and right of it respectively. When you don’t specify where you want a new components to go, it assumes you mean the central bit and puts it there, displacing whatever was there before. To understand this layout better edit your constructor to contain:
add(new JButton("Centre"));
add(new JButton("North"), BorderLayout.NORTH);
add(new JButton("South"), BorderLayout.SOUTH);
add(new JButton("West"), BorderLayout.WEST);
add(new JButton("East"), BorderLayout.EAST);
Play this and you will be presented with all five button laid out as described. Try resizing the window and you should start to see why the BorderLayout is named. The border elements only stretch along the direction that touches the window, while the central position scales fully.
There are other layouts available, including BoxLayout, CardLayout, FlowLayout, GridBagLayout, GridLayout, GroupLayout and SpringLayout. They are all useful for different types of application and you can find out more by looking here
In this tick you will be using a BorderLayout for the main interface, with a visualisation of the board as the central component, and controls in the WEST and SOUTH layout placement:
Adding GameOfLife Functionality to GUILife
Your GUILife class should replace your GameOfLife class from tick 4, keeping the key functionality.
- Copy across the
mStore,mWorldandmCachedWorldstate and thecopyWorldmethod fromGameOfLifetoGUILife. Update the constructor to say:
public GUILife(PatternStore ps) {
    super("Game of Life");
    mStore=ps;
    setDefaultCloseOperation(EXIT_ON_CLOSE);
    setSize(1024,768);
}
Add two private methods
void moveBack()andvoid moveForward(). Their functionality should be the same as pressing “b” or “f” in Tick 4 (i.e. they need to move through the cache or generate new worlds as appropriate).In the
main()method, create aPatternStorethat reads inhttp://www.cl.cam.ac.uk/teaching/1617/OOProg/ticks/life.txtand creates a newGUILifeobject, setting it to visible as before. Check your application still runs (albeit without doing anything interesting).
Creating the Skeleton Layout
There are three main sections to the interface: the game panel, the patterns panel and the control panel.
- Add the following to
GUILife:
public GUILife(PatternStore ps) {
    super("Game of Life");
    mStore=ps;
    setDefaultCloseOperation(EXIT_ON_CLOSE);
    setSize(1024,768);

    add(createPatternsPanel(),BorderLayout.WEST);
    add(createControlPanel(),BorderLayout.SOUTH);
    add(createGamePanel(),BorderLayout.CENTER);

}

private void addBorder(JComponent component, String title) {
    Border etch = BorderFactory.createEtchedBorder(EtchedBorder.LOWERED);
    Border tb = BorderFactory.createTitledBorder(etch,title);
    component.setBorder(tb);
}

private JPanel createGamePanel() {
    // TODO
    return new JPanel(); // temporary return
}

private JPanel createPatternsPanel() {
    JPanel patt = new JPanel();
    addBorder(patt,"Patterns");
    // TODO
    return patt;
}

private JPanel createControlPanel() {
    JPanel ctrl =  new JPanel();
    addBorder(ctrl,"Controls");
    // TODO
    return ctrl;
}
Complete
createControlPanel()to create threeJButtonswith the labels “< Back”, “Play”, “Forward >” respectively. They should appear in the SOUTH part of the interface, and should run horizontally, each taking 1/3 of the panel width as per the screen shot above.Complete
createPatternsPanel()to produce the WEST panel containing the list of patterns. This is actually aJPanelthat contains asJScrollPanethat contains aJList: you are expected to use the Java API documentation to work out how to use these elements. TheJScrollPaneautomatically provides scroll bars whenever the components it contains cannot be displayed. TheJListit contains should be initialised usingmStoreand should present the patterns sorted by name. When you runGUILifenow, you should see the list of patterns down the left, it should be vertically scrollable and the three buttons should be along the base of the window.You will find that the JList presents each
Patternas a string containing a type and memory reference. This is because it doesn’t know how to print aPatternobject. To fix this, override theString toString()method inPatternto print e.g. “pattern-name (author)”.
The Game Panel
The game panel will be composed of an extended JPanel, modified to draw the board. Here is a starting point:
package YOUR-PACKAGE.tick5;

import java.awt.Color;
import javax.swing.JPanel;

public class GamePanel extends JPanel {

    private World mWorld = null;

    @Override
    protected void paintComponent(java.awt.Graphics g) {
        // Paint the background white
        g.setColor(java.awt.Color.WHITE);
        g.fillRect(0, 0, this.getWidth(), this.getHeight());

        // Sample drawing statements
        g.setColor(Color.BLACK);
        g.drawRect(200, 200, 30, 30);
        g.setColor(Color.LIGHT_GRAY);
        g.fillRect(140, 140, 30, 30);
        g.fillRect(260, 140, 30, 30);
        g.setColor(Color.BLACK);
        g.drawLine(150, 300, 280, 300);
        g.drawString("@@@", 135,120);
        g.drawString("@@@", 255,120);
    }

    public void display(World w) {
        mWorld = w;
        repaint();
    }
}
The paintComponent() method is called whenever the system wants to draw the component. It is overridden here to draw something other than the usual block of colour for a panel. The code above includes some example statements that you will need to remove later.
- Create
GamePanel.javaand copy the code above into it. Add the following definition ofcreateGamePanel()toGUILifeand runGUILife.
private JPanel createGamePanel() {
    mGamePanel = new GamePanel();
    addBorder(mGamePanel,"Game Panel");
    return mGamePanel;
}- Change
paintComponent()to draw the world represented bymWorldas shown in the screenshot above. Note the following requirements:
if
mWorldisnulla blank white panel should be displayedLive cells should be drawn as black squares; dead remain white
Cell outlines (perimeters) should be in light gray
The cells should always appear square (not stretched to be rectangular). When resizing the window, the squares should fill as much of the panel as possible while remaining square. Note that constraining to perfect squares is only possible if the grid dimension divides exactly into the respective panel dimension. If it does not, you either get a gap (not aesthetically pleasing) or you have to use near-square cells (where you might be out by a pixel in one dimension due to quantisation error). The latter is generally more pleasing to the eye and is what you see in the video.
The current generation should be printed near the bottom left of the game panel (see image above) as e.g. “Generation : 6”.
You really do need to check your cells remain square and the board always fills at least the vertical or horizontal, whichever gives the bigger board. Last year lots of people didn’t bother and they ended up scrabbling around trying to make it work at the ticking session in order to get their tick.
In order to test your implementation you can create a World object in the GUILife constructor and pass it to GamePanel’s display() method.
Connecting up the Components
The remaining task for you is to handle interaction (e.g. clicking buttons or patterns)
Detecting JList Events
You need to make it so that clicking on a pattern in the JList causes that pattern to be loaded in at generation zero. This is very similar to connecting up buttons, except you need to use a ListSelectionListener to receive ListSelectionEvents.
- Adapt
GUILifeto implementListSelectionListener. Register the currentGUILifeobject with theJListjust after you create it (hint: useaddListSelectionListener). Here a skeletonvalueChanged()method:
@Override
    public void valueChanged(ListSelectionEvent e) {
        JList<Pattern> list = (JList<Pattern>) e.getSource();
        Pattern p = list.getSelectedValue();
        // TODO
        // Based on size, create either a PackedWorld or ArrayWorld
        // from p. Clear the cache, set mWorld and put it into
        // the now-empty cache. Tell the game panel to display
        // the new mWorld.
    }
Adding Play Animation
The final task is to enable the “Play” button to start animating the current world. You do this using a Timer to call moveForward() at regular intervals.
- In GUILife, add member variables
mPlayButtonreferencing the “Play”JButton';mTimerof typejava.util.Timer; andmPlaying of typeboolean. Then connect the following method tomPlayButton:
private void runOrPause() {
    if (mPlaying) {
        mTimer.cancel();
        mPlaying=false;
        mPlayButton.setText("Play");
    }
    else {
        mPlaying=true;
        mPlayButton.setText("Stop");
        mTimer = new Timer(true);
        mTimer.scheduleAtFixedRate(new TimerTask() {
            @Override
            public void run() {
                moveForward();
            }
        }, 0, 500);
    }
}
Test that the button works as expected on a few patterns.
Correct the functionality such that clicking a new pattern, or the back or forward buttons when already animating causes the animation to stop.
Getting your Tick
The online ticker will upload your code and check it compiles, but will not perform any tests. Your ticker will need to see your GUILife and will test it works as expected. To that end you should check your implementation looks and behaves exactly like the video below ( you should try to reproduce the sequence).
Acknowledgements
Special thanks go to Dr Alastair Beresford and Dr Andy Rice, who conceived the Game of Life ticks and produced earlier versions of these ticks (which the current versions are heavily based on).