Table of Contents
Important
An on-line version of this guide is available at:
http://www.cl.cam.ac.uk/teaching/current/ProgJava
You should check this page regularly for announcements and errata. You might find it useful to refer to the on-line version of this guide in order to follow any provided web links or to cut 'n' paste example code.
In each practical class you will find three course instructors who have the following duties:
- Lecturer
The lecturer has written the material for this course and is able to offer advice on its content and correctness as well as more general help with programming.
- Assessor
The assessor or ticker marks submitted exercises and discusses them with students.
- Demonstrator
The demonstrator is responsible for providing practical help on the content of the workbook and associated Java programming exercises.
The course is designed to accommodate students with diverse backgrounds in programming ability; consequently Java is taught from first principles in a practical class setting where you can work at your own pace. Students with prior experience at Java should complete this workbook as normal and then seek an extension exercise from the course lecturer.
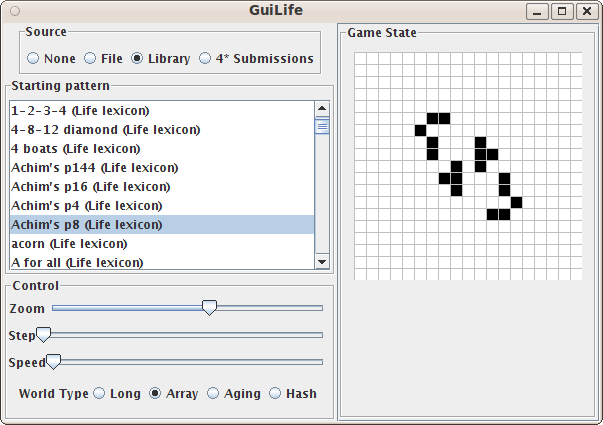
Each practical class introduces a new programming topic and provides pointers to further background reading. Each exercise is designed to provide experience and insight into the practical effort of designing, building and testing software. The work for each week is cumulative, building on work undertaken for previous weeks, so that by the end of the course you will have written a piece of software capable of playing Conway's Game of Life.[1] By way of incentive, a screenshot of the graphical user interface of the final piece of software you will write is shown in Figure 1, “Screenshot: Conway's Game of Life”.
This course uses MCS Linux. If your MCS computer is currently running Windows, please restart the machine and boot into MCS Linux.
Under Unix or Linux, a shell or terminal is often used to control the creation, execution and termination of applications. In this course we will be using a common shell, Bash, to control the Java tools. There are many other Integrated Development Environments (IDEs) available for Java, but we will avoid them in order to provide you with a sound understanding of the fundamentals. We recommend you use the Linux "Text Editor" application to write your Java code—it's simple and has all the features you require—however if you are familiar with Linux or Unix you may use an alternative text editor of your choice.
Bash is a programming language in its own right. Unfortunately we won't have time to explore many of its features in this course, however improving your Bash skills in your own time will pay dividends in later years. If you are interested in finding out more you might like to take a look at the reference manual, but only if you have time.[2]
To start a Bash shell or terminal, click on the icon in the left hand application pane once you have logged in. You should now see a new window with a cream background. The text displayed in the Bash shell is sometimes called a prompt or command line and should look something like the following
crsid@machine:~$
where crsid should be your own login name (e.g. arb33 or acr31), machine is the name of the computer you are using and the text between : and $ represents the current working directory, in this instance your home directory, which is represented by the special symbol ~.
You can execute Bash commands or start programs by typing the command or program name at the prompt. For example to print the current date and time you can use the Unix program date :
crsid@machine:~$ date
Fri 25 Oct 2013 12:10:12 BST
crsid@machine:~$
Try typing this command into your terminal now. Notice that the program date prints out the current date and time to the shell. After the date and time has been printed by the program date, the program terminates and the shell prompt is displayed again. We can pass arguments to the program which will modify its operation. Arguments are written on the same line as the program and are separated by whitespace. For example, we can modify the output of the date program by specifying an alternative output format for the date and time:
crsid@machine:~$ date +"%Y-%m-%d %H:%M:%S"
2013-10-25 12:10:12
crsid@machine:~$
In this case the additional argument after date instructs the program to print the date and time formatted according to the ISO 8601 standard.[3] Many programs in Unix have an electronic manual associated with them which describe the additional arguments the program will accept. You can view the manual associated with a program by using the man program. The man program accepts the name of a program and displays the relevant manual (if any). To list the options associated with the date program, type the following at your prompt now:
crsid@machine:~$ man date
Your shell should now display the manual page for date. You can scroll through the options for date by using the up arrow (↑) and down arrow (↓) keys on your keyboard. You can quit the man program by typing q.
Other Bash programs you might find useful include: ls to list the files inside a directory, rm to remove a file or directory, mkdir to create a new directory, and cd to change the current working directory. You can use the man program to determine how to use these programs just as you did for date above.
In this section you will write a simple Java program and use the java tools to compile and execute it.
Java is a compiled language, which means that the Java programs you write must be transformed into another format before execution. To peform this transformation you need a compiler and in this course we will use the java compiler called javac to convert Java source code into Java bytecode. Java bytecode can then be run using the Java runtime program java. Compilers for some languages, such as C, produce machine code as output which can then be run directly on the CPU. The Java designers chose to use the bytecode format because it is portable and can be moved between computers and operating systems without the need for recompilation; the price paid for this portability is the need for a runtime program to assist the computer in the execution of the bytecode. Running the java program launches a Java Virtual Machine which in turn can execute Java bytecode.
Open a copy of Text Editor (or your favourite Linux text editor if you have one). You can do this by selecting the "Dash Home" icon, which is the top icon in the left panel of icons, and typing "Text Editor" into the search box. Click on the Text Editor application icon when it appears to launch the application. The Text Editor application opens with a new blank file. Type the following Java source code into the new file:
class Example {
 public static String message = "Hello, world";
 public static void main(String[] args) {
  System.out.println(message);
 }
}
Save this Java source code to disk using the filename Example.java. (In Java the filename must be the same as the name following the keyword class with the extension '.java' appended to it.)
This example contains a lot of syntax and keywords. Java has quite a lot of essential syntax, even for the most basic program, which you do not need to fully understand this week. You will hear more about it in the Object-Oriented Programming course, and you will gain a thorough understanding of it in future practical classes. Even if it looks complex now, it won't do by the end of the term, and the main message at the moment is don't panic, you're not supposed to understand it!
Having said all this, you might find an overview of the example helpful, so here it is. The phrase class Example { ... } provides a definition of a new data structure, in this case called Example. This data structure, or class, can store values (such as integers, strings, and so on) which in object-oriented programming parlance are called fields; the example class above has a single field called message, which stores an item of type String. A class can also contain program code written as one or more methods; the example above has a single method called main which takes an array of strings (String[] args) and returns nothing (void). This is conceptually similar to an ML function which takes a string list and returns unit. A method which is of the form public static void main(String[] args) is special in Java and indicates the point at which program execution begins.
To compile the source code to bytecode make sure that your current working directory for your Bash shell is the same as the directory containing your source code. For example, if you saved Example.java into the directory called java inside your home directory then you will need to change into that directory before trying to compile the code:
crsid@machine:~$ cd java
crsid@machine:java$
In the rest of this workbook we assume your current working directory is your home directory. To compile your Java source code you should type in the following:
crsid@machine:~$ javac Example.java
The prompt should return without any textual output. If the compiler does print some output it will describe one or more warnings or errors in the program because you have not typed in the source code correctly. In this case take another look at your file and correct any mistakes you find; the output from the compiler may help you to identify where these are.
If your program has compiled correctly, the compiler will have generated a file called Example.class. You can check this exists by using the program ls. The file Example.class is the bytecode version of your Java source code which you can execute with the java program. Run your Java bytecode now as follows:
crsid@machine:~$ java Example
Hello, world
crsid@machine:~$
Notice that we do not include the '.class' file extension when calling the java program. What has happened here is that the program code we wrote describes a class called Example. The compiler has turned this into bytecode and stored it in a file called Example.class. Next we launched java and told it which class to use (not which file). However, in order to use the class the Java Virtual Machine must first load the class' bytecode. One of the means for doing this is to look for a file on disk with the same name and a .class extension and so everything works.
In all but the most trivial of Java projects you will produce multiple classes, and because the Java compiler produces one bytecode file for each class, Java provides a convenient mechanism for encapsulating multiple bytecode files into a single file on disk. The encapsulating file is called a jar file and is similar in concept to zip files (Windows), DMG files (MacOS X) or tar files (Unix systems). Your task in this section is to package up your example program and check that you can execute it.
To create a jar file we will use the command line tool called jar. The jar program accepts a variety of options on the command line which you can read about by typing man jar. To create a suitable jar file for the example above you should type the following, making sure that your current directory includes the Example.java and Example.class files before doing so:
crsid@machine:~$ jar cfe Example.jar Example Example.*
The command line arguments to the execution of program jar above do the following things:
cfeInstructs the
jarprogram tocreate afile with the specifiedentry point (see below).Example.jarThe name of the jar file to be created.
ExampleThe entry point, specified as the name of the class which contains the special main function, where program execution should begin.
Example.*The list of additional files to include in the jar file. In this case the
*wildcard has been used and is expanded by Bash into all files in the current directory which match the patternExample.*. This will include bothExample.classandExample.java; these two file names will then be passed separately to thejarprogram. It is equivalent to writing:jar cfe Example.jar Example Example.class Example.java.
After executing the above commands in your shell you should find a jar file called Example.jar in your current directory which contains both Example.java and Example.class and creates an internal manifest file which states that the Example class contains the special 'main' function where execution begins. You can check the contents of the jar file by using the test feature of the jar tool:
crsid@machine:~$ jar tf Example.jar
META-INF/
META-INF/MANIFEST.MF
Example.class
Example.java
crsid@machine:~$
You can see that the jar tool has created an additional directory containing a file called MANIFEST.MF as well as including both Example.java and Example.class. In general, the manifest file can contain a multitude of configuration parameters and options to control the execution of the Java application. You can write a manifest file by hand to specify such options, however this will not be necessary in this course.
Once you have built a jar file, you can load the classes contained within it and execute the class specified by the entry point using the java program with the -jar option:
crsid@machine:~$ java -jar Example.jar
Hello, world
crsid@machine:~$
If you do not see the output 'Hello, world', then you have not packaged your jar file correctly; in this case you will need to review the steps covered in this section and if you're still stuck seek help from the demonstrator or lecturer.
In order to manage large projects and prevent different programmers from accidentally giving the same name to two different implementations of a class, Java classes can be placed in a package. By convention, Java package names use an Internet Domain Name Service (DNS) name as a prefix for a package name. Consequently in this course you should package all of your code inside uk.ac.cam.your-crsid where your-crsid should be replaced by your own MCS username. In other words, if you log in to MCS machines with the username arb33 all your java code should have the package prefix uk.ac.cam.arb33.
You must declare which package a class is associated with at the very top of the source file. For example, to place the 'hello world' example above into the package uk.ac.cam.arb33.examples you write the following:
package uk.ac.cam.arb33.examples;

class Example {
 public static String message = "Hello, world";
 public static void main(String[] args) {
  System.out.println(message);
 }
}
The source file should still be saved into a file called Example.java but should be placed inside the directory hierarchy which mirrors the package name. Therefore in the above example, Example.java should be saved inside a directory heirarchy of uk/ac/cam/arb33/examples. Such a directory path can be created with the following Bash commands:
crsid@machine:~$ mkdir uk
crsid@machine:~$ mkdir uk/ac
crsid@machine:~$ mkdir uk/ac/cam
crsid@machine:~$ mkdir uk/ac/cam/arb33/
crsid@machine:~$ mkdir uk/ac/cam/arb33/examples
The electronic manual for mkdir explains how to do this in one step:
crsid@machine:~$ mkdir -p uk/ac/cam/arb33/examples
You should then move Example.java into this location using the mv command:
crsid@machine:~$ mv Example.java uk/ac/cam/arb33/examples
Bash provides command completion to reduce the amount of typing required for commands like these. Simply type the first part of the command or the directory path before pressing the [tab] key on your keyboard. If there is a unique completion then Bash will fill it in for you. If there are multiple completions then simply press tab again to see them or continue typing to disambiguate the options.
To compile a program which is inside a package, the current working directory of the shell must contain the outermost directory of the package (in other words, in the case above, the directory uk should be directly inside the current working directory). The example can then be compiled as follows:
crsid@machine:~$ javac uk/ac/cam/arb33/examples/Example.java
the compiler will put the Example.class file in the same directory as Example.java.
The associated jar file can be built in a similar fashion, except that the name of the class must now include the name of the package it is within:
crsid@machine:~$ jar cfe Example.jar \
uk.ac.cam.arb33.examples.Example \
uk/ac/cam/arb33/examples/Example.*
crsid@machine:~$
(Note: the backslash character (\) is used to continue a single command onto an extra line; you do not have to type this character in if you write all the text on a single line.)
The jar file can then be executed using the java program as before:
crsid@machine:~$ java -jar Example.jar
Hello, world
crsid@machine:~$
When you become a more proficient Java programmer, you may wish to keep your source files in a separate location from your bytecode files. This is possible, but for now we will forego this complexity and keep all the files in one directory hierarchy.
You have now successfully compiled, packaged and executed a simple Java program. We will now introduce the basic data-types provided in Java and the operators you can use to manipulate them. You will use this knowledge at the end of the practical to complete the assessed exercise.
In Java we use variables to allocate computer memory to store either: (i) a value of a basic, or primitive, type or (ii) a reference to an Object. This workbook focuses on how to create and manipulate variables of a primitive type; you will investigate Objects and references to Objects in future weeks. By the end of this term, you should be able to list and use all the primitive types and explain the behaviour of the operators which act upon them.
Variables in Java are different to values in ML. Values in ML are normally immutable, in other words, once you create them you cannot modify them. In Java it is much more common to program with mutable "values" than immutable ones. A mutable "value" in Java can be modified, possibly many times, after it has been created. Consequently such mutable "values" in Java are called variables in deference to the fact that Java programs commonly modify the contents of a variable during execution.
There are eight primitive storage types in Java which can be used to store values representing truth or falsity, integers of varying size, or floating point numbers. Table 1, “The primitive types” shows the names, sizes and storage capacity of these types. At this stage you should use this table to get an idea of what's there and refer back to it as you need to. By the end of the course we expect you to be able to remember the contents. The meaning of each of the columns in the table is as follows:
- Name
The sequence of characters in a Java source file used to refer to the type.
- Size (bits)
The amount of computer memory allocated to store the data in a variable.
- Minimum and maximum
The larger the size (bits) of the type, the greater the number of unique values it can store. The Floating-Point Computation course will give you more details about
floatanddoubletypes. These are defined by the international standard IEEE 754.- Example literals
A literal expresses a value which may be stored in a variable. Some examples are given in the table and we'll go into more detail over the next few pages.
| name | size (bits) | minimum | maximum | example literals |
|---|---|---|---|---|
byte | 8 | -128 | 127 | |
char | 16 | 0 | 216-1 | 'A' |
short | 16 | -215 | 215-1 | |
int | 32 | -231 | 231-1 | 52, 0x34, or 064 |
float | 32 | IEEE 754 | IEEE 754 | 0.0F, -1e4F |
long | 64 | -263 | 263-1 | 4294967296L |
double | 64 | IEEE 754 | IEEE 754 | 3.14e-1D, 2.7, or 1e4 |
boolean | N/A | N/A | N/A | false or true |
Table 1. The primitive types
We can create a variable of a particular primitive type by writing the name of the type followed by a memorable name. This can be done either within a class definition (in which case it is also called a field) or within a method such as the main method we saw earlier. Below is a simple example which declares two variables, both of type int:
class VariableExample {
 public static int fieldVar;
 public static void main(String[] args) {
  int methodVar;
 }
}
You should choose the names of variables carefully, partly because a good name will improve readability (and therefore is strongly encouraged from a software engineering perspective), but also because some names cannot be used to name variables in Java. The following names are reserved words in Java:
abstract   assert       boolean    break    byte      case
catch      char         class      const    continue  default
do         double       else       enum     extends   false
final      finally      float      for      goto      if
implements import       instanceof int      interface long
native     new          null       package  private   protected
public     return       short      static   strictfp  super
switch     synchronized this       throw    throws    transient
true       try          void       volatile while
using any of these words as a name for a variable will result in a compile error. If you encounter this problem, the solution is to change the name of the variable. You will learn what many of these reserved words do in this course, but not all. Some of the advanced features of Java will not be taught until the second year.
Java has five primitive types which support storage of a range of integral values: byte, char, short, int and long. To explore the primitive integral types you will need to write simple Java programs. To get you started, follow the instructions below, making sure you replace your-crsid with your username. For example, if your username is arb33 you should use arb33 in place of your-crsid.
Create a new Java source file called
PrimitiveInt.javainside the directoryuk/ac/cam/your-crsid/examplesyou created in the last section.Enter the following Java program into the file called
PrimitiveInt.java:package uk.ac.cam.your-crsid.examples; class PrimitiveInt { public static void main(String[] args) { int i; //create a variable called i i = 1; //update i with the value 1 i = i + 1; //update i with the value of "i+1" System.out.println(i); //print out the current value of i } }Compile your program using the
javacprogram.Run your program using the
javaprogram.
If you have followed the steps correctly, your program should print out the number 2. Make sure you work through the above even if it seems obvious! You will need to modify this program later.
The first set of operators on primitive types we will consider are the numeric operators. These perform numeric or mathematical operations with values of a primitive type and are written as follows: + (addition), - (subtraction), * (multiplication), / (division), % (modulus or remainder).
These are infix binary operators. In this context, the word binary means that the operator takes two operands and infix means that the operator is written between the arguments. For example, a + b uses the infix binary operator + to add the values stored in the variables a and b together; a and b are the left-hand and right-hand operands to the operator +.
The modulus operator (%) might be unfamiliar to you. The operation a % b calculates the remainder after a has been divided by b.
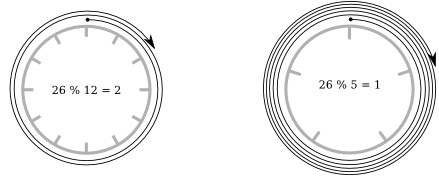
This can be restated as follows: a % b finds a number x such that a - x is exactly divisible by b. An alternative way of thinking about the modulus operation uses clock arithmetic: the position of the hour hand twenty-six hours after midnight can be calcuated as 26 % 12, which of course yields the answer two because twenty-six hours after midnight, the hour hand will be be located at position two on the clock face.
The answer to 26 % 5 can be found by considering a clock which completes a full revolution every 5 hours (rather than the usual 12) and consequently has only five hours marked on the face. Figure 2, “Clock arithmetic” contains a graphical illustration of 26 % 12 and 26 % 5.
A unary operator is an operator which takes a single argument. The unary operator - (minus) is used to negate a literal or the value stored in a variable. For example, -a changes the sign of the value stored in the variable a.
Every operator in Java produces a result which can then be used as a left-hand or right-hand operand with another operator. The term expression is used to describe a valid construct made up of operators, variables, literal values and methods invocations (which will be explained later in the course); an expression is turned into a statement, or unit of execution, by appending it with a semi-colon (;). The order in which operands are executed in a statement depends on operator precedence, which is reasonably intuitive, but does have the potential to catch you out occasionally. You can override the default operator precendence by using round brackets. For example, the expression 1 + 2 * 3 produces the result 7. If you want the addition to take place before the multiplication you can write (1 + 2) * 3, giving the result 9.
In the PrimitiveInt program, the assignment operator (=) is used to assign a new value to the variable i. The assignment operator is another example of a binary infix operator in which the left-hand operand is the name of a variable, and the right-hand operand is a value which the variable is updated to store. As mentioned before, every operator in Java produces a result, and the result of evaluating the assignment operator is the value of the right-hand operand. For example, the expression "i = 1" has the value 1 as its result.
The next operators to consider are the unary increment and decrement operators written as ++ and -- respectively. They combine together both an assignment and an addition operation, and the position of the increment and decrement operators with respect to the variable name determines the value returned as a result.
If the increment operator is written before the name of the variable, then it is more accurately called the pre-increment operator. For example, given a variable i, the pre-increment operator is written ++i. The pre-increment operator is equivalent to writing the expression i = i + 1, and therefore ++i increases the value stored in i by one and also returns the increased valued as its result.
In contrast, if the increment operator is written after the name of the variable, then this operator is more accurately called the post-increment operator. For example, for the variable i, the post-increment operator is written i++. The post-increment operator increments the value stored in i by one, but the result returned by the operator is the value stored in i before it was incremented.
The pre-decrement and post-decrement operators behave similarly to the pre- and post-increment operators except that the value stored in the variable is reduced by one rather than increased by one.
Java also provides shorthand forms for all numeric operators when combined with assignment. For example, i = i + 10 can be shortened to i += 10 and j = j * k can be shortened to j *= k. A summary of the numeric and assignment operators is shown in Table 2, “Numeric operators and assignment”.
+ - / * % | Binary infix numeric operations |
- | Unary negation |
++ -- | Post-increment, pre-increment, post-decrement, pre-decrement |
+= -= *= /= %= | Shorthands for variable updating |
Table 2. Numeric operators and assignment
In order to understand the next set of operators you need to understand how integer numbers are stored in memory as binary numbers. If you have not seen binary numbers before, this section might take you some time to work through; paying careful attention to binary numbers now will pay dividends later.
Important
We have provided some programs to help visualise the conversion between binary and decimal numbers. These can be downloaded from the course webpage.
Binary numbers can be explained by analogy to "normal" numbers. The number system used on a daily basis today is called the decimal number system, sometimes called base 10 arithmetic. The decimal system requires 10 unique digits (0, 1, 2, 3, 4, 5, 6, 7, 8 and 9) to write down a number. For example, the number 6409 has 6 thousands (103), 4 hundreds (102), no tens (101) and 9 ones (100); hence 6409 can be written as 6 × 10 3 + 4 × 10² + 0 × 101 + 9 × 100.
Binary numbers use base 2 arithmetic and consequently, there are only two digits in binary (0 and 1). Binary arithmetic is often used in computers because it simplifies the hardware design. The binary number 1011 has one eight (23), no fours (22), one two (21) and one one (20); hence the number 1011 can be written as 1 × 23 + 0 × 22 + 1×21 + 1×20, or 11 in decimal. In the preceding example, the binary number was written so that the leftmost position represented the binary value with the highest power of two and the rightmost position represented the least. This is identical to our "normal" decimal number system. For binary numbers we refer to the leftmost position as the most significant bit and the rightmost position as the least significant bit.
A binary number can be converted into its decimal equivalent by adding up all the powers of 2 where there is a corresponding 1 in the binary representation. In other words, if there is a 1 at position i in the number then you include 2i in the summation used to calculate the equivalent decimal number. By convention, the least significant bit is found at position 0. Therefore the most significant bit position in an n-bit binary number is n-1.
Hexadecimal notation is used to represent counting in base 16. In this notation we have 16 different digits (0, 1, 2, 3, 4, 5, 6, 7, 8, 9, A, B, C, D, E and F). In Java, a literal value is written in hexadecimal by prefixing the number with the characters 0x (a zero and lowercase x) in order to avoid confusion with decimal numbers. For example, the hexadecimal number 0x1FAD has a single four thousand and ninety six (4096 = 163), fifteen (written as F) two hundred and fifty sixes (256 = 162), ten (written as A) sixteens (161) and thirteen (written as D) ones (160). In other words, 0x1FAD can be written as 1 × 163 + 15 × 162 + 10 × 161 + 13 × 160.
Hexadecimal numbers are popular with programmers because and they are easily converted to binary numbers with simple mental arithmetic and offer a more compact representation than writing a binary number directly. They also allow us to write numbers which spell out (rude) words. Java also supports octal numbers (base 8) and a literal value can be written in octal by prefixing the number with a leading zero. For example, the octal number 077 has the value 63 in decimal.
Important
We have provided some programs to help visualise the operation of the bitwise operators. These can be downloaded from the course webpage.
The bitwise logical operators perform logical operations on the binary representation of integers. For each of the n bits in the number, the bit at position i in the left-hand operand is combined with the bit in position i in the right-hand operand; these two bits are used to produce the bit at position i in the result. The operators are as follows:
&(bitwise AND)The output bit is set only if the corresponding bits in the right-hand operand and in the left-hand operand are set;
|(bitwise OR)The output bit is set if the corresponding bits in left-hand operand or in the right-hand operand are set;
^(bitwise XOR)The output bit is set if the corresponding bit in the left-hand operand is different to the bit in right-hand operand.
For example, 23 & 24 gives the result 16, or in binary, 10111 AND 11000 equals 10000.
The shift operators are used to move the bits in a number left (towards the most significant bit) or right (towards the least significant bit). They are written as << and >> for left and right shift respectively. For example, the expression 45>>3 shifts the bits representing the value 45 (written in binary as 101101) right three places, resulting in the value 5 (written in binary as 101).
The binary number system described so far cannot represent negative numbers. Most modern computers use a method called 2's complement which is able to represent both positive and negative numbers. In this scheme the most significant bit in an n-bit binary number represents -2(n-1) whilst the remaining bits at position i (where 0 ≤ i < n-1) represent the positive values 2i as in earlier sections. For example, the 8-bit binary number 10001100 is decoded as minus one hundred and twenty eight (-128 = -27) plus eight (8 = 23), plus four (4 = 22); in other words -27 + 23 + 22 = -116. This representation might seem a little odd, but it is appealing from the hardware design point of view (understanding why this is the case is beyond the scope of this course).
The right-shift operator >> performs sign extension, which means that the value of the most siginificant bits added during the right-shift operation are filled with the value of the most significant bit rather then with zeros. The alternative right-shift operator >>> performs a right-shift without sign extension, and therefore the top bits are always filled with zeros.
There is only one unary bitwise operator in Java, tilde (~), which negates every bit found in its argument; in other words it, swaps 1 for 0 and 0 for 1. A table summarising the bitwise operators is shown in Table 3, “Numeric operators and assignment”
& | ^ | Bitwise binary infix operators and, or and xor |
~ | Bitwise unary negation |
<< >> >>> | Bitwise left and right shift with and without sign-extension |
&= |= ^= <<= >>= >>>= | Shorthand notation for updating the value held in a variable |
Table 3. Numeric operators and assignment
As you have seen earlier in the workbook, literal values for int can be written in one of three ways:
in decimal as you might expect (e.g.
52),in octal by prefixing the literal with
0(e.g.064), orin hexadecial by prefixing the literal with
0x(e.g.0x34).
You can write literal values for long similarly, except that you must postfix the literal with an L (i.e. 52L, 064L and 0x34L). It's not possible to write a literal value of type byte or short. If you want to store a literal into a variable of type short or byte you can do so by assigning an int literal which will be converted to a value of the correct type automatically. For example,
short myShort = 12;
The char type is 16-bits wide and is normally used to store values representing characters, but can also be used to store and retrieve integral values. Java supports unicode,[4] making programs which support non-latin character sets easy to write. You can embed unicode characters in literal text strings inside Java source code, and even use unicode characters for variable, field, method or class names. You can specify literal values for char variables by:
placing the character that you want inside single quotes (e.g.
'A'),providing a unicode value inside single quotes (e.g.
'\u0065'), orproviding an integer value (e.g.
65).
The storage of floating point values in float and double types is based on the IEEE 754 standard. Internally, floating point values are represented by a sign bit, a mantissa and an exponent, which means these types can store a much larger range of values at the expense of reduced precision. Therefore it is natural to express values in scientific notation such as 1.23 × 10 -42, which can be written in Java as 1.23e-42. In Java all literal floating point values are of type double unless explicitly postfixed with F in which case they are of type float. Because the precision of values stored in variables of type float is poor, you should always use a double type unless you have undertaken a careful analysis to assertain that a float will provide sufficient accuracy. Such floating point issues are beyond the scope of this course and will be covered in more detail in the Floating Point Computation course.
The boolean type does not have any explicit storage size assigned to it: it can only store one of two literal values, true or false. There are six binary comparison operators in Java which take two primitive types a and b and produce a value with a boolean type as a result. The value (false or true) depends on the values of a or b and the choice of operator:
aequalsb(writtena==b),adoes not equalb(a!=b),ais less thanb(a<b)ais less than or equal tob(a<=b)ais greater thanb(a>b)ais greater than or equal tob(a>=b)
Expressions or values of type boolean can be combined together using the binary logical operators for or (|) and and (&) as well as the unary operator for not (!). Remember that whilst the operators & and | look identical to the bitwise operators for AND and OR, they take values of a different type, and perform completely different actions!
Here are some examples of expressions using a variety of operators mentioned so far:
int a = (1+2)*3;                    //9
int b = 1+2*3;                      //7
boolean t1 = a == b;                //false
boolean t2 = a >= b+2;              //true
boolean t3 = a != b & !(a % 4 > 1); //true
boolean t4 = t1 | t2 & t3;          //true
Java also has two short-circuit boolean operators written as && and || which behave identically to & and | respectively except as outlined in the following text. If the left operand of && evaluates to false then the right operand is not evaluated; similarly if the left operand of || evaluates to true then the right operand is not evaluated. This is generally sensible, since it does not affect the result of the expression and saves the computer from evaluating the contents of the right operand. The only exception to this is if the right operand has a side-effect such as updating the contents of a variable, in which case you should use the normal boolean operator not the short-circuit one.
You will often want to provide comments in your code to document how a particular piece of code works, or provide extra information to other programmers who might read or modify your code. You can write comments in Java in one of two ways:
/* A comment which can span
   multiple lines */

//A comment which contines until the end of the line
A multi-line comment starts with /* and finishes with */; multi-line comments cannot be nested (in other words, a comment cannot contain the characters /* or */ within it. A single line comment starts with // and continues until the end of the line.
If you are writing a large application or library, you will probably want to write more extensive documentation to help other software developers use the library or maintain your software. Java supports javadoc to do this. Javadoc is a command line tool which examines your source code, looking for multi-line comments which start with /** and uses the information held within the comment as well as its location in the source file to generate HTML documentation for the software project. Javadoc is beyond the scope of this course, although the interested reader who wants to know more may like to take a look at Sun's documentation.[5]
A Java long is an integer with 64 bits. Your task is to write a class called PackedLong which uses the 64 bits inside the java long integer to store 64 boolean values. We will make use of the PackedLong class next week as the basis for our Game of Life implementation. You should create a source file called PackedLong.java inside the directory structure uk/ac/cam/your-crsid/tick1/ where your-crsid is your username. Place the following code inside PackedLong.java:
package uk.ac.cam.your-crsid.tick1; //TODO: replace your-crsid

public class PackedLong {

 /*
  * Unpack and return the nth bit from the packed number at index position;
  * position counts from zero (representing the least significant bit)
  * up to 63 (representing the most significant bit).
  */
 public static boolean get(long packed, int position) {
  // set "check" to equal 1 if the "position" bit in "packed" is set to 1
  long check = //TODO: complete this statement

  return (check == 1);
 }

 /*
  * Set the nth bit in the packed number to the value given
  * and return the new packed number
  */
 public static long set(long packed, int position, boolean value) {
  if (value) {
   // TODO: complete this
   // update the value "packed" with the bit at "position" set to 1
  }
  else {
   // TODO: complete this
   // update the value "packed" with the bit a "position" set to 0
  }
  return packed;
 }
}
The PackedLong class does not contain a special "main" method. Consequently this means that it cannot be executed directly using the java command line program. Do not add a main method to this class; instead create two extra Java source files inside the same directory structure. Save the following program into uk/ac/cam/your-crsid/tick1/TestBit.java:
package uk.ac.cam.your-crsid.tick1; //TODO: replace your-crsid

public class TestBit {
 public static void main(String[] args) throws Exception {
  long currentValue = Long.decode(args[0]);
  int position = Integer.parseInt(args[1]);
  boolean value = PackedLong.get(currentValue, position);
  System.out.println(value);
 }
}
Save the following program into uk/ac/cam/your-crsid/tick1/SetBit.java:
package uk.ac.cam.your-crsid.tick1; //TODO: replace your-crsid

public class SetBit {
 public static void main(String [] args) throws Exception {
  long currentValue = Long.decode(args[0]);
  int position = Integer.parseInt(args[1]);
  boolean value = Boolean.parseBoolean(args[2]);
  currentValue = PackedLong.set(currentValue,position,value);
  System.out.println(currentValue);
 }
}
Once you have written your PackedLong implementation, you should be able to test your code using the two supplied programs.
The TestBit program accepts two arguments on the command line. The first argument is a long value which represents the 64 boolean bits, and the second argument tells the TestBit program which boolean value to print out. For example, executing
java uk.ac.cam.your-crsid.tick1.TestBit 85 4
should produce the answer "true". If it does not, your implementation of PackedLong is incorrect. The SetBit program accepts three arguments on the command line. The first is the long value which represents the 64 boolean bits, the second argument tells SetBit which bit to set, and the third argument tells SetBit whether the chosen bit in the new value should be set to 1 (to represent true) or 0 (to represent false). For example, executing
java uk.ac.cam.your-crsid.tick1.SetBit 85 2 false
should produce the answer "81". If it does not, then your implementation of PackedLong is incorrect.
Testing your implementation with the two examples above will probably not be sufficient to locate all the errors in your implementation of PackedLong. Therefore you should produce a more complete list of test cases, paying particular attention to sign extension. Once you are happy with your program you should submit a jar file named crsid-tick1.jar to ticks1a-java@cl.cam.ac.uk for testing, remembering to replace crsid with your username. Your jar file should contain the following files:
META-INF/
META-INF/MANIFEST.MF
uk/ac/cam/your-crsid/tick1/SetBit.class
uk/ac/cam/your-crsid/tick1/SetBit.java
uk/ac/cam/your-crsid/tick1/TestBit.class
uk/ac/cam/your-crsid/tick1/TestBit.java
uk/ac/cam/your-crsid/tick1/PackedLong.class
uk/ac/cam/your-crsid/tick1/PackedLong.java
answers.txt
Note: you know how to build a jar file with a specified entry point in order to tell the Java runtime program how to execute the program within the jar file. There are two candidates for the entry point in this tick: TestBit and SetBit. Please make TestBit the entry point for your jar file.